“Don’t skip leg day” has almost become a meme in the gym, warning dedicated lifters to give lower body training as much emphasis, intensity, and attention as their upper body.
That’s all well and good, but even when it comes to “leg day,” many lifters still end up skipping a relatively large portion of their lower body. Not even addressing the flamingo-legged elephant in the room that is calf training. The more urgent body part that deserves your attention is the hamstrings.
Whether it’s for athletic performance, total-body power, or a complete and well-developed set of legs, here are some must-do movements to target the backs of your thighs.
Best Hamstring Exercises
Romanian Deadlift
While the conventional deadlift is known for building serious power and size in the entire posterior chain (lower back, glutes, and hamstrings), the Romanian deadlift zones in even further on that growth stimulus by adjusting the range of motion and body positioning.
By keeping your legs very slightly bent, put your hamstrings into a longer stretched position while also forcing them to contract harder during hip extension, which both contribute to greater growth.(1)
How to Do the Romanian Deadlift
Stand holding a barbell with a slightly wider than shoulder-width, overhand grip. Pull your shoulder blades back and raise your chest. Slightly bend your knees and push your glutes toward the wall behind you.
Focus on feeling your hamstrings stretch as you “reach” your tailbone to the wall. When the bar reaches as low as possible without rounding your back, drive your heels “through” the ground and push your hips forward to return upright.
Benefits of the Romanian Deadlift
- As a barbell movement, the Romanian deadlift allows the use of potentially heavy weights, which contributes to strength gains.
- This movement puts the target muscle through a long range of motion with a deep stretch, which benefits muscle growth.
Split-Stance Dumbbell Romanian Deadlift
Single-leg training can be highly beneficial for strength, power, and muscle growth.(2) However, many lifters struggle with balance to the detriment of any single-leg exercise. Taking a staggered or split-stance drastically reduces the balance demands while maintaining the single-leg emphasis.
The split-stance dumbbell Romanian deadlift allows you to focus on working the hamstrings of your lead leg, while your rear leg provides just enough stability to stay steady. Using dumbbells instead of a barbell allows a longer range of motion while reducing lower back strain.
How to Do the Split-Stance Dumbbell Romanian Deadlift
Stand with a dumbbell in each hand by your sides. Take a shoulder-width stance with the toes of one foot in line with the heel of the lead foot. Keep your back straight while pushing your hips and glutes behind you. Allow your hands to face each other as the weights lower toward your front foot. Pull with your front leg, not the rear foot, to stand upright. Perform all reps on one leg before switching sides.
Benefits of the Split-Stance Dumbbell Romanian Deadlift
- This movement pairs the benefits of single-leg training with the stability of a bilateral (two-legged) exercise.
- The split-stance dumbbell Romanian deadlift allows a significant muscle-building stimulus from relatively light weights, due to the stance and leverage.
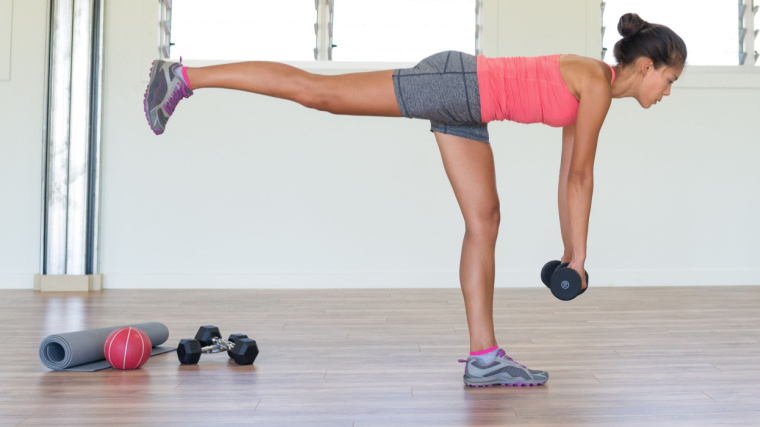
Single-Leg Single-Arm Romanian Deadlift
The single-leg, single-arm Romanian deadlift might look, or even sound, more like a circus trick than a serious training exercise. But it’s a top-level choice for muscle-building tension and high-performance athleticism.
By requiring one leg to provide stability and the opposite arm to carry the weight, you’re creating a total-body movement that hits your legs, core, and back like nothing else.
How to Do the Single-Leg Single-Arm Romanian Deadlift
Stand with a dumbbell in your left hand, by your side with your palm facing your body. Slightly bend your right knee, lean forward at your hips, and let your left leg raise into the air as the weight moves toward the ground. Avoid twisting your shoulders or rounding your spine. Move slowly to control the weight and maintain balance. When you’re reached as far as your mobility allows, slowly return to the starting position. Perform all reps on one side before switching hands and legs.
Benefits of the Single-Leg Single-Arm Romanian Deadlift
- This comprehensive exercise works the “posterior oblique sling” — a series of muscles which play a key role in posture, especially when walking and moving.
- The single-leg, single arm Romanian deadlift strongly works the oblique muscles of the abs and core.
- Stabilizer muscles in the ankles, knees, hips, and shoulders are recruited, making the exercise an efficient way to improve joint health.(3)
Standing Leg Curl
The standing leg curl machine can be found in several different but similar varieties. Some allow your non-working foot to be planted firmly on the ground in a fully standing position while other machines, sometimes called “kneeling leg curls” have a specialized pad to support your non-working leg in a bent position. The overall result and performance is the same with either.
Standing leg curls allow you to emphasize knee flexion (bending your leg), a key function of the hamstring muscle. An added benefit of the standing machine is performing the work unilaterally, targeting each leg on its own.
How to Do the Standing Leg Curl
Setup in the machine with the curl pad placed just above the ankle of the working leg. Secure your torso in position using any available handles. Brace your core and squeeze the heel of your leg toward your glutes. Achieve a complete range of motion. Lower the weight under control until your leg is fully straightened. Perform all reps on one side before switching legs.
Benefits of the Standing Leg Curl
- The standing leg curl applies constant tension to the target muscle, unlike free weight movements which apply varying levels of resistance due to gravity.
- Unilateral (single-leg) training can help to address and correct muscular imbalances between sides.
- The design of the machine limits your ability to reduce muscle activation by using full-body momentum to swing the weight.
Seated Leg Curl
The seated leg curl, like many machines, requires some individualized setup for the most productive training experience. Most machines have an adjustable back pad, thigh support, and ankle pad which must be correctly set in place to keep your body in the most efficient position. Most people, however, skip this crucial step.
This strict movement can provide an intense hamstring contraction with little to no contribution from other body parts, making it an ideal muscle-builder.
How to Do the Seated Leg Curl
Adjust the back pad to position your knee joint in line with the pivoting leg attachment. Set the thigh pad to secure against the tops of your quadriceps. Adjust the ankle pad to sit just above your heel. Brace your core and drive through your heels to reach a full contraction, with your feet well-under the seat of the machine. Straighten your legs under control.
Benefits of the Seated Leg Curl
- The seated leg curl puts the body in nearly identical positioning as the quadriceps-focused leg extension while training the direct opposite muscle group, making the two movements an ideal superset.
- This machine provides significant support which eliminates momentum and removes your ability to lift the weight using anything but strict hamstring activation, leading to a greater muscle-building stimulus.
- The seated position changes the stretch on your hamstring muscles, which may contribute to greater growth compared to a lying leg curl.(4)
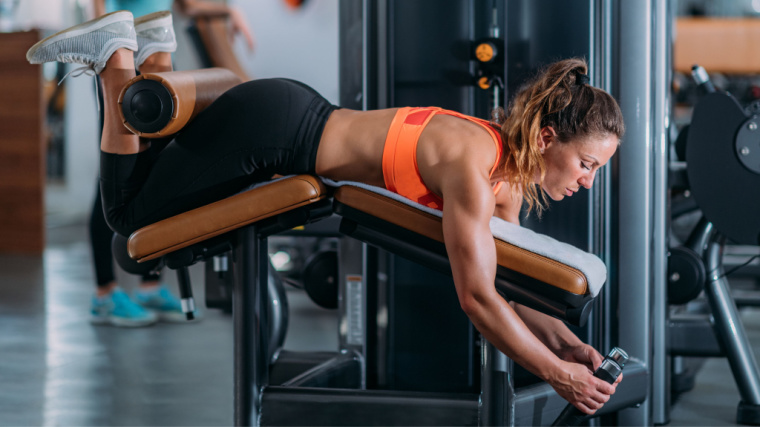
Lying Leg Curl
The lying leg curl may be the most popular hamstring exercise, but it’s also one often done incorrectly. Many lifters hike their hips off the pad as they curl, which shifts focus away from their hamstrings and onto their glutes and hip flexors.
To maximize hamstring recruitment, it’s essential to keep your hips pinned to the pad throughout the entire repetition. Some lifters find it necessary to raise their upper body onto their forearms, or even hold themselves up using straight arms, to keep their hips in position.
How to Do the Lying Leg Curl
Lie face down on the machine with the pad resting above your ankles. Flex your abs to ensure a stable upper body. Steadily bring your heels as close as possible to your glutes. Ideally, they should be able to touch briefly. Lower the weight under control.
Benefits of the Lying Leg Curl
- The lying position puts your hamstrings into a long stretched position, which can help improve hamstring flexibility and growth.
- The lying leg curl allows for a strong peak contraction, which can contribute to building strength and muscle.
High Leg Press
The leg press is a common and effective exercise for quadriceps growth, but a slight foot adjustment can shift muscle recruitment and emphasize your hamstrings.
Setting your feet relatively higher on the pressing platform than in the traditional leg press will emphasize the hamstrings (and glutes) more than the quadriceps.(5) This turns the exercise into a highly effective hamstring movement which also allows relatively heavy weights.
How to Do the High Leg Press
Sit in a leg press machine and place your feet shoulder-width apart with your toes near the top of the foot platform. Keep your feet flat as you lower the weight as far as your mobility allows. Your lower back should remain in contact with the pad at all times. From the bottom position, straighten your legs to near lockout.
Benefits of the High Leg Press
- The high leg press allows you to work the hamstrings using heavy weights, which contributes to muscle growth and strength gains.
- This leg press variation can be performed toward the end of a hamstring-focused workout, to fully exhaust the fatigued muscle, or at the beginning of a hamstring workout to overload the target muscle with heavy weights.
Kettlebell Swing
The kettlebell swing is one of the most widely known kettlebell exercises and can be programmed for muscle-building, strength, conditioning, or fat loss.
Unlike many exercises in the gym, the kettlebell swing primarily emphasizes the concentric (lifting) phase of each repetition with relatively less emphasis on the eccentric (lowering) phase. This helps to improve power output while also stimulating muscle growth.
How to Do the Kettlebell Swing
Stand with your feet well-beyond shoulder-width apart, with a kettlebell on the ground several inches in front of your toes. Bend your legs slightly and drive your hips back as you grab the top handle of the kettlebell using a palm-down grip with both hands. Pull the kettlebell back toward your body, letting it swing just behind your legs. Brace your core and keep your back straight as you contract your lower body to bring the weight near chest-height using the hip drive, not actively lifting with your arms. Allow the weight to fall back along its path just behind your legs and repeat.
Benefits of the Kettlebell Swing
- The kettlebell swing is shown to improve overall strength and explosive power.(6)
- This dynamic movement builds grip strength, core strength, cardiovascular conditioning, and metabolic stress for a muscle-building stimulus.
- Because it requires minimal equipment and limited space, the swing is a convenient and space-efficient way to train your lower body. This makes it ideal for home gyms or those with limited access to weights.
Slider Leg Curl
If your home gym doesn’t have a pair of furniture sliders, you’re missing out on an extremely effective addition that opens up plenty of new exercises for the entire body. For your leg workouts, specifically, they’re a perfect alternative to any leg curl machine.
The sliders allow you to perform knee flexion on nearly any surface (rug, tile, gym flooring, etc.). Because they’re designed to literally slide on the ground, they also require increased core engagement, so your abs and hips will be working harder than during any machine-based curl.
How to Do the Slider Leg Curl
Lie on the ground with your legs straight and a slider under each heel. Keep your head and shoulders on the ground as you curl your feet toward your glutes while driving your hips up. Imagine a steel rod running from your chest to your knees — don’t allow your body to bend at the waist. Pause briefly and control both feet as you return to the starting position.
Benefits of the Slider Leg Curl
- The slider leg curl is one of the only hamstring curl options in a home gym without a dedicated leg curl machine.
- The instability of the sliders increases the core stability demands of the exercise.
- The slider leg curl can be progressed like other bodyweight movements using added load, changes in rep speed, or using a single-leg.
Seated Resistance Band Curl
Resistance bands are more commonly associated with upper body exercises, but this lower body alternative is another highly effective machine alternative when you’re in a home gym or traveling.
With the seated resistance band curl, you only need a band, a stationary object to serve as anchor point, and a bench, box, or chair to sit on. This delivers a high-tension exercise targeting the hamstrings with little to no help from other muscles.
How to Do the Seated Resistance Band Curl
Attach a resistance band to an immovable object several feet in front of a box, bench, or chair. Sit on the box with the band behind your ankles and your torso upright. Brace your upper body and extend your legs until they’re nearly straight. Keep your feet close to the ground as you drive your heels back under your body as far as possible. Don’t allow your upper legs to rise, which would take tension off your hamstrings. Hold the contraction for one second before straightening your legs and repeating.
Benefits of the Seated Resistance Band Curl
- The seated resistance band curl is an efficient hamstring exercise when training with limited equipment.
- Resistance bands offer “accommodating resistance” — more challenging as the band is stretched farther and relatively less challenging in the stretched position— which can reduce strain on the knee joint.
Nordic Hamstring Curl
The Nordic hamstring curl is a relatively advanced exercise because it is, essentially, a leg curl performed with your own bodyweight. However, simple modifications and adjustments can be made so lifters of any experience and strength level can benefit from this powerful movement/
The Nordic hamstring curl is also supported by a significant amount of research showing its benefits for reducing the risk of hamstring injuries in athletes in a number of sports.(7)
How to Do the Nordic Hamstring Curl
Kneel on the ground with your heels locked into position under an immovable object, such as a Smith machine on a very low setting or a heavily loaded barbell. Begin in a “tall kneeling position”, sitting upright with your shins on the ground and a straight line from your knees through your torso to your neck. Maintain a stiff body position as you slowly lower yourself forward to the ground. Keep your hands up and ready to catch yourself. Focus on feeling tension in your hamstrings. When you feel tension reducing, Pull yourself back to an upright position. Alternatively,
Benefits of the Nordic Hamstring Curl
- The Nordic hamstring curl is supported by research to help reduce the risk of hamstring injuries in athletes.
- Because this movement emphasizes the eccentric (lowering) portion of the range of motion, it creates a significant growth stimulus. However, be aware that any eccentric emphasis can also lead to significant post-exercise muscle soreness.(8)
- This is one of the few bodyweight exercises to particularly target the hamstrings with knee flexion (curling), making it effective for exercise variety.
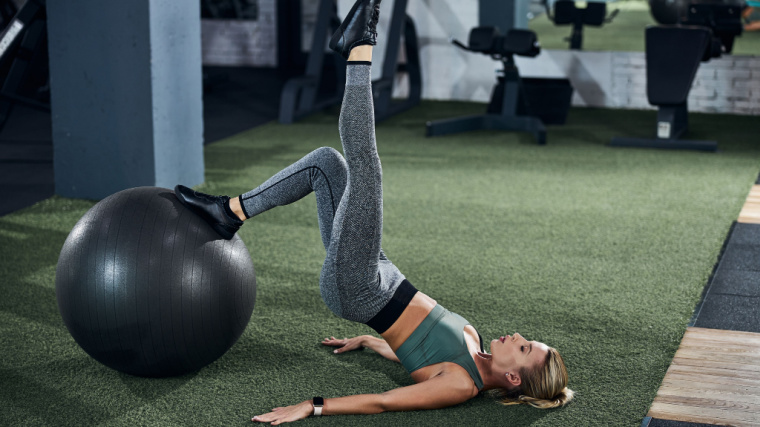
SHELC
The supine hip extension leg curl, or SHELC, is a thorough bodyweight exercise targeting the hamstrings and glutes. It is typically done on an exercise ball, but a similar movement can be done on a large foam roller.
The general movement is similar to the slider leg curl, however, the SHELC is performed through a longer range of motion. The “softness” of the exercise ball also makes the exercise more unstable and recruits more stabilizer muscles in the core, hips, and ankles.
How to Do the SHELC
Lie on the ground with your calves on an exercise ball. Keep your head, shoulders, and elbows flat on the ground throughout the exercise. Press your lower legs into the ball as you raise your hips to the ceiling. Keep a straight line through your entire body as you pull your feet toward your body. Pause briefly at the peak contraction. Slowly straighten your legs and briefly pause, supporting your body in a straight line before repeating the next repetition. Keep your hips elevated until the end of the set.
Benefits of the SHELC
- This bodyweight exercise works the hamstrings during hip extension as well as knee flexion, the two key functions of the muscle, which can lead to a greater growth stimulus compared to other exercises.
- The instability of the exercise ball increases core stability requirements, as well as recruitment of smaller lower body muscles, which can help improve joint health.
The Hamstring Muscles
While certain “hamstring exercises” isolate and emphasize the specific hamstring muscles, other movements will recruit other leg muscles including the glutes, quadriceps, and calves.
Hamstrings
Your hamstrings, on the backs of your thighs, are a collection of several similar-functioning muscles including the biceps femoris, on the outer portion of the leg, and the semitendinosus and semimembranosus, both along the inner part of the leg.
Your hamstrings are worked during two primary types of movements. They’re recruited during hip extension — moving your thigh from in front of your body in line under your torso — which is performed during Romanian deadlift variations. The hamstrings are also responsible for knee flexion, or bending your leg, during any type of leg curl.
Glutes
The glutes are a relatively strong muscle involved primarily in hip flexion. They will be recruited to assist during many hamstring movements, particularly hip extension exercises performed with a straight or relatively straight leg. The glutes are minimally involved during leg flexion, making those leg curl variations a higher priority when you want to emphasize the hamstrings over the glutes.
Quadriceps
The muscles on the front of the thigh — the quadriceps — are anatomically opposite from the hamstrings. Not only are they located on the opposite side of the upper leg bone, but they work in an opposite (or antagonistic) role for knee extension or straightening the leg.
However, in certain multi-joint exercises like the high leg press, the quadriceps are recruited to help extend the leg and lift the weight. Similarly, your quads are recruited in exercises like the slider leg curl to control your descent as you straighten your leg and stretch your hamstrings.
Calves
The calf muscles on the back of your lower legs are primarily responsible for flexing and extending your feet. However, part of the calf muscle extends over the knee joint and is recruited during hip flexion. This is why, on certain exercises performed with straight or nearly straight legs, you may feel tension in the back of your knees or your calves.
How Often Should You Train the Hamstrings
In an ideal training scenario, hamstring training would receive as much attention as quadriceps training. However, in reality, many lifters tack on one or two hamstring exercises after a large number of quad-focused movements.
An effective solution to this less-than-attentive approach to hamstring training is to simply separate the quadriceps and hamstrings into two workouts. Rather than having “leg day,” design a quadriceps workout including squat and lunge variations and perform a separate workout focused on the types of exercises listed above.
While each session will be relatively shorter and can be paired with another body part depending on your training split, attacking each side of your thigh with more focus allows greater training intensity, relatively more volume, and it decreases the chances of “forgetting” to train them.
Whether you’re addressing them directly on their own or as part of a more comprehensive lower body workout, directly training your hamstrings once or twice per week can be an effective way to build muscle and strength while recovering sufficiently.
How to Progress Your Hamstring Training
No matter how often you’re targeting your hamstrings, it’s important to use a variety of exercises which address both functions of the muscle. In any workout, be sure to include Romanian deadlift variations which train hip flexion, as well as performing leg curl variations to work knee flexion.
To prioritize hamstrings during any workout, use several sets of any leg curl as the very first exercise of the day. This pre-exhaust technique fatigues your hamstrings and makes them more likely to reach muscular failure before other body parts trained in additional movements.
This helps to emphasize the hamstrings during exercises in which other muscle groups may receive relatively greater attention (such as the high leg press or even during the traditional squat) and helps to ensure optimal recruitment of the hamstrings.
How to Warm-Up Your Hamstrings
“Hamstring tear” is a phrase that can strike fear into any experienced lifter or athlete. Not only can a hamstring injury require significant recovery time, but it may potentially become a recurring issue requiring ongoing attention and adaptation.
Properly warming up your hamstring muscles, glutes, hips, knees, and ankles can allow for more training intensity with a reduced risk of injury. Beginning each hamstring workout with a simple, low-intensity series of bodyweight squats, unweighted single-leg Romanian deadlifts (modified toe touches), and classic standing leg swings (side to side as well as front to back) can go a long way toward preparing your muscles and joints for more intense training.
No Back Seat for the Hammies
Just because you can’t flex your hamstrings and see them in the mirror is no excuse to pretend they’re not there, literally supporting every step you take and (almost) every move you make in the gym. It’s well-past time to put the back of your thighs front and center, and give your leg development, lower body strength, and athletic power a real kick in the pants.
References
- Van Every, D. W., Coleman, M., Rosa, A., Zambrano, H., Plotkin, D., Torres, X., Mercado, M., De Souza, E. O., Alto, A., Oberlin, D. J., Vigotsky, A. D., & Schoenfeld, B. J. (2022). Loaded inter-set stretch may selectively enhance muscular adaptations of the plantar flexors. PloS one, 17(9), e0273451. https://doi.org/10.1371/journal.pone.0273451
- Speirs, Derrick E.1,2; Bennett, Mark A.3; Finn, Charlotte V.4; Turner, Anthony P.2. Unilateral vs. Bilateral Squat Training for Strength, Sprints, and Agility in Academy Rugby Players. Journal of Strength and Conditioning Research: February 2016 – Volume 30 – Issue 2 – p 386-392 doi: 10.1519/JSC.0000000000001096
- Vleeming, A., Pool-Goudzwaard, A. L., Stoeckart, R., van Wingerden, J. P., & Snijders, C. J. (1995). The posterior layer of the thoracolumbar fascia. Its function in load transfer from spine to legs. Spine, 20(7), 753–758.
- Maeo, S., Huang, M., Wu, Y., Sakurai, H., Kusagawa, Y., Sugiyama, T., Kanehisa, H., & Isaka, T. (2021). Greater Hamstrings Muscle Hypertrophy but Similar Damage Protection after Training at Long versus Short Muscle Lengths. Medicine and science in sports and exercise, 53(4), 825–837. https://doi.org/10.1249/MSS.0000000000002523
- Escamilla, R. F., Fleisig, G. S., Zheng, N., Lander, J. E., Barrentine, S. W., Andrews, J. R., Bergemann, B. W., & Moorman, C. T., 3rd (2001). Effects of technique variations on knee biomechanics during the squat and leg press. Medicine and science in sports and exercise, 33(9), 1552–1566. https://doi.org/10.1097/00005768-200109000-00020
- Lake, Jason P.; Lauder, Mike A.. Kettlebell Swing Training Improves Maximal and Explosive Strength. Journal of Strength and Conditioning Research: August 2012 – Volume 26 – Issue 8 – p 2228-2233 doi: 10.1519/JSC.0b013e31825c2c9b
- van Dyk, N., Behan, F. P., & Whiteley, R. (2019). Including the Nordic hamstring exercise in injury prevention programmes halves the rate of hamstring injuries: a systematic review and meta-analysis of 8459 athletes. British journal of sports medicine, 53(21), 1362–1370. https://doi.org/10.1136/bjsports-2018-100045
- Hody, S., Croisier, J. L., Bury, T., Rogister, B., & Leprince, P. (2019). Eccentric Muscle Contractions: Risks and Benefits. Frontiers in physiology, 10, 536. https://doi.org/10.3389/fphys.2019.00536
Featured Image: baranq / Shutterstock


