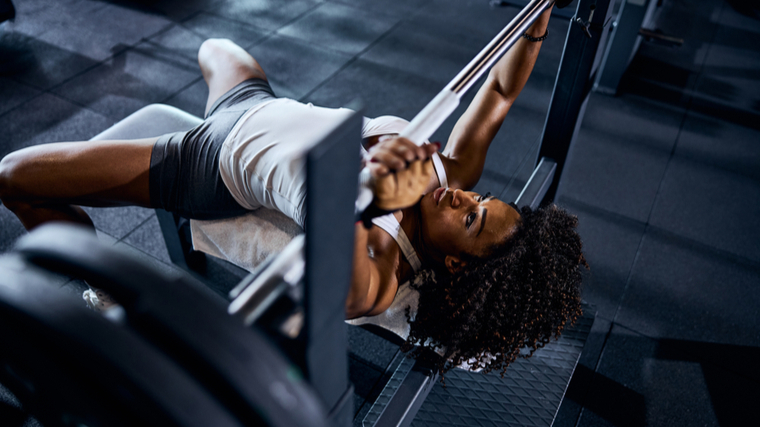
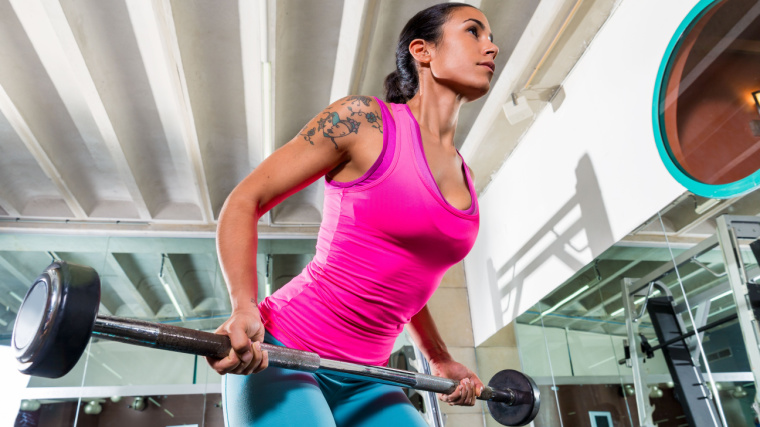
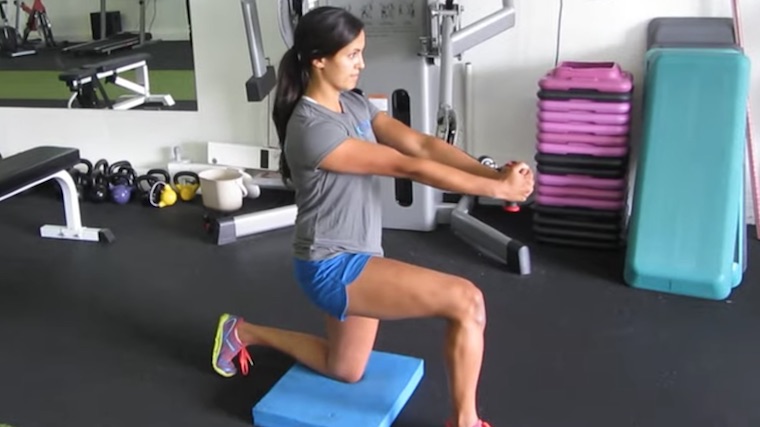
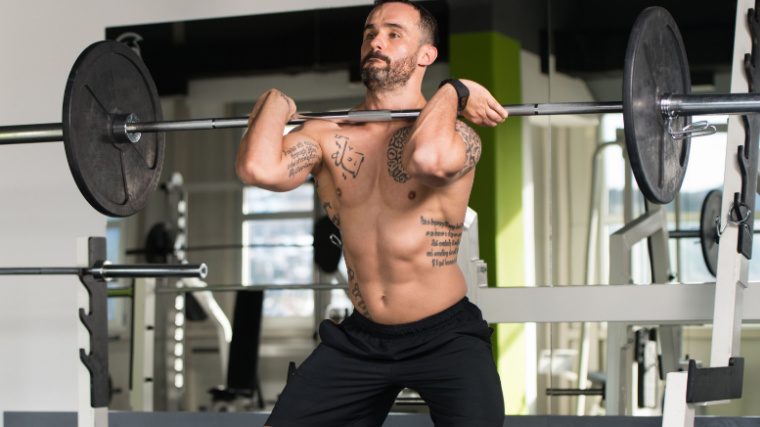
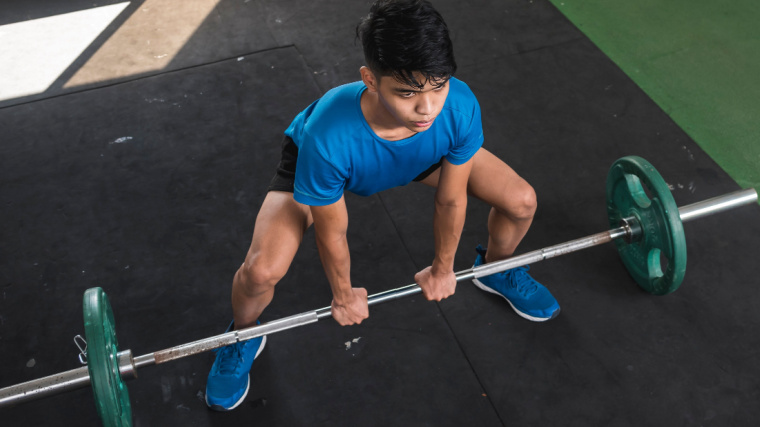
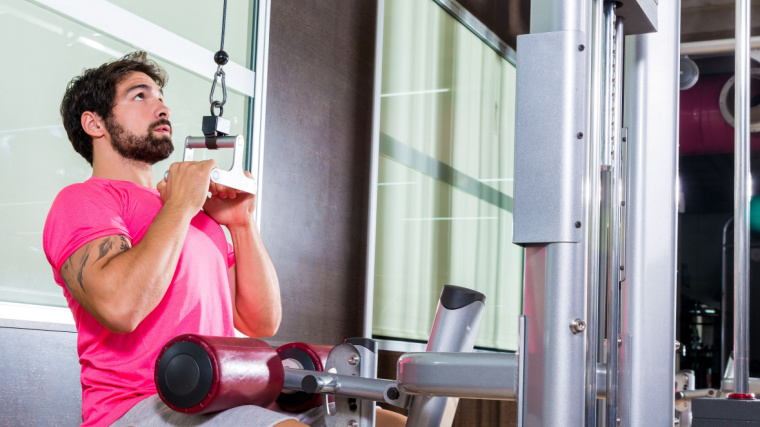
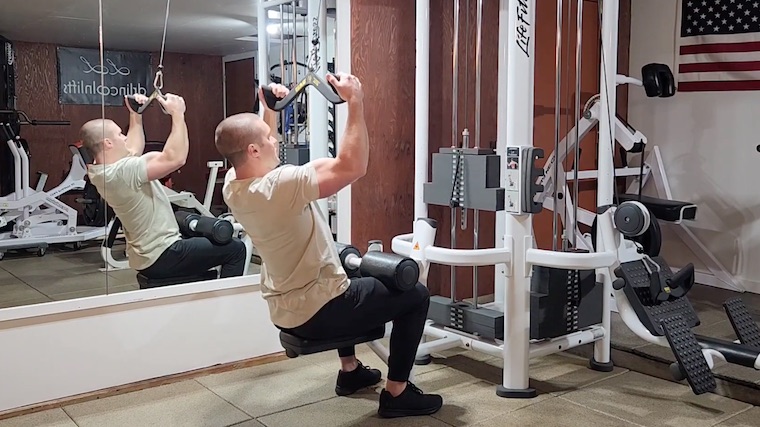
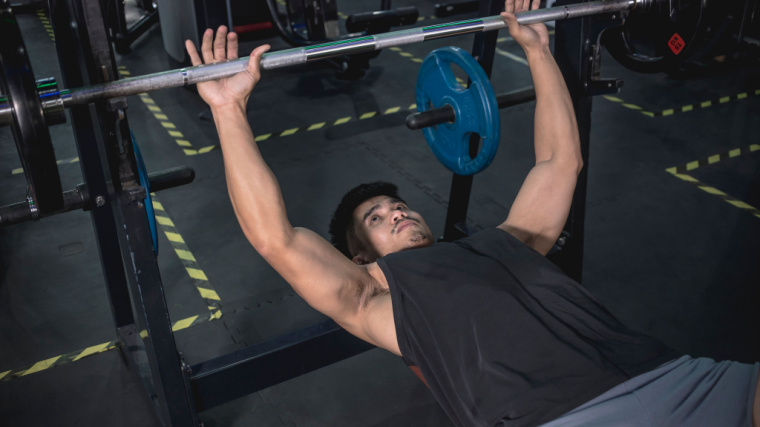
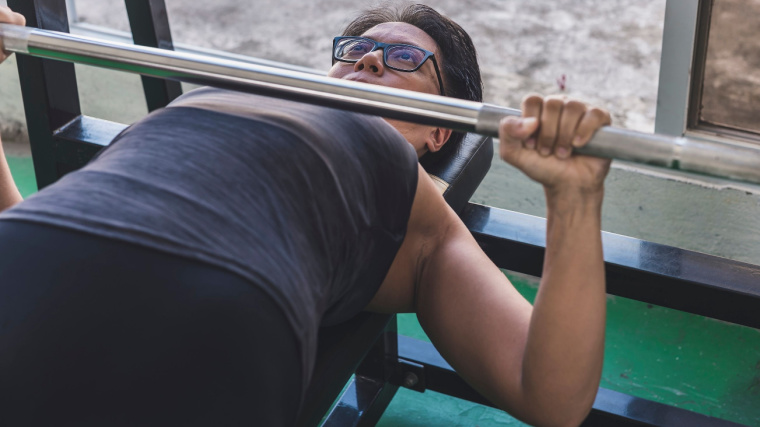
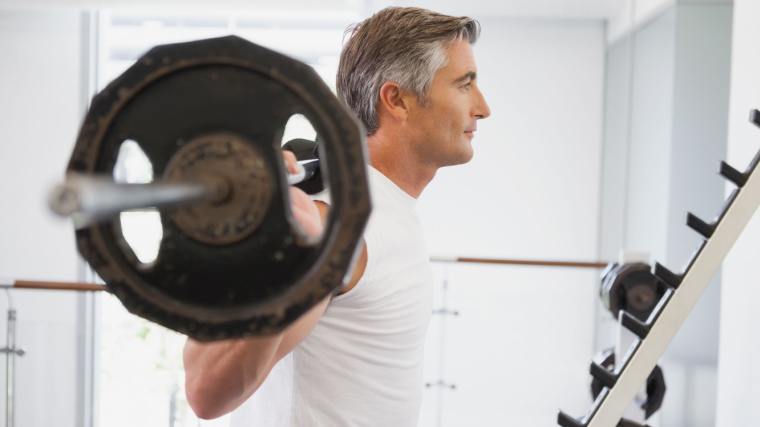
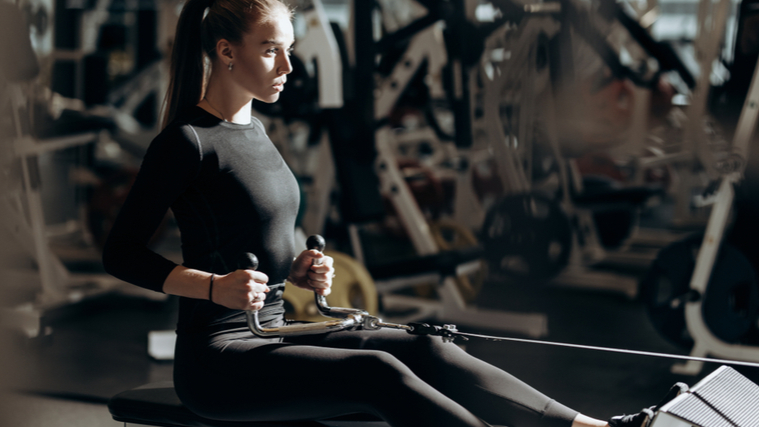
In some gym circles, you’re not considered a “true” lifter if nobody has ever asked you, “How much do you bench?” This fundamental exercise is the archetypal test of upper body strength and size.
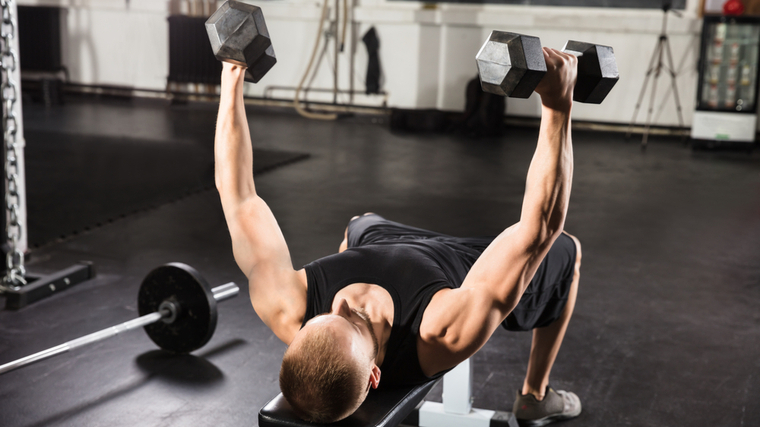
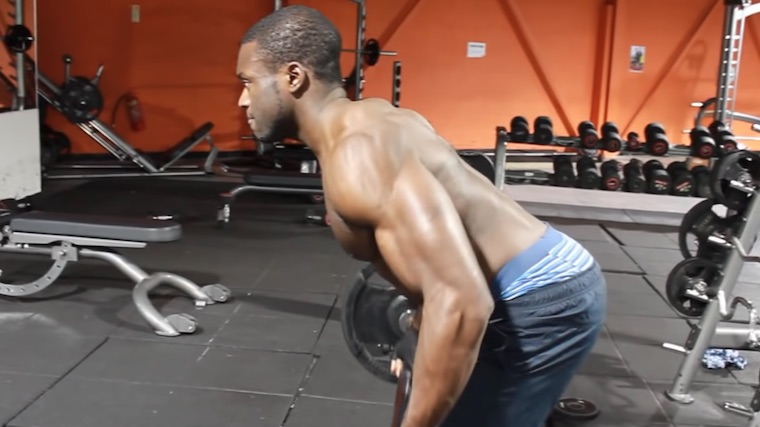
Yet, you might’ve seen this scene happen in person or in a viral video: a powerlifter marches toward a bench press station, folds themselves like a Cirque du Soleil acrobat, and proceeds to lift a seemingly impossible weight using the shortest possible range of motion. On the other side, you see big lifters moving big weights while lying on the bench as flat as a flounder.
Credit: YAKOBCHUK VIACHESLAV / Shutterstock
So, who’s right or wrong? Is one of these lifters even “wrong?” Here’s a review of the benefits and risks of performing the bench press with an arch, as well as how and when to use this modified technique to reach your goals.
The Importance of a Bench Press Arch
Benefits of Using an Arch
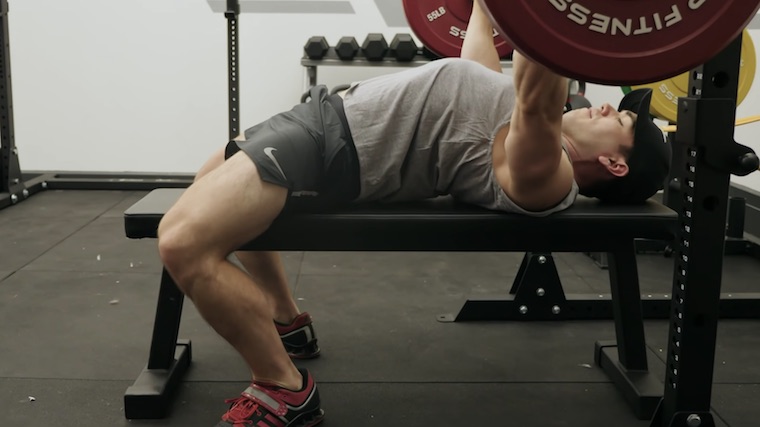
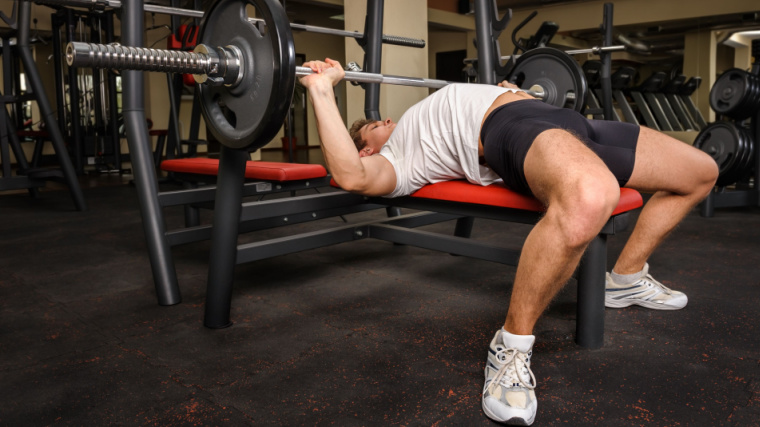
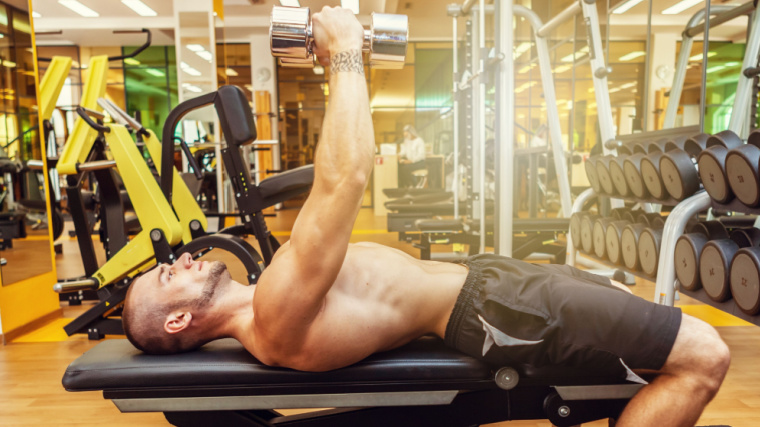
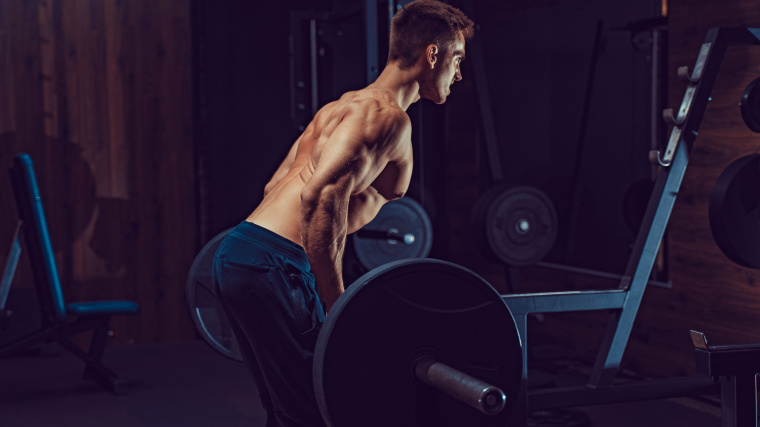
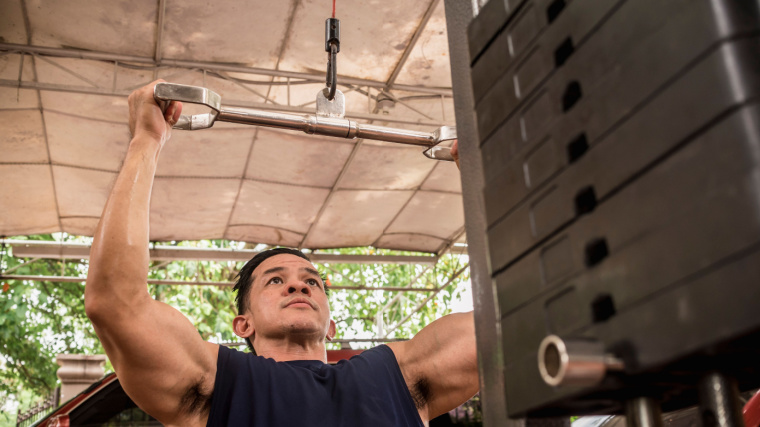
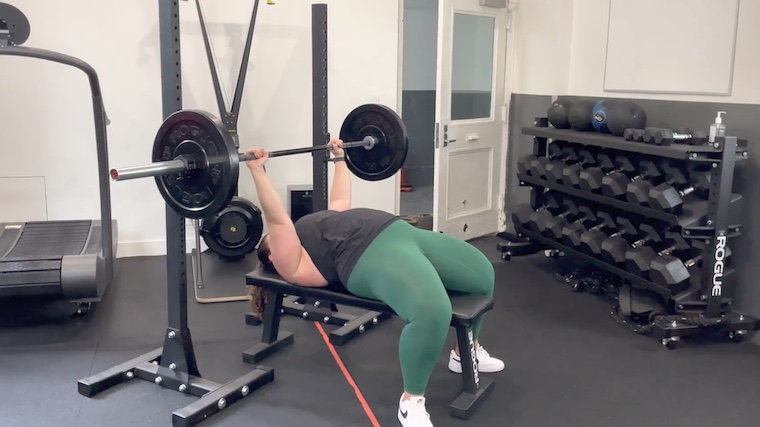
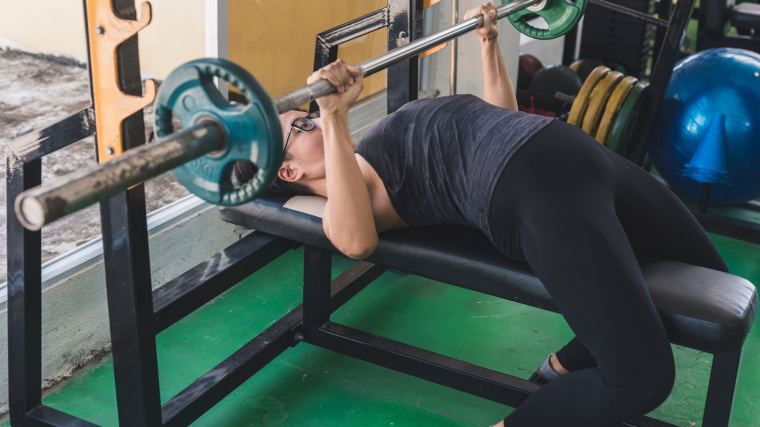
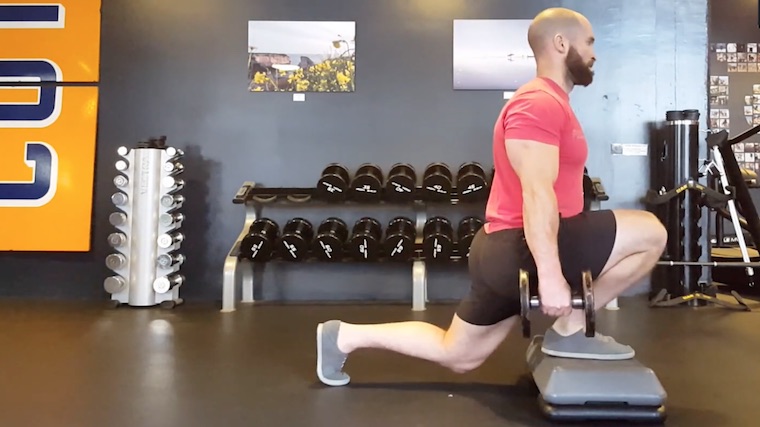
The bench press arch refers to the deliberate extension and curvature of your spine when lying on the flat bench. A little arch is natural with most people, as it simply follows the natural curve of the spine, which isn’t flat.
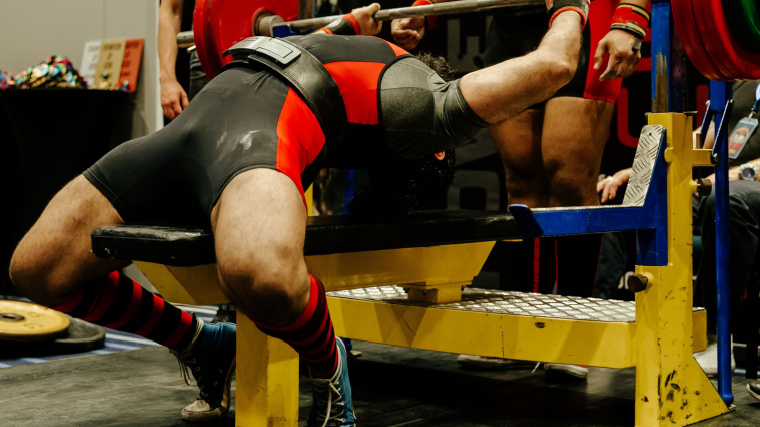
You can easily spot an arch, as the lower back of the lifter is not touching the bench. If someone has an exaggerated spine curvature — for instance, a lordosis — they are forced to arch. Some lifters, especially powerlifters in competition, try to amplify this curvature and have as big an arch as possible. Why? It has several benefits, especially if you want to get stronger.
More Weight Lifted
With a bigger arch, the lower portion of your chest is in a higher position. This means that the point of contact with the barbell will be higher and, as such, the range of motion will be shorter. For the same amount of force produced, you can lift more weight. If you want to increase your bench press, then learning how to arch is an excellent way of improving the efficiency of your lift.
This method became so effective that some powerlifters would seem to barely make the barbell move more than a few inches and, as result, would set incredible records. Many would even say it’s cheating, ridiculous, and defeats the purpose of the sport.
As such, some powerlifting federations, like the International Powerlifting Federation — the biggest tested powerlifting federation in the world — updated their competition rules to limit arching. The goal was to ensure that performance is primarily based on a lifter’s strength, and not their mobility.
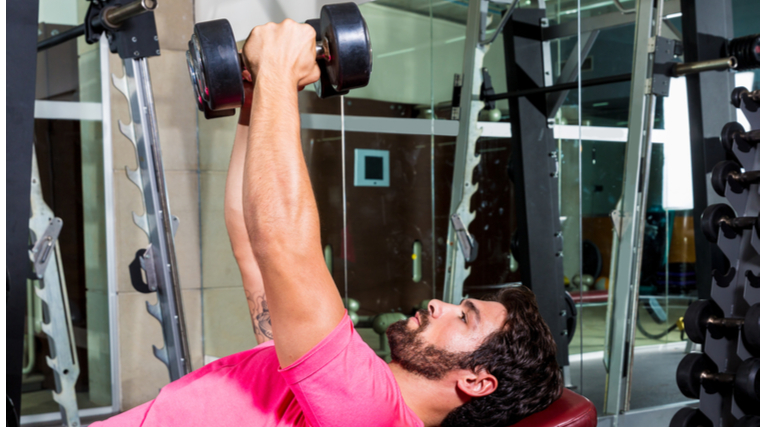
Safer on the Shoulders
Your shoulders are some of the most mobile and most fragile joints in your body. They are put under a lot of stress with the bench press. Arching your back allows you to better squeeze your shoulders blades together and down, and maintain them in place during execution of the exercise.
Because the range of motion is shorter with an arched bench press, your elbows travel a shorter distance into the bottom position and will not go as far beneath your shoulder joint. This prevents excessive stretching in your shoulders and chest muscles, while avoiding a relatively weaker position that might result in injuries or joint strain. This is especially important if you have longer arms, as these effects are amplified.
More Overall Stability
Arching your back makes your upper body more “compact” and creates more full-body tension by strongly activating your upper back, lat, hips, and core muscles, compared to lying flat on the bench.
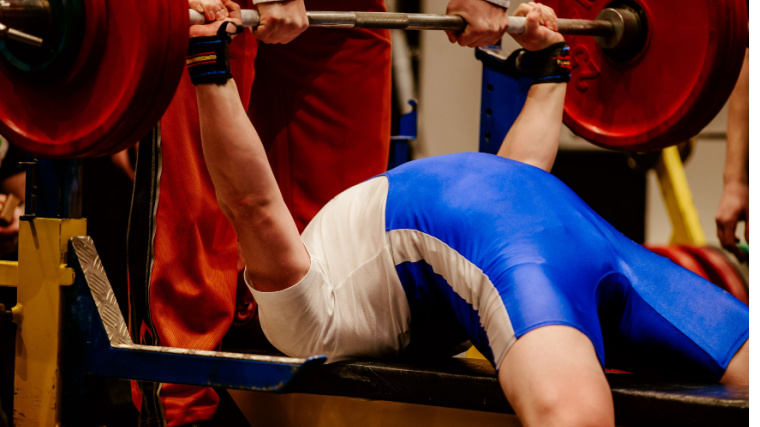
Credit: Real Sports Photos / Shutterstock
This way, you can properly distribute the energy from your legs through your torso to your shoulders and into the barbell. If your whole body is tensed, you will provide a more stable surface from which to press.
It’s the same principle that makes squatting with your feet on the floor easier than standing on a stability ball — you can generate more force without having to balance your body. If your torso wiggles on the bench with each repetition, you’re bound to leak strength and decrease your rate of technical adaptation.
More Muscle Growth
This is perhaps the most surprising benefit, as most gym veterans swear that the arched bench press should only be used by powerlifters focused on strength, and that a flatter version is better for muscle mass. But studies have shown more back and triceps activation during the arched bench press. (1) That’s logical, as the lats help arch the back, and a shorter range of motion will put more stress on your arms.
But what about building your chest? People have claimed that the arched bench turns the lift into some sort of decline bench press and that’s somewhat true, as lower chest activation is slightly greater. But upper chest activation remained the same, so muscle recruitment is still net-positive, likely because you can use more weight. So overall, you activate more muscle mass and stimulate more growth.
Risks of Using an Arch
With all these perks, arching seems too good to be true. There might be some risks, though, especially if you exaggerate it too much. You can have too much of a good thing.
Lower Back Strain
Your spine is naturally extended because of its curvature, but extreme extension will put the disks and nerves at a greater risk of injury. Sure, there’s no axial loading or shear forces, but the technique will still put some stress on your lower back, especially if you then use leg drive to generate full-body tension. The probabilities of injuries may be relatively low, but you should keep them in mind, especially if you have pre-existing back issues.
Credit: Real Sports Photos / Shutterstock
A hernia could even potentially happen, even though it usually occurs during spinal flexion (bending forward at the waist). If you already have lower back troubles or injuries, arching might prove very painful and counterproductive. If you’re such a lifter, you should refrain from using a powerlifting arch and stick to maintaining your natural arch or pressing with a flatter back, depending on which is least painful.
Less Muscle Mass
But, didn’t we just say that an arched back recruits more muscle mass? Indeed, but there’s arching and there’s arching. If you cut the range of motion too much, some muscles will be less stimulated. The more a muscle is stretched, the more it responds to training. (2) And if there’s almost no stretch due to an extremely limited range of motion, the stimulus will be much lower.
Using some partial movements here and there is not a problem, but they shouldn’t make up the bulk of your training. If your training is minimalist — using a limited variety of exercises or very low volume — you should probably abstain from using a big arch. Or, if you do bench with an arch, make sure you’re also including full-range exercises like the incline bench press and overhead press to really complete your training and fill out your physique.
How to Arch
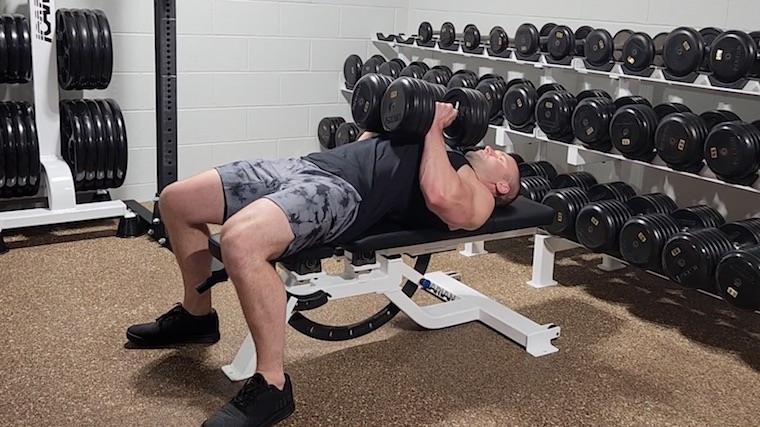
Most people already have a natural arch, this is just how they’re built. If you want to stick to a natural arch when performing a bench press, simply squeeze your shoulders blades together and down, and puff your chest up and high. But if you want to maximize your arch (either because you naturally don’t have one or you want to lift as heavy as possible), follow these steps.
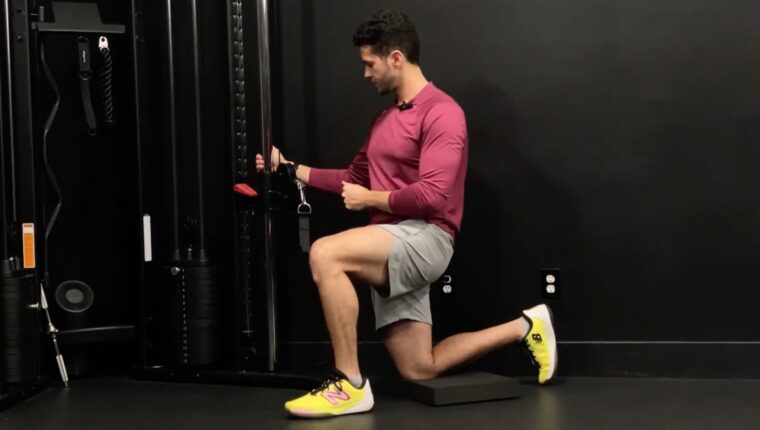
Step 1 — Setup on the Bench
Lay down on the bench, grab the barbell, and grip the bar outside of shoulder-width. Your eyes or eyebrows should be directly in line with the bar. Squeeze your shoulders blades together and down (toward your glutes) as far as possible. Try to feel your traps dig into the bench. Focus on arching your upper back as much as possible, not necessarily your lower back.
Credit: BarBend / YouTube
If you want to take things to the max and really optimize your position, you can even put your feet on the bench while setting up your initial position. This will put as much weight as possible on your traps and will help to leverage your body into position.
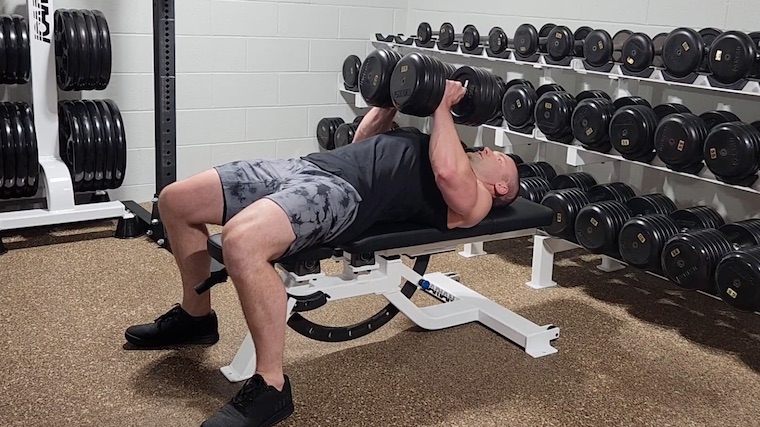
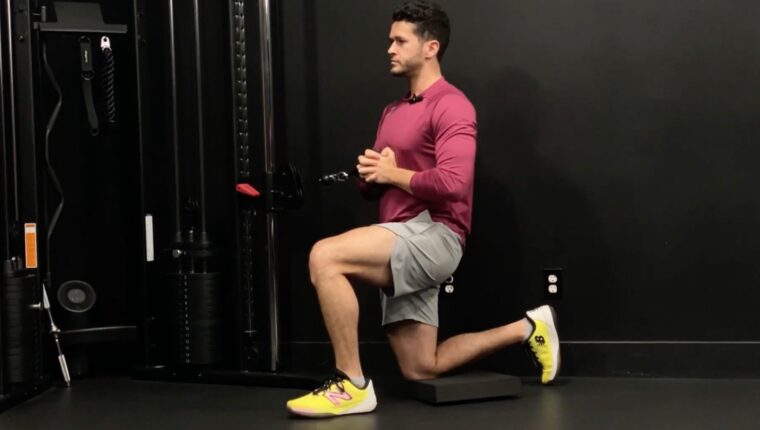
Step 2 — Set Your Stance
If they were up on the bench, put your feet on the floor while keeping your arch. Position your feet as close to your shoulders as possible. Start “digging” your heels backward as far as you comfortably can.
Credit: BarBend / YouTube
Push your toes into the ground “down and away” from your body. This lower body pushing motion will help you prevent your glutes from rising off the bench.
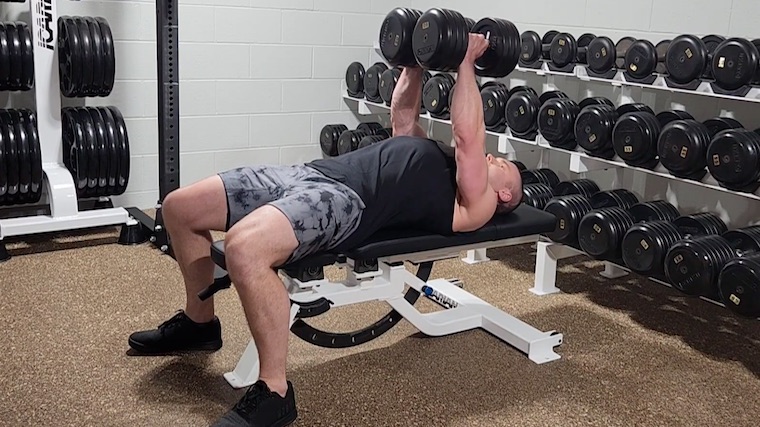
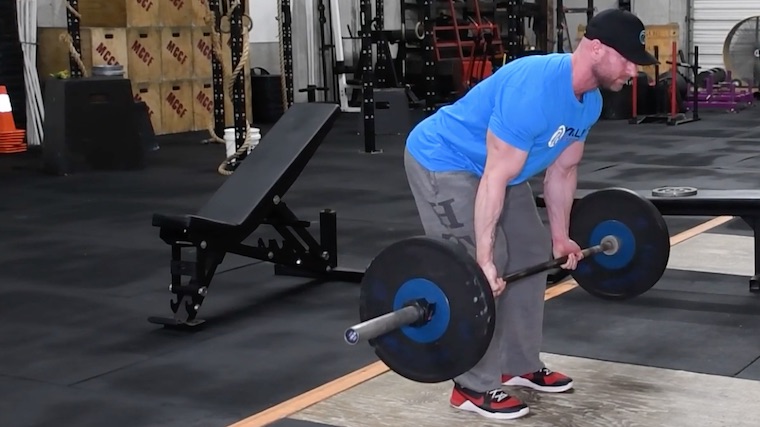
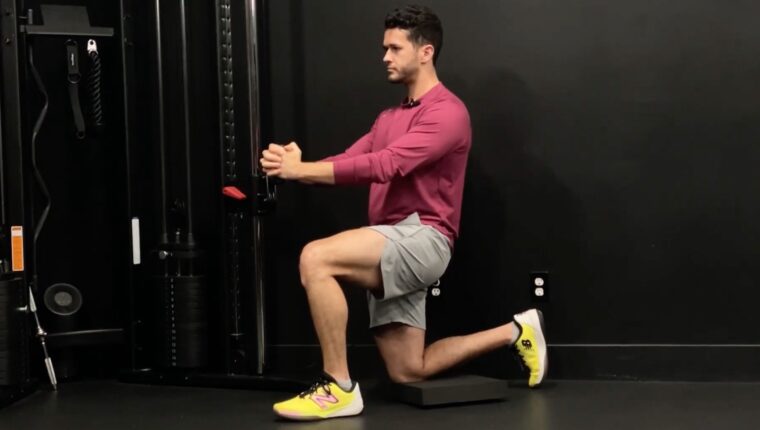
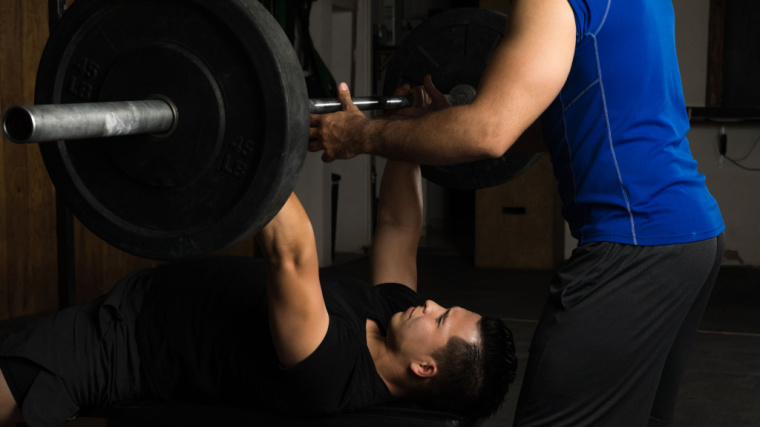
Step 3 — Unrack the Bar, Lower, and Press
Maintain pressure through your feet. Unrack the barbell, with the help of a spotter if possible. Once the bar is set at the midway point, just above your chest, pause very briefly to confirm proper positioning.
Credit: Serghei Starus / Shutterstock
Keep applying full-body tension from your traps to your toes. Lower the barbell until it gently touches your chest. Feel tension in your upper body at all times and hold your chest high. Move the weight deliberately and cautiously because the range of motion will be less than what you may be used to. As you feel the bar make contact, press powerfully to lockout.
How to Improve Your Arch
The bench press is an unnatural movement in itself — lying on a short platform while repeatedly moving a long, heavy bar above your rib cage and several vital organs. Intentionally arching your upper body during the exercise can feel even more unnatural.
Your first attempts to use an arch will likely feel awkward and certainly won’t be perfect. Also, unfortunately for the stiffer lifters out there, there’s a dose of mobility involved. Some will never develop a really big arch, but you can still improve it following these suggestions.
Dynamic Foam Rolling
Before you lift, after a general warm-up, grab a foam roller and start hammering your mid-back for a minute. This upper body drill is key for thoracic mobility.
Loosening your spinal erectors, running the full length of your back, will also help tremendously with improving your arch position. Don’t forget to also, carefully, roll your lower back. This will help hold your position when your lower body is set and creating tension.
Knee Raises or Leg Raises
Why should you do a few sets of an ab exercise before benching? Well, these movements also greatly stimulate your hips flexors. If you perform ab work with a full, smooth range of motion, those hip flexors will loosen. Tight hips flexors will prevent you from pulling your feet into position on the floor, which will prevent you from getting into a deep arch position.
Face Pulls and Postural Exercises
Because of the generally sedentary modern lifestyle, most people are more prone to a kyphotic (rounded shoulder), caveman-style posture. This can increase the risk of bench press injuries, but also prevent you from adopting a great arch. You simply won’t be able to open your chest as much.
A great warm-up before benching would be to grab a light resistance band and perform face pulls, pull-aparts, and the over-and-back (sometimes intimidatingly called “shoulder dislocates”). These exercises will strengthen your rotator cuff and, more importantly, improve your posture which carries over to your arch.
Bench Thoracic Spine Stretch
Stretching after your session is never a bad idea, but you could even do some static stretching before your bench. This can be especially useful in the most extreme cases of bad posture or mobility restrictions. There are several options available, but here’s one of the most effective.
Kneel down in front of a flat bench or a box. Place your elbows on the bench and bend your elbows to aim hands up in the air. Slowly lean your body down until your head passes between, and under, your upper arms. Move as far as comfortably possible.
To accentuate the stretch, bring your hands towards your traps or the back of your neck (without pressing down). Hold the stretch for 45 to 60 seconds.
Big Arch for a Big Bench
Prejudice, misinformation, and a few bad apples have given the bench press arch a bad rep, but there are actually many benefits. If you can ignore the comments you might get from other lifters about “the right way” to bench, give it a try and watch your performance improve, your muscles grow, and your shoulder pain diminish.
References
Alan C. Cudlip, Jacquelyn M. Maciukiewicz, Brendan L. Pinto & Clark R Dickerson (2022) Upper extremity muscle activity and joint loading changes between the standard and powerlifting bench press techniques, Journal of Sports Sciences, 40:9, 1055-1063, DOI: 10.1080/02640414.2022.2046937
Alan C. Cudlip, Jacquelyn M. Maciukiewicz, Brendan L. Pinto & Clark R Dickerson (2022) Upper extremity muscle activity and joint loading changes between the standard and powerlifting bench press techniques, Journal of Sports Sciences, 40:9, 1055-1063, DOI: 10.1080/02640414.2022.2046937
Part dumbbell bench press and part isometric dumbbell flye, the hex press is a unique high-tension chest-builder. The hex press is performed on a flat bench with the dumbbells squeezed together throughout the pressing motion. This feature explains why one alternate name for this unique chest exercise is the “squeeze press.”
Credit: sornram / Shutterstock
This exercise also goes by “Champagne press,” but the hex press isn’t just for special occasions. Like Champagne, the hex press compliments just about anything — it’s great for lifters training for a stronger press, a more muscular chest, or healthier shoulders.
Ready to pop the cork on new chest gains? Find everything you need to know below.
Hex Press
Hex Press Video Guide
See the hex press in action, demonstrated by author Dr. Merrick Lincoln. Note the key techniques, then check out the Step-by-Step breakdown with additional form tips.
How to Do the Hex Press Step By Step
It may look like a close-grip dumbbell bench press but, while there are some similarities, there are crucial differences that make the hex press stand out. Follow these steps for proper, efficient, and effective technique.
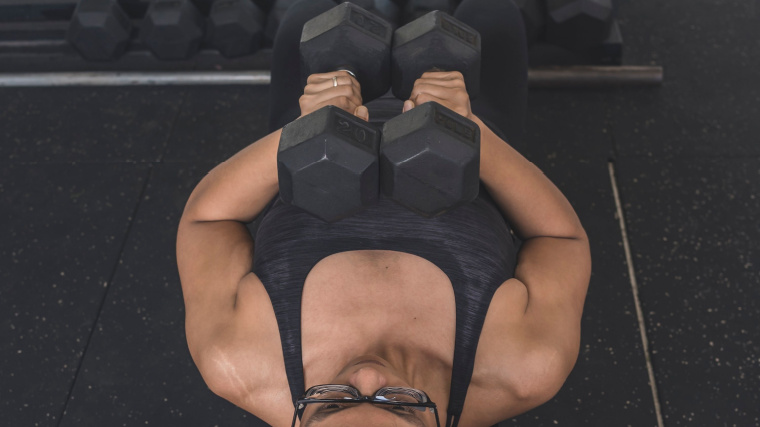
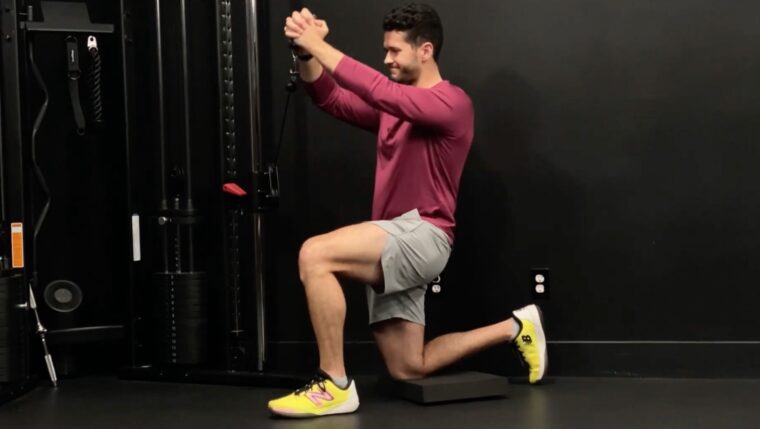
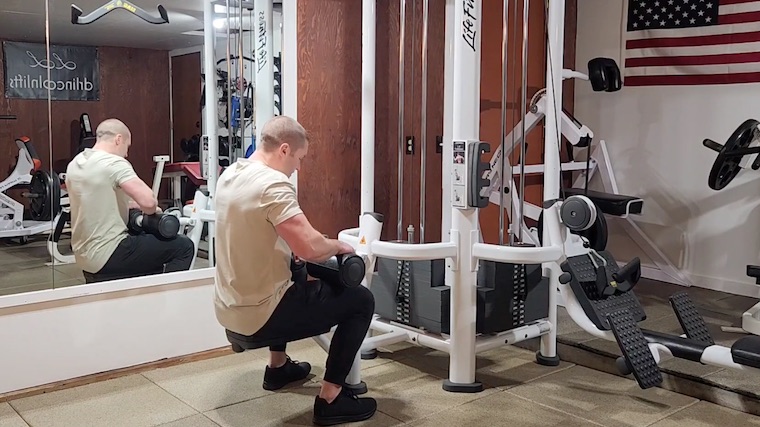
Step 1 — Set Up Five Points of Contact
Credit: Merrick Lincoln, DPT, CSCS / YouTube
Like the bench press, the hex press is performed on a flat bench. Hold a dumbbell in each hand, set up with five points of contact for stability — the back of your head on the bench, your shoulder blades on the bench, your buttock on the bench, your right foot touching the floor, and your left foot touching the floor. (1)
Form Tip: Recruit a “spotter,” or individual who can assist you if you run into trouble during the exercise. Any exercise involving weights passing over the body requires a spotter. (1) A spotter is especially important when learning an unfamiliar exercise. The spotter stands behind the bench and, if assistance is necessary, they will assist by grasping your wrists to guide the dumbbells. (1)
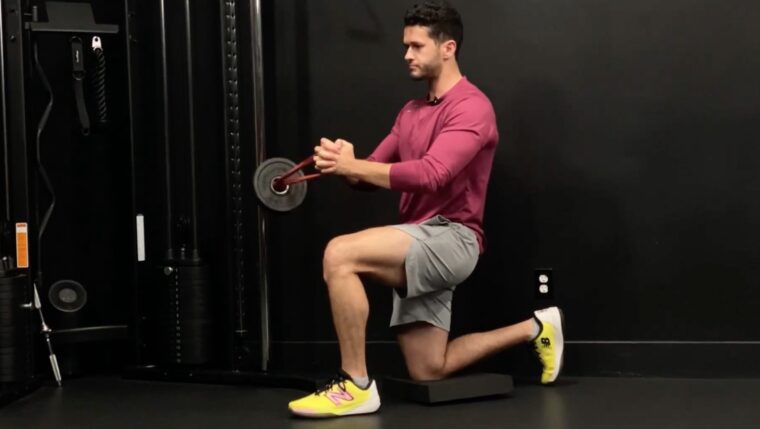
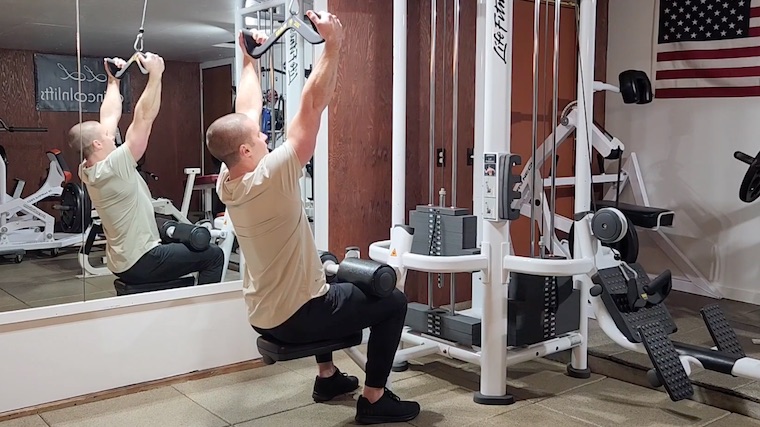
Step 2 — Set Your Shoulders and Squeeze the Dumbbells Together
Credit: Merrick Lincoln, DPT, CSCS / YouTube
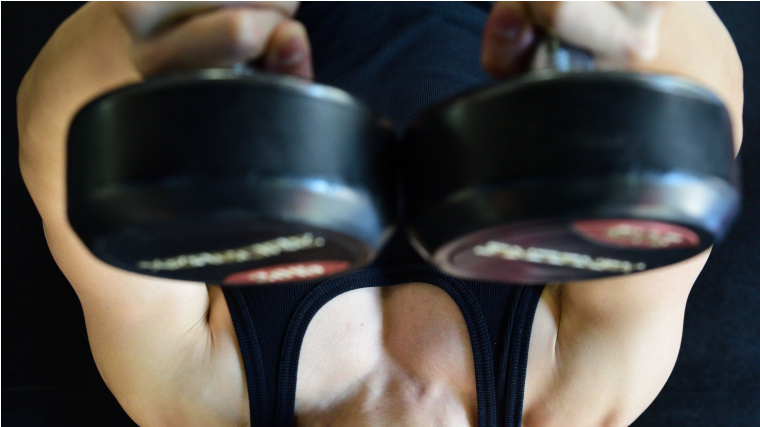
Lift your chest toward the ceiling by arching your back and pulling your shoulder blades together. Maintain this position throughout the exercise. With a neutral grip (palms facing each other), bring the dumbbells together just above your sternum and squeeze them together hard.
Form Tip: If you’re using hexagonal-shaped dumbbells — the namesake equipment for the hex press — ensure flat surfaces of the dumbbells are aligned and squeezed together.
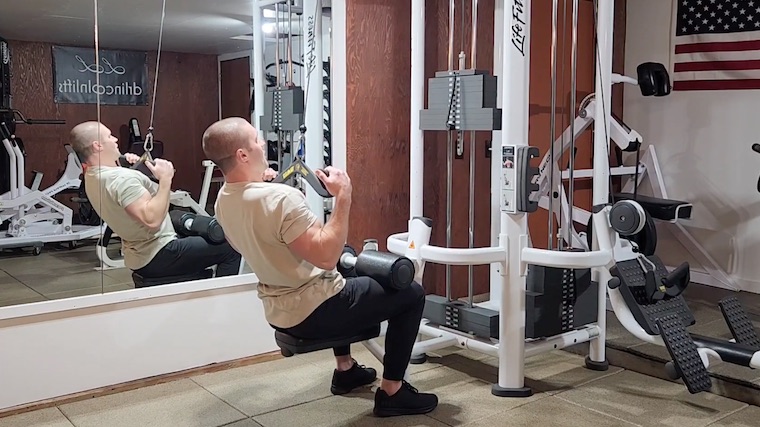
Step 3 — Maintain Pressure, Press to Lockout
Credit: Merrick Lincoln, DPT, CSCS / YouTube
Initiate the press by flexing your shoulders and extending your elbows. Keep the dumbbells squeezed together and elbows tucked throughout the movement. Don’t decrease inward pressure as you reach the top, locked out, position.
Form Tip: Keep tension. In addition to the profound contraction you’ll feel in your chest, you should feel tension in your upper back and lats, which keep your shoulder blades pulled together (retracted) and keep your elbows tucked toward your sides.
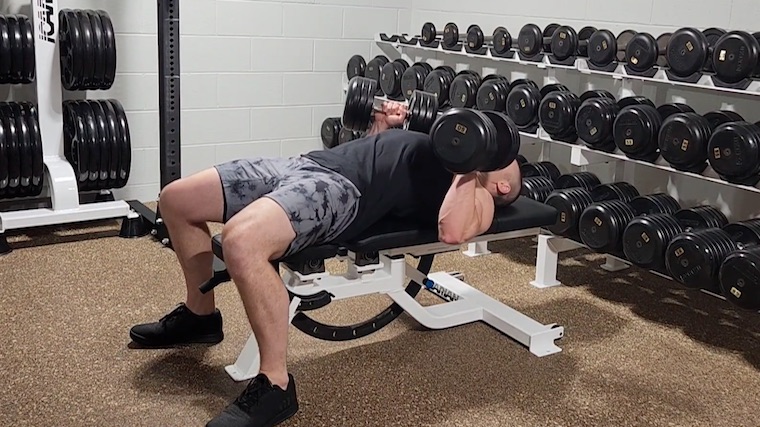
Step 4 — Lower without Separating
Credit: Merrick Lincoln, DPT, CSCS / YouTube
Lower to the center of your chest using the same arm path as the upward movement phase. Focus on keeping the dumbbells firmly squeezed together throughout the lowering phase, which may feel slightly unnatural at first, since the lowering phase of most exercises emphasizes a muscle stretch.
Form Tip: Think about “rowing” or actively pulling the dumbbells back your chest. “Rowing” the weights back to the starting position reinforces tension in your upper back and eliminates the need to reset your arch before the next repletion.
Hex Press Mistakes to Avoid
Dodge these common errors for cleaner technique and more effective hex presses.
Losing The “Squeeze” Between Dumbbells
The pressure exerted between the dumbbells is part of the special sauce that makes the hex press effective — and extra spicy. It promotes muscular engagement in parts of the chest that might not otherwise be as active.
Credit: Andrey_Popov / Shutterstock
At the bottom position of the exercise, the lifter’s elbows are bent, and shoulder internal rotation force is required to keep the dumbbells together. Toward the top position, arms are straighter, and shoulder horizontal adduction force is required to keep the dumbbells together. Although it may get harder to keep the squeeze at the top and bottom of the movement, firm pressure between the dumbbells must be maintained throughout.
Dropping Your Chest, Freeing Your Shoulder Blades, or Flaring Your Elbows
Loss of tension in the back allows the chest to drop, shoulder blades to spread, and upper arms to drift away from the lifter’s sides. These three errors tend to occur together, and they can make the hex press less effective.
Credit: Vladimir Sukhachev / Shutterstock
If you feel any of these faults, reset by arching your spine, retracting your shoulder blades (and pinning them to the bench), and tucking your elbows toward your ribcage. Now, keep this tension and finish.
Non-Perpendicular Pressure Between Dumbbells
When squeezing the dumbbells together, it’s essential to maintain opposing forces from the left and right arm that are horizontally aligned and nearly equal in magnitude. Otherwise, dumbbells may slip or roll apart, leading to loss of tension, missed reps, or worse.
Credit: lunamarina / Shutterstock
Get the feel of creating the squeeze using light dumbbells during your “work up” sets and focus on maintaining even, steady pressure throughout the workout.
How to Progress the Hex Press
When first performing the hex press, start with relatively light dumbbells to hone technique. Once you’re comfortable with the exercise, a “working weight” 20 to 30% lower than what you’d typically use for a traditional dumbbell bench press will likely be appropriate. From there, lifters have several great options for progressing the hex press.
Squeeze Harder
The simplest way to progress the hex press is to apply more inward pressure to the dumbbells. Increasing the “squeeze” makes the exercise more difficult and boosts the training stimulus experienced by the chest and shoulder muscles.
Increase Weight
Squeezing harder during the hex press can make virtually any weight more challenging, but this progression method isn’t likely to stimulate triceps growth or carry over to heavy pressing as efficiently as increasing the weight.
Once you’re able to hit or surpass your repetition target on the final working set, it may be time to use heavier dumbbells. Ideally, jumping up to the next pair of dumbbells on the rack will drop you back toward the bottom of your target repetition range.
Increase Repetition Volume
As you get stronger with the hex press, consider performing additional repetitions per set. For example, if you normally perform eight to 12 repetitions, and you’re consistently hitting 12 reps with more left in the tank, change your target to 12 to 16 repetition sets. Shifting the repetition range upward helps to ensure challenging sets and ongoing muscle gain.
Benefits of the Hex Press
The hex press biases your chest while requiring only light to moderate weights and minimal shoulder extension. Altogether, the hex press may provide new chest growth and a more shoulder-friendly pressing experience.
Robust Chest Training
Performed properly, the hex press enables maximal or near-maximal chest contraction throughout every repetition — a feat not possible during traditional presses. Here’s why:
Traditional exercises are limited by the amount of resistance our muscles can overcome during the sticking point, or the most challenging portion of the movement. For presses, the sticking point occurs toward the beginning of the upward movement phase. (2) During the remainder of the movement, your muscles are not maximally challenged. During the hex press, you can ensure your muscles are adequately stimulated by squeezing the weights together as hard as you desire.
Not feeling adequately challenged? Simply squeeze the dumbbells together harder to demand more force from the chest. Moreover, squeezing as you press virtually ensures thorough engagement of pectoralis major — Read more in the “Muscles Worked” section below.
Reinforces Mind-Muscle Connection and Pressing Technique
Horizontal pressing exercises, such as the bench press and dumbbell bench press, are a mainstay for strength training and physique development. Several technical elements are common across all bench-supported horizontal pressing exercises, including the need for shoulder blade retraction and co-contraction of muscles around the shoulder joints. Also desirable is the sensation of muscular effort from the chest. Lifters spend months, even years, honing their form to improve efficiency and effectiveness.
Credit: MDV Edwards / Shutterstock
Fortunately, the hex press can help lifters to build strength, technique, and a mind-muscle connection that can reinforce proper performance of other horizontal presses. During the hex press, squeezing the dumbbells together creates the feeling of peak pectoralis major contraction throughout the pressing movement. This sensation of “flexing the pecs” can help to enhance the mind-muscle connection, which may be conducive to greater gains. (3)
Squeezing the dumbbells together also encourages greater involvement of your rhomboids and middle trapezius, as they must counteract forces from pectoralis major, subscapularis, serratus anterior, and other muscles on the front of the torso. Rhomboids and middle traps are the muscles primarily responsible for maintaining retraction of the shoulder blades. Increased demand during the hex press may encourage lifters to create a tighter setup for bench-supported horizontal pressing.
Shoulder-Friendly Pressing
Individuals with certain shoulder problems, such as shoulder instability, may not tolerate traditional pressing. (4)(5) Individuals who present with apprehension and pain in the front of the shoulder when the arm is brought out and extended behind the body may have a specific type of instability called anterior instability. (4)(6) This problem is common among lifters. One small study reported over two-thirds of recreational resistance trainees showed signs and symptoms of anterior instability. (6)
Unlike the basic dumbbell bench press or barbell bench press, the hex press limits shoulder extension at the bottom of the movement. Your arms cannot travel behind your body, because the dumbbells are not allowed to clear the chest. This feature may be better tolerated by lifters with functional anterior instability.
Because every brand of shoulder pain is different, those suffering with shoulder issues should seek a qualified sports medicine provider — and the hex press might be worth discussing, as it may present an opportunity to train around or train through certain shoulder issues with the appropriate guidance.
Muscles Worked by the Hex Press
As a neutral-grip pressing movement, the hex press trains the muscles that flex your shoulders and extend your elbows. Squeezing the dumbbells together also trains the muscles of shoulder horizontal adduction (i.e. those trained during a chest flye) and the muscles of shoulder internal rotation. Here are the major players.
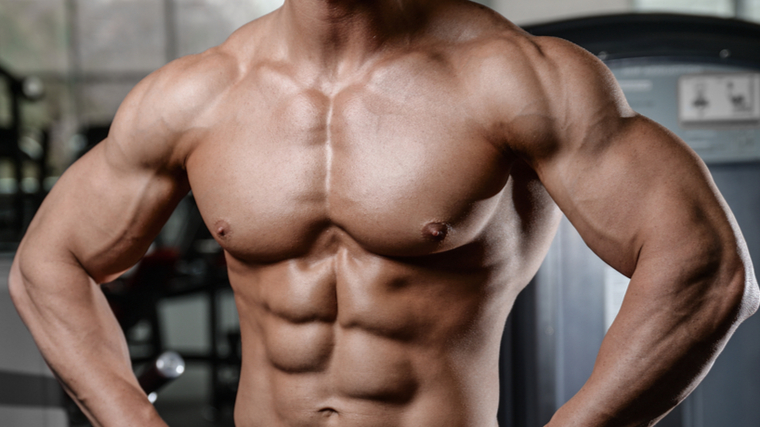
Pectoralis Major
You’ll feel the hex press most profoundly in pectoralis major, the biggest, most superficial muscles of your chest. The pectoralis major has two major parts — the clavicular head, or upper chest, and the sternocostal head, which composes the middle to lower part of the chest. Each part contributes to various shoulder actions and the hex press covers virtually all bases for training your pectoralis major.
Credit: ALL best fitness is HERE / Shutterstock
Shoulder flexion is resisted during the pressing movement of the hex press. The clavicular head of pectoralis major is trained during resisted shoulder flexion. (7) Shoulder horizontal adduction is trained by squeezing the dumbbells together toward the top of the hex press.
Both heads of the pectoralis major are trained during shoulder horizontal adduction, along with a handful of different muscles. (7)(8) Shoulder internal rotation is trained when the dumbbells are squeezed together toward the bottom of the hex press. Again, both heads are trained during internal rotation exercise, albeit the sternocostal head is likely biased. (9)
Anterior Deltoid
The deltoid is the “cap” of muscle surrounding the front, back, and side of your shoulder. It is divided into three functional parts, each with different actions — anterior, middle, and posterior. The anterior deltoid, or front delts, flex the shoulder and assist with squeezing the dumbbells together during the hex press. (7) While typical pressing exercises hit this part of the delt, the extra squeeze of the hex press makes this exercise more effective for anterior deltoid development.
Triceps Brachii
The hex press trains your triceps brachii, the three-headed muscle on the backside of your arms. In addition to filling your sleeves, the triceps brachii helps improve your bench press numbers by enhancing lockout strength. For a great triceps pump, try three or four sets of hex press with light-to-moderate weight dumbbells for high-repetition sets with 60 seconds rest between each set.
Rotator Cuff
Although traditional pressing largely trains muscles on the front of your chest and shoulders, the movement also activates important muscles located deep behind the shoulders— the posterior rotator cuff. (10) The posterior rotator cuff serves a stabilizing function during the press.
By actively squeezing the dumbbells together, particularly during the bottom half of the hex press, the deep muscle on the front of the shoulder, or anterior rotator cuff, is engaged. Hence, the hex press appears to be uniquely suited to train both the posterior and anterior rotator cuff muscles.
How to Program the Hex Press
The hex press can be programmed in a variety of ways on push day, during a specific chest workout, or during a full body workout. Hex presses can build muscle and strength. In addition, they prime your chest and shoulders for heavy work and work nicely for intensification techniques.
As a Low-to-Moderate Weight, High-Repetition Chest Builder
Whether training for building muscle (i.e. “hypertrophy”) or strength, high effort sets — those carried up to or near muscular failure — are effective even relatively with light weight. (11)(12)(13)
Select light-to-moderate weight dumbbells (e.g. 40 to 70% of what you’d use for a standard dumbbell bench press). Then, take each working set to within two or three repetitions of failure. Two to four sets of eight or more repetitions will promote strength and size, provided sets are performed with high levels of effort.
As a Lightweight Activation Exercise
Do you or someone you know suffer from the inability to feel the chest working during presses? Don’t despair. The hex press might be the fix.
Simply perform one to three light sets of hex presses before your primary press of the day (i.e. before the bench press, incline press, etc.). Focus on the “squeeze” during the hex press. Then, like an overfilled shaker bottle, the mind-muscle connection to your pecs will spill over to your primary pressing movement.
Maximally squeezing the dumbbells together during a set of hex pressing may increase power output during a subsequent set of presses via a phenomenon called post-activation potentiation. (14) This effect may be especially appealing for athletes and lifters training to be more athletic.
As Part of a Giant Set
A giant set is an intensification technique consisting of four or more exercises in series without rest between. Like supersets, the exercises used giant sets can target non-competing muscle groups or identical muscles.
When all four exercises in the giant set target the same muscles, they’ve been shown to produce similar hypertrophy to supersets and traditional sets that used 90 second rest intervals. (15) But here’s the kicker — giant sets take less time than supersets and traditional sets.
The hex press requires simple equipment, minimal setup, and compliments many different giant set configurations. Here’s a sample giant set:
Take no rest between individual exercises. Switch dumbbells if necessary and immediately begin the next lift. Rest 60-90 seconds between giant sets.
Hex Press Variations
Looking for other effective and shoulder-friendly ways to train the chest? Depending on your preferences and available equipment, you might choose one of the following variations:
Single-Arm Dumbbell Floor Press
The dumbbell floor press can be a great exercise for learning and training horizontal pressing movements. Compared to the basic dumbbell bench press, the floor press limits shoulder extension, as the upper arms will be stopped by the ground. The shoulder extension range of motion of the floor press is similar to the hex press, meaning it is likely to minimize stress on the front of the shoulder, as discussed in the Benefits section, above.
One major drawback of the dumbbell floor press, however, is that it is usually limited to light dumbbells due to difficult setup. Performing the floor press one arm at a time (“unilaterally”) helps to minimize this problem.
Perform the single-arm dumbbell floor press lying on your back, either with your feet flat on the floor or your legs extended out in front of you. Begin the press with a single dumbbell held at the side of your chest and your upper arm resting on the floor. Keep your shoulder blades pinned to the floor as you drive the dumbbell toward the ceiling and lower with control.
Incline Hex Press
Limited research suggests the incline bench press may provide greater gains in upper chest, or clavicular head pectoralis major, muscle thickness compared to the flat bench press. (8)(16)
Although we must be cautious extrapolating these findings to the hex press, lifters wishing to build their upper chest might consider the incline version of the exercise. The incline hex press is performed just like the hex press, except an incline bench or adjustable bench set to approximately 45-degrees is used.
Hex Press to Flye Press Combo
A potential shortcoming of the hex press is the inability to expose the chest to training at long muscle lengths (e.g. “under stretch”). Enter the flye press. The traditional flye press involves pressing to lockout and then allowing the dumbbells to spread apart in a “flye-like” motion during the downward movement phase, thereby training pectoralis major at long muscle lengths during the eccentric (lowering phase).
For the hex press to flye press combo, get the benefits of the “squeeze” by performing the upward movement phase like a hex press and lowering the weights like a flye. Be sure to use lighter dumbbells than usual for this movement, as the eccentric flye is extremely challenging.
Medicine Ball Push-up
While this final variation isn’t a dumbbell press at all, push-up variations are criminally underrated. They can be done nearly anywhere. Better yet, push-ups increase strength and muscle mass similarly to the bench press. (17)
Performing push-ups with your hands on either side of a medicine ball requires isometric horizontal adduction of the shoulders similar to the hex press, while training through a similar pressing range of motion. Try the medicine ball squeeze push-up as a hex press alternative when dumbbells are scarce, when you want to change-up in the feel of your chest training, or when traditional push-ups become too easy.
FAQs
“Will the hex press build my ‘inner chest’?”
In bodybuilding speak, the “inner chest” refers to the fibers of pectoralis major that attach to the sternum. Specifically, those interested in building their inner chest are likely most concerned with the proximal or most central portions of those fibers. Anyone who performs the hex press properly will tell you they feel a strong contraction of this portion of the pectoralis major. Although no studies have directly tested the hex press, let alone measured its long-term effects on chest muscle thickness, there is a case to be made for its use as an inner-chest builder. Narrow-grip pressing tends to show lower muscular activity of the sternal part of pectoralis major compared to traditional or wide-grip pressing. (18) Although the arm path of the hex press resembles a narrow-grip or close-grip press, hex pressing involves the additional task of keeping the dumbbells squeezed together. Therefore, it’s safe to assume the “squeeze” enhances sternal pectoralis major contraction, a feat lifters may be unable to accomplish during the traditional bench press. (19)
“My gym doesn’t have ‘hex’ dumbbells. Can I use roundhead dumbbells for the hex press?”
Although metal or rubber hexagonal-shaped dumbbells are common, many gyms have round or “pro style” dumbbells. The hex press can be performed with round dumbbells, as demonstrated in the video at the beginning of the article. However, it is more challenging. Round dumbbells demand more precise application of inward pressure to avoid movement between the dumbbells.
“Why not just do pec flyes?”
That’s an option. Both exercises train pectoralis major, anterior deltoid, and company. But pec flyes are a single-joint exercise and fail to hit the triceps brachii, which does receive a training stimulus during the hex press. Machine pec flyes and cable crossovers can also be more taxing on the shoulders, especially among lifters with functional anterior instability from a previous injury or cumulative trauma. This pathology is discussed in detail in the Benefits section.
“Can you explain more about why hex press is thought to be ‘shoulder-friendly’?”
The radius of the dumbbells gives the effect of a board press, which limits pressing range of motion. Specifically, shoulder extension is limited. Individuals with certain shoulder injuries, such as functional anterior instability, may not tolerate loaded shoulder extension. Hence, the hex press may be a suitable option. Diving deeper, functional anterior instability is thought to be related to decreased activity of subscapularis — a muscle of the rotator cuff. (4) Squeezing the dumbbells together at the bottom of the hex press elicits strong contraction of the subscapularis. This feature might improve tolerance to exercise or help address subscapularis insufficiency. Generally, hex pressing tends to be better tolerated than pec flyes and traditional bench press variations by those with banged up shoulders. Again, go see a qualified sports medicine practitioner if you’re dealing with a shoulder injury.
Build a Magnum Chest with the Champagne Press
The hex press is performed by aggressively squeezing dumbbells together throughout a neutral-grip dumbbell bench press. The squeeze engages greater portions of your pecs, which may lead to accelerated chest gains. The hex press also reinforces important elements of pressing technique, spares sore shoulders from loaded hyperextension, and creates co-contraction conducive to joint stability. Savor the squeeze and celebrate the hex press.
References
Haff, G. G., & Triplett, N. T. (Eds.). (2015). Essentials of Strength Training and Conditioning 4th ed. Human Kinetics. Champagne, IL, USA. 351-408.
Kompf, J., & Arandjelović, O. (2017). The sticking point in the bench press, the squat, and the deadlift: Similarities and differences, and their significance for research and practice. Sports Medicine, 47, 631-640.
Schoenfeld, B. J., et al. (2018). Differential effects of attentional focus strategies during long-term resistance training. European Journal of Sport Science, 18(5), 705-712.
Moroder, P., et al. (2020). Characteristics of functional shoulder instability. Journal of Shoulder and Elbow Surgery, 29(1), 68-78.
Kolber, M. J., et al. (2010). Shoulder injuries attributed to resistance training: a brief review. The Journal of Strength & Conditioning Research, 24(6), 1696-1704.
Kolber, M. J., Corrao, M., & Hanney, W. J. (2013). Characteristics of anterior shoulder instability and hyperlaxity in the weight-training population. The Journal of Strength & Conditioning Research, 27(5), 1333-1339.
Ackland, D. C., et al. (2008). Moment arms of the muscles crossing the anatomical shoulder. Journal of Anatomy, 213(4), 383-390.
dos Santos Albarello, et al. (2022). Non-uniform excitation of pectoralis major induced by changes in bench press inclination leads to uneven variations in the cross-sectional area measured by panoramic ultrasonography. Journal of Electromyography and Kinesiology, 67, 102722
Ackland, D. C., & Pandy, M. G. (2011). Moment arms of the shoulder muscles during axial rotation. Journal of Orthopaedic Research, 29(5), 658-667.
Wattanaprakornkul, D., et al. (2011). Direction-specific recruitment of rotator cuff muscles during bench press and row. Journal of Electromyography and Kinesiology, 21(6), 1041-1049.
Schoenfeld, B., et al. (2021). Resistance training recommendations to maximize muscle hypertrophy in an athletic population: Position stand of the IUSCA. International Journal of Strength and Conditioning, 1(1), 1-30.
Lasevicius, T., et al. (2018). Effects of different intensities of resistance training with equated volume load on muscle strength and hypertrophy. European Journal of Sport Science, 18(6), 772-780
Weakley, J., et al. (2023). Physiological Responses and Adaptations to Lower Load Resistance Training: Implications for Health and Performance. Sports Medicine-Open, 9(1), 1-10.
Esformes, J. I., et al. (2011). Effect of different types of conditioning contraction on upper body postactivation potentiation. The Journal of Strength & Conditioning Research, 25(1), 143-148.
Demirtaş, B., et al. (2022). The effect of three different sets method used in resistance training on hypertrophy and maximal strength changes. Physical Education of Students, 26(6), 270-279.
Chaves, S. F., et al. (2020). Effects of horizontal and incline bench press on neuromuscular adaptations in untrained young men. International Journal of Exercise Science, 13(6), 859.
Kikuchi, N., & Nakazato, K. (2017). Low-load bench press and push-up induce similar muscle hypertrophy and strength gain. Journal of Exercise Science & Fitness, 15(1), 37-42.
López-Vivancos, A., et al. (2023). Electromyographic Activity of the Pectoralis Major Muscle during Traditional Bench Press and Other Variants of Pectoral Exercises: A Systematic Review and Meta-Analysis. Applied Sciences, 13(8), 5203.
Paoli, A., et al. (2019). Mind-muscle connection: effects of verbal instructions on muscle activity during bench press exercise. European Journal of Translational Myology, 29(2).
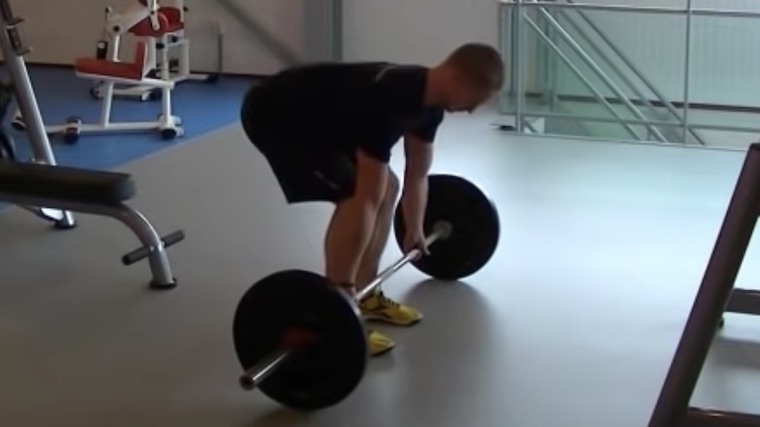
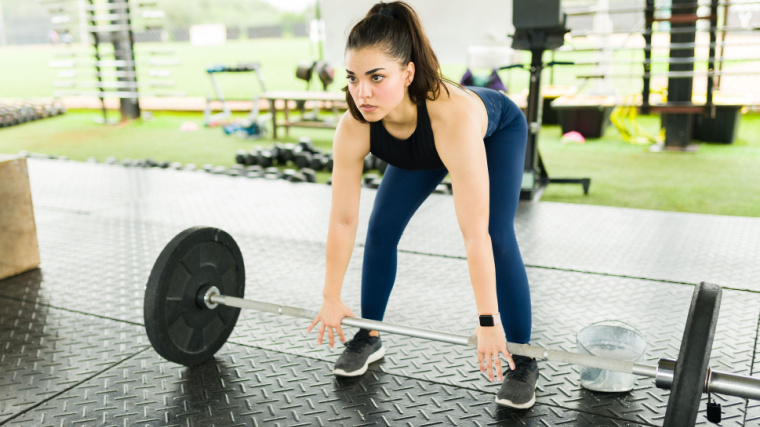
How do you develop killer lats? First, you need to do lat pulldowns. Then you need to do pull-ups. After you’re done with that, try some rows, and then finish off with some pullovers. Or… you could just perform the reverse-grip bent-over row and get nearly the same results as combining a series of back-focused exercises.
Credit: lunamarina / Shutterstock
Efficient programming and exercise choice can drastically improve the quality of your back workouts. Follow these steps to learn how to perform the reverse-grip bent-over row, and how you should incorporate it into your routine to make the most out of your back day.
How to Do the Reverse-Grip Bent-Over Row Step By Step
Approaching the reverse-grip bent-over row for the first time doesn’t need to be an intimidating experience. Follow these steps for a picture-perfect lift.
Step 1 — Setting Up
Credit: Rocher Möllenkamp / YouTube
When you initially approach the bar, setting up for the reverse-grip bent-over row feels a bit like setting up for a deadlift. With the barbell over your midfoot, grab the bar slightly outside shoulder-width, using a double-underhand (supinated) grip — this is the “reverse grip” compared to the double-overhand (pronated) grip of the standard barbell row.
Brace your core, keep your spine neutral (not rounded or excessively arched), and drive through your feet to lift the weight off the floor.
Form Tip: Experiment with your grip width to see what results in feeling the highest degree of lat (back) activation. Most likely, setting up with your grip just past shoulder width apart will yield the best results.But depending on your limb and torso length, you may feel more comfortable slightly closer or wider.
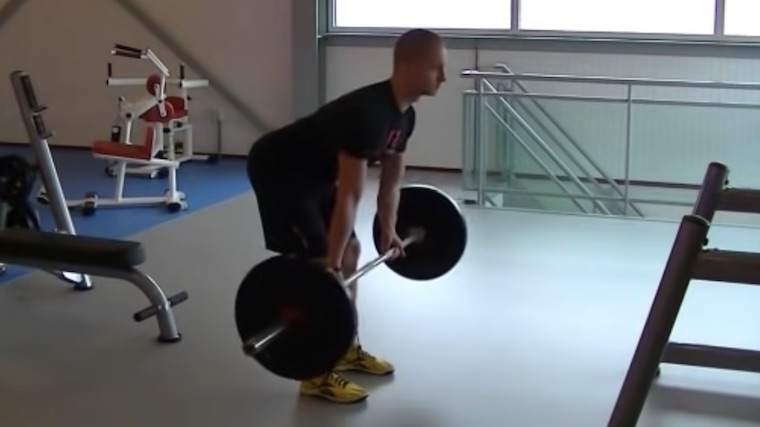
Step 2 — Find Your Trunk Angle and Brace Your Core
Credit: Rocher Möllenkamp / YouTube
Hinge forward at your hips and stop when your trunk is pitched at roughly a 45-degree angle. Bend your knees slightly and maintain that angle throughout the movement. Keep your arms straight and allow the barbell to shift slightly forward. Take a deep breath and brace your core as you prepare to perform the row.
Form Tip: Consistency is key. Keep your arms at a dead-hang while you set up. This will reinforce the position you want to hold at the beginning and end of each rep.
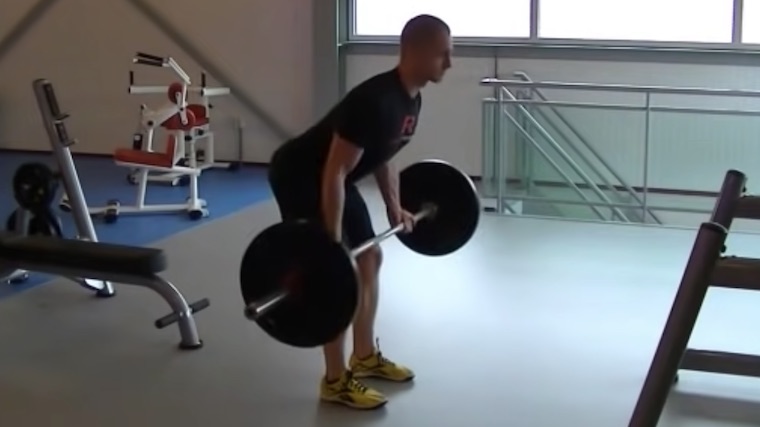
Step 3 — Pull From Your Elbows
Credit: Rocher Möllenkamp / YouTube
Squeeze and depress your scapula (pull your shoulder blades together and “down” toward your tailbone), then pull your elbows back. As you lift the weight, consciously engage your back muscles before you contract your biceps.
Continue pulling the weight toward your trunk until the barbell makes contact with your torso. To specifically target your lats rather than your upper back muscles, make the bar contact closer to your belly button than your sternum.
Form Tip: Don’t be concerned if your bar path isn’t a perfectly straight line. Pulling towards your belly button may feel awkward at first, but you should quickly notice increased lat activation when lifting this way.
Step 4 — Lower the Weight
Credit: Rocher Möllenkamp / YouTube
Squeeze your back muscles at the top of the lift and consider holding the weight there for a moment. Keeping your back flat and your core tight, lower the weight back to the stretched position until your arms are fully extended.
Maintain the forward hinge position throughout the entire set. To perform the next repetition, pull the barbell toward your belly button again.
Form Tip: Keep the movement relatively slow and controlled. This helps to avoid using momentum from one repetition to another to lift the weight.
Reverse-Grip Bent-Over Row Mistakes to Avoid
If you have a passing familiarity with the traditional bent-over row, or hinge movements as a whole, you could probably jump right into using the reverse-grip bent-over row to build your back and biceps without thinking too hard about form. Nevertheless, slipshod technique could mean you’re leaving gains on the table, or even putting yourself at an increased risk of injury.
Setting Up With a High Torso Angle
Either tight hips and hamstrings, a weak core, or a combination of the two could make it difficult for you to hold your trunk at a 45-degree angle across an entire set of rows. As a result, you could end up performing more of an upright row than you intend.
Credit: SOK Studio / Shutterstock
Setting up with a higher torso angle can result in increased muscular activation in your trapezius and your rhomboids, which means less isolation for your lats.
Avoid it: When you setup to perform the row, be sure to hinge forward and shoot your hips back to create a strong pulling position. Add hinge movements like the deadlift, Romanian deadlift, and the good morning into your training plan to develop greater levels of strength, balance, and mobility. This will help you build the strength needed to maintain the angle in your torso for your entire set.
Lower Back Rounding
For your spinal health and your longevity in the gym, for goodness sake, keep a flat back whenever you perform hinge movements like the row. While lower back rounding may be the result of a lack of mobility, you could also experience this just by going too heavy.
Credit: Gabriel Sey / YouTube
Avoid it: If you find your lower back rounding while you perform the reverse-grip bent-over row, set your ego aside. Either practice hinge movements until you’re capable of maintaining an isometric hinge or reduce the weights significantly and start over.
Engaging Your Biceps First
Since your biceps are a wrist supinator — responsible for turning your hand into a palm-up position — they engage the moment you “reverse” your grip on a bent-over row. In addition to being a secondary mover to perform the exercise, they also stabilize your elbow.
Credit: MercolaPeakFitness / YouTube
But your biceps should not be the primary mover in the reverse-grip bent-over row. That job falls to your lats, and trying to use your biceps to lift heavy loads meant for your lats might not end well for the much smaller biceps muscle.
Avoid it: Consciously think about pulling your shoulders back to engage your back muscles before pulling with your elbows. Don’t try to curl the bar to move the weight.
Utilizing Momentum From Rep to Rep
If you fail to maintain a consistent angle in your torso across each repetition, you might be generating momentum with your hips that decreases the load on your lats and biceps. This can be a sign of going too heavy, but you might also be doing this for ego lifting or simply because you’re not paying attention.
Credit: Maui Athletics / YouTube
Avoid it: If the weight is too heavy for you to keep under control, lower it. Otherwise, consider focusing on the eccentric (lowering) portion of the lift to guarantee you keep the weight moving in a slow and controlled fashion to prevent momentum from building.
How to Progress the Reverse-Grip Bent-Over Row
If you have trouble performing the reverse-grip bent-over row right off the bat, here’s how you can approach it as a beginner and how to increase the difficulty as you continue to get stronger and progress in the gym.
Yates Row
The Yates row is the cousin of the reverse-grip bent-over row, the difference between the two being the angle of your torso. While you perform a reverse-grip bent-over row with your torso at roughly a 45-degree angle, the Yates row is performed from a more upright position.
The resulting lift targets your rhomboids and your traps in addition to your lats and biceps. It may not be as good of a lat builder, but it makes up for it by hitting your entire back. What was a “mistake” for the reverse-grip row can be used deliberately for a strategic purpose.
As you develop strength performing the Yates Row, you can slowly transition towards the reverse-grip bent-over row by experimenting with your torso angle. Sinking deeper into the hinge position will let you feel your lats working harder as you get closer to the 45-degree angle.
Add Isometric Holds or Timed Eccentrics
At a certain point, implementing basic linear progression — adding more repetitions or more weight — stops being as useful for lifts like the reverse-grip bent-over row. Rather than continuously increasing the load on the bar, which can eventually create a higher risk than reward and may decrease stress on the target muscle, you can add isometric holds or timed eccentrics.
With isometrics, squeeze your back and shoulders at the top of each repetition for one, two, or even three seconds while the bar is in contact with your abdomen. For timed eccentrics, focus on making the negative (lowering) phase of each rep take two, three, or four full seconds. This can help to maximize your gains and develop your mind-muscle connection.
Reverse-Grip Pendlay Row
If you’re looking to add an extra level of difficulty, swap out the reverse-grip bent-over row for a reverse-grip pendlay row. Since each rep starts and finishes on the ground, there’s no way for you to build momentum from rep to rep, which makes it a great lift to isolate your muscles and focus on pure pulling strength.
The reverse-grip pendlay row requires more hamstring flexibility than the reverse-grip bent-over row, because you’re in a steep forward-leaning position. However, it’s relatively easier on your core and lower back since you don’t have to hold an isometric hinge for the duration of your set.
Benefits of the Reverse-Grip Bent-Over Row
When you step into the gym, you come face-to-face with a wide range of tools and movements that you can use to sculpt your biceps and your lats. Here are some of the unique benefits of the reverse-grip bent-over row that make it worth adding to your routine.
Increased Lat Activation
Switching from a pronated grip to a supinated grip puts your arms and shoulders into a different position and changes the pulling angle, which is why it’s easier to draw the weight closer to your belly button than your sternum. This results in increased lat activation when compared to the traditional bent-over row.
Additionally, your rhomboids and traps play much less of a role in the reverse-grip bent-over row than they do when you perform the lift with an overhand grip.
Improved Balance and Core Strength
Holding an isometric hinge isn’t easy. Your core muscles work overtime to maintain a consistent angle under heavy loads. Simultaneously, your hamstrings stay active and engaged at a lengthened position, which can help build strength in your posterior chain while also improving your overall mobility.
Unparalleled Rowing Strength
The reverse-grip bent-over row cuts down on a number of variables and limiting factors posed by many other row variations. Generally speaking, you can lift heavier loads with a barbell than you can with a dumbbell.
Flipping your grip from overhand to underhand means your grip strength won’t hold you back as you increase loads over time because your wrists and forearms are in a stronger position. Finally, range of motion tends to be more efficient than with a traditional bent-over row, since you have improved leverage when tracking the bar closer to your center of gravity.
When you put all these factors together, what you get is a lift that lets you lift heavy weights with your lats, without so many of the variables that get in the way when performing other types of rows.
Muscles Worked by the Reverse-Grip Bent-Over Row
As a compound exercise, the reverse-grip bent-over row targets muscles across numerous joints. Here’s a list of the largest muscle groups worked by the lift.
Latissimus Dorsi
With some back exercises, you feel “your back” working. That’s not the case with the reverse-grip bent-over row. When performed correctly, you should be able to feel and, later specifically target, your lats in particular.
Your lats are the biggest muscle group in your upper body — running along each side of the back half of your torso. Your lats are also the primary muscle group working in the reverse-grip bent-over row. A rock-solid pair of lats make your upper body and shoulders appear broader and your waist look more narrow in comparison, which makes them an important part of developing an aesthetic physique.
Biceps
As secondary movers — muscles which assist the primary target muscles during a given exercise — your biceps and your brachialis muscles play two separate roles during the reverse-grip bent-over row. Since your biceps are a wrist supinator, they get direct stimulation to maintain the palm-up position during the lift. More importantly, they’re responsible for stabilizing your elbow during flexion to support the joint as the muscle contracts.
Abdominals
With a barbell held out in front of you and your torso held in an isometric hinge, your abs provide the strength and stability necessary to keep you from buckling over while performing the reverse-grip bent-over row. Especially as you get to heavier loads, you’ll find that your core plays a crucial role — keeping your torso held at the desired angle and stabilizing your spine to prevent rounding.
Hamstrings
As with any hinge movement, the reverse-grip bent-over row provides stimulus to your hamstrings. By developing strength in the fully lengthened (stretched) position, the exercise promotes muscular balance and flexibility in your hamstrings.
How to Program the Reverse-Grip Bent-Over Row
Building an effective training routine can be challenging. When you’re in the gym, you want to make the most of your time and energy to maximize your gains. If you’re not sure how to incorporate the reverse-grip bent-over row into your workout plan, here are a few options that you might consider.
As an Accessory for the Deadlift
For powerlifters, who specialize in performing the squat, bench press, and deadlift, finding efficient compound (multi-joint) exercises that complement your primary lifts can be a bit of a chore or simply confusing. The reverse-grip bent-over row builds strong lats while performing an isometric hinge, which can improve both strength and mobility across your posterior chain.
Following the deadlift, consider incorporating three to five sets of six reps, using a weight that lets you keep your torso angle solid across the length of the set.
As a Main Movement For Bodybuilders
In the interest of both exercise economy, and the hormonal response that compound movements provide, many bodybuilders prefer to start their workouts with heavy compound exercises before they get to their isolation movements. (1)(2) When you’re carving a statue from stone, use the dynamite before you get started with the hammer and chisel.
If your training split has a back and biceps day, the reverse-grip bent-over row lets you isolate your lats and warm-up your biceps, while also stimulating a hormonal response which may support muscle growth. Early in your workout, hit at least three sets of eight, focusing on the eccentric portion of the lift to maximize your hypertrophy gains. (3)
As a High Volume Accessory Lift
If you spend a significant amount of time in a squat rack or on a weight platform, adding the reverse-grip bent-over row as an accessory after the classic bent-over row can be as much about convenience as anything else. All you have to do is flip your wrists around and you have a lift that lets you engage and isolate your lats while also dialing in your rowing technique after the related muscles are thoroughly warmed up and pre-trained.
If you want to implement the reverse-grip bent-over row as a high volume accessory movement, consider performing three sets of 15 following other row variations.
Reverse-Grip Bent-Over Row Variations
Maybe you don’t have access to a barbell. Maybe you’re dealing with nagging shoulder or back pain. Maybe you just want to mix things up. Regardless of your reasons, here are a few different lifts that let you target your back like the reverse-grip bent-over row.
Seal Row
As with all chest-supported rows, the seal row provides unique stimulus by preventing you from developing momentum or engaging your hips. Unlike other chest-supported rows, you perform the seal row by lying face down on a flat bench.
The resulting lift can target your lats and your rhomboids without having to concern yourself with keeping a flat back. The full bench support also removes strain from the lower back and makes it virtually impossible to move the weight using momentum.
Single-Arm Dumbbell Row
Single-arm dumbbell rows are a relatively easy-to-learn introductory lift that keeps paying dividends as you grow in the gym. To get started, just kneel on a bench and row.
The single-arm row provides some advantages over barbell rows. Kneeling on a bench limits the amount of stress on your spine. Since the lift is performed one side at a time, you can isolate your lats and correct any muscular imbalances that may develop if you tend to exclusively use barbell row variations.
Inverted Row
Advanced pull-ups aren’t the only way to utilize your body weight for back-building. Inverted rows can be performed in a number of different ways — whether that be with suspension straps, on a Smith machine, a barbell set in a power rack, or any other stable surface that lets you get under it, and keeping your body in a straight line, pulling upwards.
To modulate the level of difficulty, simply increase or decrease the angle of your body relative to the floor. Either elevate your feet (for increased difficulty) or create a steep angle with an elevated upper body (to decrease the challenge).
FAQs
Should I perform the reverse-grip bent-over row instead of the bent-over row?
If you’re specifically interested in targeting your lats, the reverse-grip bent-over row would be a good addition to your routine. It isn’t necessarily a replacement for the bent-over row which, in addition to targeting your lats, also hits your rhomboids and helps develop grip strength.
Why am I feeling my biceps more than my back while performing the reverse-grip bent-over row?
If you feel your biceps more than your back during the reverse-grip bent-over row, you’re probably leading with your arms. Think about squeezing your back and shoulder muscles before pulling with your elbows.
What should I do if my mobility keeps me from performing the reverse-grip bent-over row?
No lift is strictly necessary to get a good workout, but improving your mobility can be a crucial part of joint health and longevity in the gym. Consider incorporating movements that both strengthen your posterior chain and improve your mobility into your routine. Some examples of these include Romanian deadlifts and good mornings.
References
Vingren JL, Kraemer WJ, Ratamess NA, Anderson JM, Volek JS, Maresh CM. Testosterone physiology in resistance exercise and training: the up-stream regulatory elements. Sports Med. 2010 Dec 1;40(12):1037-53. doi: 10.2165/11536910-000000000-00000. PMID: 21058750.
Shaner AA, Vingren JL, Hatfield DL, Budnar RG Jr, Duplanty AA, Hill DW. The acute hormonal response to free weight and machine weight resistance exercise. J Strength Cond Res. 2014 Apr;28(4):1032-40. doi: 10.1519/JSC.0000000000000317. PMID: 24276305.
Hody S, Croisier JL, Bury T, Rogister B, Leprince P. Eccentric Muscle Contractions: Risks and Benefits. Front Physiol. 2019 May 3;10:536. doi: 10.3389/fphys.2019.00536. PMID: 31130877; PMCID: PMC6510035.
Some lifters will only consider training their abs with high-repetition bodyweight exercises. If they do add resistance, it’s often with exercises performed on highly stabilized machines, excessively heavy movements with compromised technique, or basic cable crunch variations that don’t allow the abs to perform as efficiently as possible. That’s when it’s time to head into the cable station and hit your core with something new.
Credit: Balance In Motion / YouTube
The half-kneeling Pallof press is a challenging, progressive core exercise derived from the basic standing Pallof press. The unique ground-based position challenges different musculature on both sides of your body while coordinating your torso, core, and legs with different tasks.
Here’s a review of all the elements you need to know about building total-body stability and core strength with the half-kneeling Pallof press.
Half-Kneeling Pallof Press
Half-Kneeling Pallof Press Video Demonstration
Author James Shapiro explains the half-kneeling Pallof press and offers in-depth guidance for exercise technique, common mistakes, as well as several simple and effective ways to adjust the exercise.
How to Do the Half-Kneeling Pallof Press Step By Step
Following these detailed instructions to position yourself up for the half-kneeling Pallof Press will optimize your results. You will need a cable pulley system or a long resistance band with an anchor point that will not move, such as a squat rack.
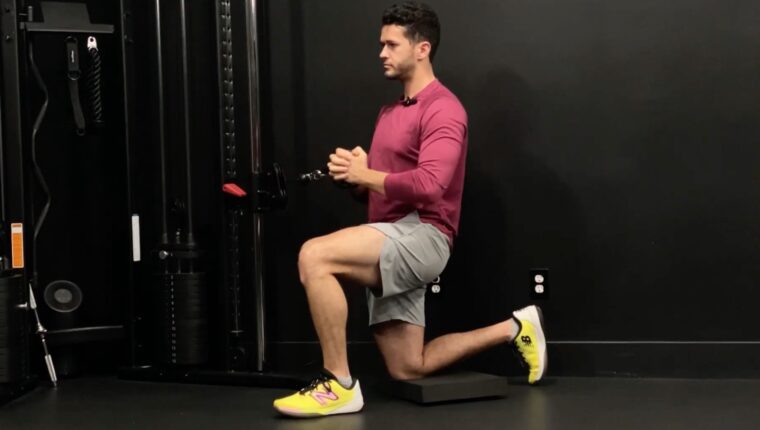
Step 1 — Set Up Your Equipment and Position
Credit: James Shapiro Performance / YouTube
Being relatively comfortable is a priority since you’re in a half-kneeling (one-knee down) position Use a pad to cushion your knee if you don’t like the surface you are kneeling on. Set the pulley or band height so that the resistance runs in-line with your sternum — above your hips and under your chest — when you’re in the kneeling position.
Stand sideways to the cable and assume a half-kneeling position with the foot of your outside leg flat on the ground and the knee, shin, and toes of your inside leg on the ground. Your outside leg should have a roughly 90-degree angle relative to your hip and knee. Set the heel of your outside leg directly underneath the same side knee and set the knee of your inside leg underneath your hip.
Form Tip: Tucking the toes of your inside leg down (aiming your shoelaces to the ground) will add an extra level of lower-body bracing and activation. If you keep that foot pointed up on its toes, you might experience less hip stabilization and glute activation.
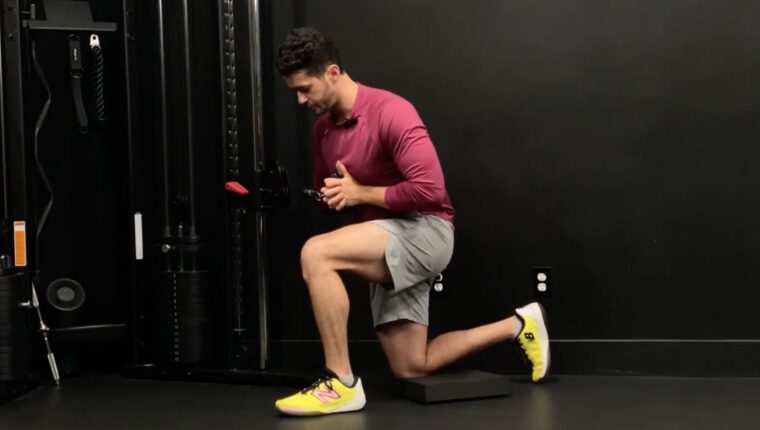
Step 2 — Brace with the Weight
Credit: James Shapiro Performance / YouTube
Grab the cable or band with both hands and interlock your fingers. Slowly pull the handle to the center of your sternum. With your lower body in position, drive your shoulders down pull your elbows to your sides to brace your total-body position before initiating the movement.
Keep your outside leg strong by engaging your glutes and activating your shoulders prior to the press. You should be able to maintain these key positions throughout the entire exercise.
Form Tip: The half-kneeling Pallof press is not an evenly distributed movement toward the body. The rotational forces being applied by the resistance are biased more toward the side closest to the band’s anchor point. This means you need to work even harder with the side farthest from the anchor point (the outside half of your body) to stay in line and balanced. This is also why it’s essential to perform reps equally on both the left and right sides.
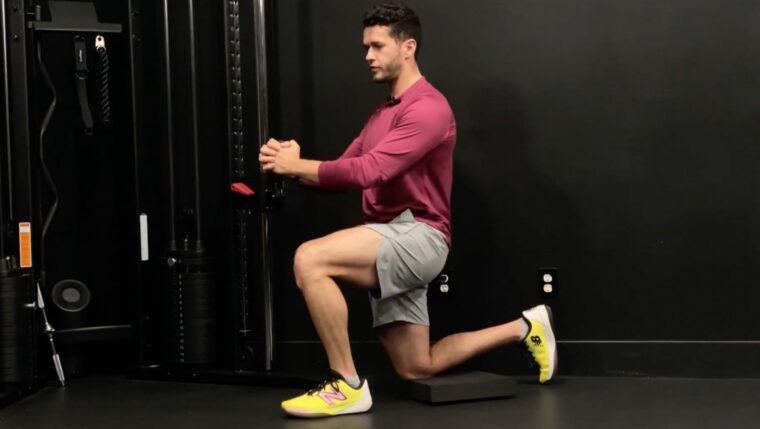
Step 3 — Press and Pause
Credit: James Shapiro Performance / YouTube
Keep your lower body stable as you press your hands in a straight line, from the center of your sternum, away from your body until your arms are locked out. Pause briefly in the locked out position.
This is the hardest point of the movement — when your arms are farthest away from your body. The greatest amount of anti-rotation occurs when the arms are extended and the hands are the furthest point away from the sternum. Pausing in the arms-locked position will maximize tension through your core.
Form Tip: Do not try to exceed the muscular stress your body can maintain. If you start to feel that you’re shifting away from pressing in a straight line as your arms extend, do not go further just to get “more” out of the exercise. At that point, it’s likely you’ve lost some of your initial brace and need to return to the starting position. If necessary, stop before lockout to maintain position.
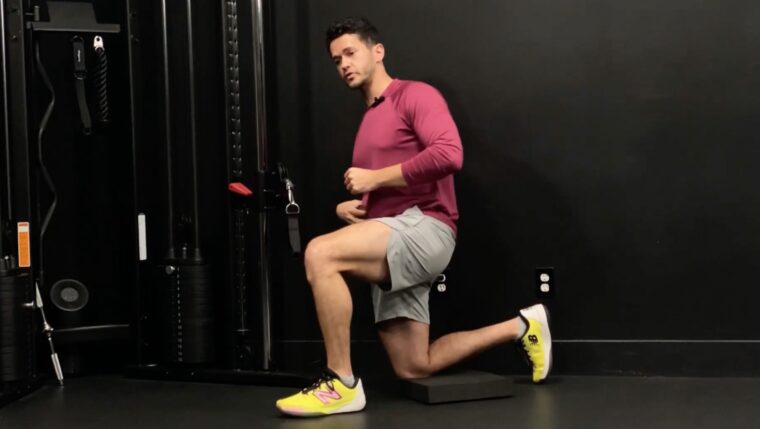
Step 4 — Return to the Starting Position
Credit: James Shapiro Performance / YouTube
Bring your hands back to your sternum in a controlled manner. Repeat steps two through four — brace, press and pause, return — for your intended repetition scheme before carefully returning the weight back to the anchor point.
Form Tip: There is no need to speed through the half-kneeling Pallof press. With a reduced and lowered base of support, plus a greater emphasis on core control, you need to be careful and deliberate with each individual repetition. Focus on quality movements instead of piling up a quantity of repetitions.
Half-Kneeling Pallof Press Mistakes to Avoid
A successful half-kneeling Pallof press requires a lot of moving parts and internal communication. Steer clear of these common mistakes to maximize your performance and results.
Leaning Too Far Forward or Backward
One common issue with half-kneeling positions is that people sometimes have a hard time understanding what a “neutral hip position” actually is. Either their torso leans too far forward because their lower body is positioned wrong or they lean back too much “for balance” and create too much extension through their low back.
Credit: James Shapiro Performance / YouTube
Avoid it: Think about keeping your upper body as tall as possible when entering the half-kneeling Pallof press. When you look down, you should see your hips are under your shoulders and above the knee of your lower leg. If you start to see an angle form between your torso and front thigh, you’re likely pushing your hips back.
Allowing Your Outside Knee To Collapse
Your outside knee might experience some movement during the pressing motion as your core is activated and your body fights against the resistance, however your knee can actually be the last place a lot of people focus on.
Credit: James Shapiro Performance / YouTube
If your outside knee collapses inward toward the weight, it is demonstrating a lack of coordination from your glutes and obliques. Loss of coordination and strength from the internal obliques on the outside portion of your body can lead to more torso rotation toward the inside leg.
Avoid it: Be attentive to not push your knee out excessively. Having your inside-leg toes tucked under and engaging your glutes will help your outside leg maintain stability. An additional cue is to focus on how much ground pressure you are developing — feel power coming up from your outside foot. Pushing through the big toe of your outside leg can keep your hips and ankle in more efficient alignment.
Having Your Arms Fall “Off-Center”
Finding an imaginary line on the floor or focusing on a spot on the wall may initially be hard, but it’s possible when you don’t have any tangible landmarks to aim for while pressing away from your chest.
Credit: James Shapiro Performance / YouTube
Once you’ve picked a target, your arms should not be moving excessively “off-center”. If they do, it indicates you have either lost the brace position or you’re using too much resistance. Being in a half-kneeling position only amplifies either of these two common faults because your stability is challenged that much more.
Avoid it: You can either reduce the resistance, which should allow you more overall control, or you can slightly reduce the range of motion to a stay in a more easily controlled position. The half-kneeling position is a very demanding variation for any movement let alone an anti-rotation core movement.
Hips Falling To The Side
Poor oblique control paired with a lack of adductor (inner thigh) activation from your outside leg will lead you to have your hips falling to the side. Some of the functions of your obliques (side abs) include rotation, flexion, and lateral flexion — performing those movements as well as resisting them.
Credit: James Shapiro Performance / YouTube
As you press forward, you may notice your hips potentially falling to the inside if you’re not strongly stabilizing the adductors of your outside leg.
Avoid it: Imagine you’re slightly crunching your obliques prior to your brace and press — just imagine, don’t actively crunch sideways. With your obliques and core fully engaged prior to pressing, you can expect little-to-no movement at your hips.
How to Progress the Half-Kneeling Pallof Press
Progressing through the half-kneeling Pallof press comes in a variety of ways. Using a band or cable pulley system can be a preference or a factor of accessibility depending on your available equipment. When the basic half-kneeling Pallof press becomes mundane or “easy,” challenge yourself with these small adjustments.
Pause Repetitions
Changing your tempo (speed of movement) is one of the best initial ways to progress a standard half-kneeling Pallof press, outside of changing your sets and reps. You can challenge your core with a longer pause in the lockout position before returning your hands to your sternum. You can also add multiple pauses for a second or less at specific points throughout the range of motion to make each repetition longer, creating more time under tension.
Increasing Repetitions Performed
Performing any anti-rotation exercise depends on the strength and endurance of your entire core musculature working together. Increasing the number of repetitions performed puts a strain on your core and challenges your local and overall muscular endurance. Making small incremental jumps in repetitions will also increase the amount of time worked and is a form of linear progression.
Benefits of the Half-Kneeling Pallof Press
The list of benefits the half-kneeling Pallof press holds may persuade you to add it into your workouts even if it may not look like the most interesting exercise. The research and evidence demonstrate the effectiveness of this exercise for relieving pain, supporting strength development, and improving sport performance. (8)
Reducing Lower Back Pain
One of the primary sources of work absence and disability is lower back pain (LBP). (1) With sedentary lifestyles, bad ergonomics, and poor posture, it shocking to see that more than 50% of people in the United States are affected by lower back pain that can lead to physical therapy or disability. (12)
By using the half-kneeling Pallof press to train the muscles responsible for improving the stability and endurance of your lumbar spine and hips, you can either reduce, eliminate, or prevent pain and discomfort in your lower back.
Increasing Your Strength
Performing compound (multi-joint) exercises like squats, lunges, deadlifts, overhead pressing, and bench press requires minimal movement where there should be stiffness. Many hear the word “stiffness” in a gym setting and attach a negative connotation. However, in places where there should be stiffness — such as your low back and spine — stiffness can simply mean wanting to be as stable as possible.
Credit: Jasminko Ibrakovic / Shutterstock
The effects of abdominal bracing have been shown to increase the strength and power of trunk and hip extension. (10) A core program that includes the half-kneeling Pallof press can stimulate intra-abdominal pressure, which helps to create that much-needed stability, and results in improved force output.
Sport Performance Improvements
Athletes who play sports are going to be rotating through their spine to generate force when they change direction, move sideways, jump, throw, or swing. Having the ability to generate core stiffness in certain athletic positions can also lead to great force application and prevent “energy leaks” (losses of strength and power) from occurring when attempting athletic movements. (5)(9)
Athletes who engage in core training with exercises like the half-kneeling Pallof press may see improvements in their athletic skill, agility, and power while maintaining a healthy spine. (2)(4)
Muscles Worked by the Half-Kneeling Pallof Press
Even though it has the word “press” in the exercise name, the half-kneeling Pallof press does not fall under traditional pressing exercises which would train your chest or shoulders. The press portion of the exercise is used to increase the lever arm and more strongly challenge your core stabilizers. You’re not actively lifting the weight during the pressing movement, so your chest and shoulders are not significantly recruited.
This means the muscles in your hips, core, and a few intrinsic muscles of your back get utilized a lot more than muscles of the shoulders, pecs, and triceps.
Obliques and Transverse Abdominis
Your internal and external obliques — found on each side of your abdominal wall — maintain abdominal tension, increase intra-abdominal pressure, and coordinate to rotate your trunk.
Credit: MDV Edwards / Shutterstock
This buildup of intra-abdominal pressure reinforces the transverse abdominis (your “primary” abdominal muscle) to stabilize your spine and pelvis. (6) Coordination between all of these muscles help to keep your spine and trunk stable and relatively stationary during he half-kneeling Pallof press as you press with your hands away from your body. (11)
Hip Musculature
In the half-kneeling position, your hips work isometrically to activate and integrate your core muscles. Your hamstrings and glutes are firing to maintain hip extension on your inside leg while holding a neutral hip position. Your outside leg has the TFL (tensor fasciae latae, a hip muscle) to assist the leg in hip flexion. Your inside leg is relying on a neutral position that counteracts the hip flexion of the outside leg. These muscles work in concert to prevent your hips from tilting sideways, forward, or backward during the exercise.
Intrinsic Back Muscles
People often misinterpret “core muscles” to mean only those located where we can see them — on the front of our body. However there are smaller intrinsic muscles located on our back, near our spine, or with attachment to our ribs.
The erector spinae, semispinalis, quadratus lumborum, and multifidi are a few that play a part during the half-kneeling Pallof press. These muscles are designed to extend the spine, laterally flex the spine when contracted unilaterally, maintain posture, and stabilize the low back. (7)
How to Program the Half-Kneeling Pallof Press
The half-kneeling Pallof press is considered a “supplemental” or accessory exercise and doesn’t necessarily need to be the primary movement for your workout. Understanding where the half-kneeling Pallof press can be programmed will determine its effectiveness in your program. Also note, if you’re familiar with performing the standing Pallof press, use less resistance with the half-kneeling exercise due to the change of position.
Supplementing Your Main Compound Lift
Performing the half-kneeling Pallof press at relatively lower intensities can be beneficial to those who lack proper core bracing during heavier sets of their squats, deadlifts, bench pressing, or overhead pressing. (3)
Fatiguing your core is not a smart or effective approach before performing compound movements. However, performing the half-kneeling Pallof press with lower intensities (staying away from muscular failure) and lower volume (such as two sets of 10 to 12 reps) can reinforce and maintain core tension for your primary training movements.
Low Intensity Recovery Days
Adding the half-kneeling Pallof press to recovery workouts or low intensity days can be an effective way to prepare your body, and your central nervous system, for the more intense workouts during your training week. Performed at low to moderate volume — such as two to four sets of eight to 12 reps — can help prime your body for the next day. It can also help with small “power leaks” with your strength-based movements.
Positioned in a Core Circuit
Many experienced lifters have found that training multiple core movements together as a form of circuit training amplifies the intensity of each exercise, compared to performing separate exercises by themselves. Pairing up other core exercises such as suitcase carries, hollow body holds, or deadbugs can amplify the intensity of the half-kneeling Pallof press.
Half-Kneeling Pallof Press Variations
Challenging yourself with the half-kneeling position can be difficult, but definiely not impossible. Below are a few variations of the half-kneeling Pallof press that increase with difficulty and should be progressed slowly. Demonstrations can be reviewed in the technique video at the beginning of the article.
Pallof Press and Lift
Moving your arms away from your center-mass is the driving force behind the anti-rotational benefits of the Pallof press. The farther the leverage moves from your center, the more difficult it will be.
Credit: James Shapiro Performance / YouTube
Adding a lift above your sternum, to eye-level or higher, further challenges your whole body to remain stable while engaging your serratus and shoulder stabilizers even more. Start small, as even a little movement will yield exponential difficulty to the exercise.
Pallof Perturbation Press and Hold
When your goal is to brace and maintain position, your body will work even harder when forces are trying to move you, rather than forces being manipulated more passively. This advanced exercise variation is performed with a small weight plate and a resistance band attached to an anchor point, rather than with a cable pulley.
Credit: James Shapiro Performance / YouTube
Attach a relatively light resistance band to the anchor point and slide a five-pound weight plate halfway down the band. Step out farther from the anchor position than normal and assume a half-kneeling position.
Focus on a rapid, almost explosive, press and hold the locked out position. The momentum of the movement should sling the plate forward and back. This forward and backward disturbance will try to push your body out of position. Work hard to maintain full-body tension, with core stiffness and a strong position, as the weight plate slowly comes to rest.
Isometric Split Squat Pallof Press
This variation increases lower body involvement while decreasing your base of support, which further increases the stability requirement. Start off in the half-kneeling position, brace, and press your arms in front of your chest. Then the hard part begins.
Credit: James Shapiro Performance / YouTube
Hold the locked out position, and push from the ground with both legs until your back knee is slightly off the ground. Briefly hold this isometric split squat position before gently returning the knee back to ground. Keep your arms locked and repeat the split squat position for repetitions.
FAQs
Why is the half-kneeling Pallof press harder than the standing version?
By taking the half-kneeling position, you create an uneven environment when your outside leg enters hip flexion and your inside hip remains neutral. This position affects the oblique core musculature demands when comparing the half-kneeling position and the more evenly stabilized standing position.
How can this exercise increase my strength for heavy compound lifts?
It takes a lot of experience to build full-body tension and equally express force through both sides of your body. Naturally, people will have a bias from one side of their body, either due to overall posture or from favoring the dominant side of the body. If you’ve ever felt a small turn or tilt to one side of your body when performing a lift, it’s a sign that you are losing tension during the movement. The half-kneeling variation can help address the oblique muscles on your relatively weaker side, so that your body can express force more efficiently.
What resistance level should I start with?
Begin with relatively light weight or low resistance. If you’re using a looped resistance band, use a thinner band, as band tension exponentially increases as you stretch it farther from the anchor point. If you have access to a cable pulley station, I would initially use 50% of the resistance you use if you’re familiar with performing the standing Pallof presses. If it’s your first time performing any Pallof press, use less than 10 pounds and master the technique before progressing gradually in weight.
References
Chang, Wen-Dien et al. “Core strength training for patients with chronic low back pain.” Journal of physical therapy science vol. 27,3 (2015): 619-22. doi:10.1589/jpts.27.619
Hibbs, Angela E et al. “Optimizing performance by improving core stability and core strength.” Sports medicine (Auckland, N.Z.) vol. 38,12 (2008): 995-1008. doi:10.2165/00007256-200838120-00004
Huxel Bliven, Kellie C, and Barton E Anderson. “Core stability training for injury prevention.” Sports health vol. 5,6 (2013): 514-22. doi:10.1177/1941738113481200
Kibler, W Ben et al. “The role of core stability in athletic function.” Sports medicine (Auckland, N.Z.) vol. 36,3 (2006): 189-98. doi:10.2165/00007256-200636030-00001
Luo, Shengyao et al. “Effect of Core Training on Skill Performance Among Athletes: A Systematic Review.” Frontiers in physiology vol. 13 915259. 6 Jun. 2022, doi:10.3389/fphys.2022.915259
Lynders, Christine. “The Critical Role of Development of the Transversus Abdominis in the Prevention and Treatment of Low Back Pain.” HSS journal : the musculoskeletal journal of Hospital for Special Surgery vol. 15,3 (2019): 214-220. doi:10.1007/s11420-019-09717-8
Malátová, Renata, Jitka Rokytová, and Jan Stumbauer. “The use of muscle dynamometer for correction of muscle imbalances in the area of deep stabilising spine system.” Proceedings of the Institution of Mechanical Engineers, Part H: Journal of Engineering in Medicine 227.8 (2013): 896-903.
McGill, Stuart M.. “Core Training: Evidence Translating to Better Performance and Injury Prevention.” Strength and Conditioning Journal 32 (2010): 33-46.
Samson, Kim M. et al. “A Core Stabilization Training Program for Tennis Athletes.” Athletic Therapy Today 12 (2007): 41-46.
Tayashiki, Kota et al. “Effect of abdominal bracing training on strength and power of trunk and lower limb muscles.” European journal of applied physiology vol. 116,9 (2016): 1703-13. doi:10.1007/s00421-016-3424-9
Willson, John D., et al. “Core stability and its relationship to lower extremity function and injury.” JAAOS-Journal of the American Academy of Orthopaedic Surgeons 13.5 (2005): 316-325.
Wu, Aimin et al. “Global low back pain prevalence and years lived with disability from 1990 to 2017: estimates from the Global Burden of Disease Study 2017.” Annals of translational medicine vol. 8,6 (2020): 299. doi:10.21037/atm.2020.02.175
Featured Image: James Shapiro Performance / YouTube
There aren’t too many “one-lift wonders” that can make you epic by delivering a ton of benefits in a single set, but the deadlift is one of them. The conventional deadlift gives you the potential to lift a lot of weight, get jacked, and brag about your massive deadlift PRs (if that’s something you’re in to).
Credit: Drazen Zigic / Shutterstock
However, if done improperly, the deadlift can lead to frustration or even injury. Neither of those results are good for your long-term performance, let alone your spinal health, so it’s time to go over the key components of proper deadlift form. Here’s what to do and when to do it for a stronger, safer deadlift.
Perfect Your Deadlift Form
Deadlift Setup Tips
A strong and efficient deadlift begins before the weight even leaves the ground. Here’s how to make the most from each individual repetition.
Take Time to Set Your Stance
The first step in perfecting your deadlift form is to approach the bar and set your stance. For a typical conventional deadlift stance, you want your feet relatively close together, about shoulder-width. You can make slight adjustments to be able to reach the bar and pull upright while keeping good positions at your shoulders, through your back, and into your hips.
Position the barbell directly over the middle of your feet, roughly where your arches are. Your shins should be close to the bar, but not touching it. You shouldn’t need to roll the bar toward you or away from you before beginning the repetition, it should be in a good spot from the start.
Credit: antoniodiaz / Shutterstock
If the bar is in front of your toes, it will be too far from your centerline and you’ll have poor leverage to pull the weight. If it’s too close to your ankles, the bar won’t be able to follow a powerful, vertical path because your shins and knees will be in the way.
Point your toes straight ahead and keep your feet flat on the ground as you bend down to grip the bar.
Choose the Right Grip
Your grip is a crucial part of the deadlift as it helps control the weight and generate the force you need. Without a stable grip, you can say bye-bye to most of your motor unit recruitment because your grip is the place where power transfers from your body to the weight.
There are four grip variations you can potentially use, depending on your experience and goals: the double-overhand grip, the mixed grip, the hook grip, and the double-overhand with lifting straps.
Credit: Jacob Lund / Shutterstock
The double-overhand grip involves both hands gripping the barbell with your palms facing down. This is a good grip for beginners, as it allows for even distribution of weight across your body and it helps to build grip strength.
This is also the most common grip for most lifters. If you can use the double-overhand grip, use it. It doesn’t have any significant injury risks and it keeps the weight of the bar evenly distributed. However, some people might “outgrow” the double-overhand grip as they progress in strength. Then it might be time to use a mixed grip.
The mixed grip involves gripping the barbell with one palm facing down and the other palm facing up. These mechanics allow you to hang on to more load. This grip is commonly used by experienced lifters in the gym and competitive powerlifters, as it allows for a more secure overall grip and better control of heavier weights.
However, the mixed position is inherently unbalanced and you do put yourself at risk for a biceps tear with the supinated (palm up) side because your elbow joint is more directly exposed to stress and the biceps muscle is put into a significant stretch. (1) It also gives the bar the potential to “spin” or rotate away from your body because the force isn’t evenly distributed across the bar.
If you’re deadlifting for multiple reps per set, switch your mixed grip hand position every set or even pausing briefly to flip your grip with each repetition. If you’re maxing out, listen to your body to avoid a potentially serious biceps injury.
The next alternative is the hook grip. This is a variation of the double-overhand grip where your thumb is on the inside of your fingers as opposed to the outside. If done right, it can be one of the strongest grips compared to either a double-overhand or mixed grip.
Because the hook grip uses a double-overhand position, it allows you to keep the weight evenly distributed and not have to worry about mixed-grip related injuries. However, one big drawback to the hook grip is that it is unavoidably painful because the barbell is bearing down on the side of your thumb. In fact, if your thumbs or hands are too small, it might not even be possible to hook grip because your fingers need to reach fully around the bar and your thumb.
But hook grippers swear by it, even though their thumbs are often taped for support. Nonetheless, it’s an option and the consensus among avid hook grip fans is that the pain does decrease as you adapt to using this specialized grip.
Finally, you can use a double-overhand grip with lifting straps. Straps offer maximum support and allow you to use the heaviest load, but they take your grip strength out of the equation. This is great for people with smaller hands, when their grip is limiting the performance of their glutes and hamstrings.
If you’re not concerned with building grip strength, or if you’re a competitive strength athlete who can compete with lifting straps (for example, strongman and strongwoman athletes), using straps is a great option without having the potential injury risk of a mixed grip or the required pain tolerance for a hook grip.
Get Your Body in Position
Once you’ve established your grip and stance, it’s time to focus on your overall body position. Start by bending your knees slightly and “wedging” your hips into the bar, as if you were getting ready to sit down in a chair. Keep your arms straight and get your shoulder blades back and down to keep your chest up, rather than caving forward.
You should start to feel your body naturally get tighter due to tension building from your grip, up your arms, across your shoulders and upper back, through your torso, and down your glutes and hamstrings.
Credit: MDV Edwards / Shutterstock
If you’re unsure about your position, or if something feels off, record a brief video or take a picture from the side for some immediate feedback. The top of your lats (back muscles) should be over the bar. Your shoulders slightly in front of the bar and higher than your hips. The bar should be close to your shins with your leg slightly bent (not in a deep squat position).
If you don’t feel tight, imagine squeezing oranges underneath your armpits. That messy but accurate visualization should help you to cue upper body tightness where it’s most needed — your upper back, shoulder blades, and shoulders.
Consider Switching to Sumo
If you notice your lower back is rounding despite setting up in an otherwise ideal position, or if you experience discomfort in your hips or spine with conventional deadlifts no matter how you adjust your setup, consider switching to a sumo stance.
No, sumo deadlifts are not “cheating.” That joke is getting old and was never that funny to begin with. There’s actually hard research showing deadlift stance comes down to your structure. (2)
Credit: MDV Edwards / Shutterstock
Based on your torso, femur, and tibia ratios, a sumo stance might be better suited for you. You’ll be able to build more strength with less joint strain by changing your stance. This might mean being weaker at it when you first start, though. Don’t let a short-term learning curve turn you away from a decision that’ll yield long-term results.
With sumo deadlifts, your grip should be about shoulder-width, instead of being outside of shoulder-width with conventional deadlifts. Furthermore, your stance is wider — with your feet well-outside your shoulders — with your toes slightly pointed out. How wide you go is based on your comfort, leg length, and hip mobility.
If you need to take a very wide stance, which may compromise your range of motion, you can put a weight plate under each foot to add a deficit. Other than the grip and stance being slightly different, every other lifting cue is the same as the conventional movement.
Deadlift Performance Tips
Once you’re in a good position, from your hands to your feet and everything in between, it’s time to finally get the weight off the ground. Here are some cues for the concentric (lifting) phase and the eccentric (lowering phase) of the deadlift.
Lifting the Weight
When it comes to actually lifting the weight, there are several cues you can use to ensure proper form to maximize strength and safety. Keeping you back in a neutral position should go without saying, since that’s a fundamental form tip to reduce your risk of a lower back injury.
Focus on driving through your feet and pushing your hips forward. This will help activate your quads, glutes, and hamstrings. This two-tiered approach, using your feet and hips, will let you focus on the most efficient way to produce force with good form.
Credit: UfaBizPhoto / Shutterstock
If you know your way around the gym, a strong deadlift is like leg pressing the bar off the floor — you want to use a powerful, flat-footed leg drive to break the plates off the ground — followed by a hip thrust into the bar once the barbell crosses above your knees. This lets you fully recruit your glutes to finish with a strong lockout.
Exhale at the top of the rep when you’ve locked the weight, and take an all too brief moment to shift focus onto the next phase of the repetition — returning the weight to the ground.
Lowering the Weight
Most people slam the weights down quickly on the eccentric portion of the rep. This can be fine under certain conditions, but it comes from the world of powerlifting. If you are not planning to deadlift in a powerlifting competition, there is no need to do this.
Generally, you want to lower with control, not because it’s necessarily that much safer but, like any exercise, there’s still some training stimulus during the repetition when you lower with control. (3) Dropping the weight reduces the amount of work your muscles are doing and could cut into your potential results.
Credit: UfaBiaPhoto / Shutterstock
Lower the bar as if you were doing a Romanian deadlift, keeping the bar close to your body with your knees slightly bent. Feeling your muscles stretch as the weight approaches the ground could even contribute to some extra gains. (4) It should also keep the bar in the perfect position at the bottom for an easy transition into the next rep.
Once the weight is on the ground, let it settle for at least a split-second. Do not bounce into your next rep. It will not stimulate much tension for your muscles and, worse, could lead to injury by allowing creating momentum which prevents you from properly bracing for each repetition.
Brace, Brace, Brace
Due to it’s generally heavy nature, deadlifting performance and safety hinges on your ability to brace. (5) Pun intended. It’s important to keep your core braced from the moment you set up, hold it into lockout, and maintain a good brace as you lower the weight.
Fortunately, bracing, or keeping your core tight and stable while manipulating the weight, is relatively simple. It comes down to breathing air into your stomach rather than breathing deeply into your chest. As you take a breath in, think about expanding your abs, obliques, and lower back in 360-degrees.
Credit: Jacob Lund / Shutterstock
If you’re wearing a lifting belt, you should feel your body expand “into” the belt. Once you feel tightness and pressure around your entire midsection, maintain that tightness as if you are expecting to get punched in the stomach. This keeps your spine in a stable position and helps to prevent your low back from rounding, which can be injurious.
There’s a subtle but crucial difference between bracing your core and simply “flexing your abs.” A braced core is solid from front to back and side to side, and promotes a safe, strong, and stable upper body. Flexed abs are simply contracted ab muscles on your midsection and can sometimes encourage a rounded torso position, which is the last thing you want during a heavy deadlift, since the abs are responsible for spinal flexion (bending your torso forward).
How to Deadlift
Here’s a concise review of how to display maximum strength and efficiency with crisp technique during the conventional deadlift.
Step One — Find Your Stance
The conventional deadlift needs your feet roughly shoulder-width apart for a stable and efficient platform. If the sumo deadlift feels more comfortable, take a stance much wider than shoulder-width. In either case, get the barbell over the middle of your feet, not in front of your toes and not touching your ankles.
Step Two — Pick Your Grip
Unless you’re a competitive strength athlete, use a double-overhand grip (both palms down), with or without lifting straps depending on your need to develop grip strength. Squeeze the bar hard even if you are using straps. Keep your arms straight throughout the entire exercise.
Step Three — Brace Your Core
Start your brace before the weight leaves the ground. Maintain a 360-degree braced core throughout the entire rep, during the lifting and lowering phases. A strong brace will reinforce power transfer from your lower to upper body and help to keep your back in a neutral position.
Step Four — Lift the Barbell
Get tight before the weight even leaves the ground and stay tight throughout the entire repetition. Keep your feet flat and think about performing a leg press to drive the weight up. As the bar passes your knees, imaging doing a hip thrust to activate your glutes and lock out the weight in a standing position.
Step Five — Lower with Control
After you’ve locked out the weight, quickly refocus and lower the weight at a deliberate, not excessively slow, pace. Avoid dropping the weight without tension. The bar should end up where it began, above your midfoot. Pause briefly in the bottom to settle the weight and minimize momentum. Reset your brace and repeat the process for additional repetitions.
As They Say: Grip It and Rip It
The deadlift can initially feel awkward, especially if you don’t really know what you’re doing. Even after reading this deadlift technique lesson, it might still feel like there are so many cues to think about. But like any exercise, learn it right instead of having to learn it twice. With some practice, it will become second nature. Eventually, getting a good setup will take just a few seconds and resetting between reps will take even less than that. From there, you can build a massive deadlift and dominate the world (or just hit a PR. That’d be good, too).
References
Kapicioglu, M., Bilgin, E., Guven, N., Pulatkan, A., & Bilsel, K. (2021). The Role of Deadlifts in Distal Biceps Brachii Tendon Ruptures: An Alternative Mechanism Described With YouTube Videos. Orthopaedic journal of sports medicine, 9(3), 2325967121991811. https://doi.org/10.1177/2325967121991811
Cholewa, Jason M, et al. “Anthropometrical Determinants of Deadlift Variant Performance.” Journal of Sports Science & Medicine, U.S. National Library of Medicine, 1 Aug. 2019, https://www.ncbi.nlm.nih.gov/pmc/articles/PMC6683626/.
Roig, M., O’Brien, K., Kirk, G., Murray, R., McKinnon, P., Shadgan, B., & Reid, W. D. (2009). The effects of eccentric versus concentric resistance training on muscle strength and mass in healthy adults: a systematic review with meta-analysis. British journal of sports medicine, 43(8), 556–568. https://doi.org/10.1136/bjsm.2008.051417
Nunes, J. P., Schoenfeld, B. J., Nakamura, M., Ribeiro, A. S., Cunha, P. M., & Cyrino, E. S. (2020). Does stretch training induce muscle hypertrophy in humans? A review of the literature. Clinical physiology and functional imaging, 40(3), 148–156. https://doi.org/10.1111/cpf.12622
Tayashiki, K., Maeo, S., Usui, S., Miyamoto, N., & Kanehisa, H. (2016). Effect of abdominal bracing training on strength and power of trunk and lower limb muscles. European journal of applied physiology, 116(9), 1703–1713. https://doi.org/10.1007/s00421-016-3424-9
Simple bodybuilding programs are a little too easy to find. You could pull them from fitness magazines — those ghost-written workouts that your favorite bodybuilders supposedly follow. You could roll the dice and ask an artificial intelligence chatbot to generate one for you. Or, you could attempt to develop one for yourself.
Just a few problems there. The high intensity, high volume programs used by the pros do not tend to be sustainable for the rest of us due to some physiological (and often pharmaceutical) reasons. Most people also aren’t ready to trust their potential gains to an algorithm-fueled robot, so that leaves you creating a program for yourself.
Consider a time-tested axiom before diving in: It’s not hard to create a good bodybuilding workout program, but it’s also not hard to create a bad one. Fortunately, we’ve got your back. And your chest, shoulders, arms, and legs.
Credit: Jacob Lund / Shutterstock
Here you will find evidence-based workouts to build every major area of an aesthetic physique. These workouts assume you’re a relatively healthy lifter with at least some experience in the gym (i.e. not a true beginner who could benefit from a more generalized approach). These plans work best with a body part split across the week.
The chest muscles play a prominent role in our physique. They are most often trained by multi-joint, upper body pushing exercises. The angle the “push” can be used to bias certain portions of the chest, allowing us to fully develop this region. In addition to pushing exercises, single joint exercises can also be used to target the chest. Single-joint exercise serves as “icing on the cake,” providing a touch of additional training stimulus.
The Complete Chest Workout
Just about any repetition range can build muscle. (1)(2) This engaging workout begins with the heaviest exercise. As the workout progresses, moderate repetition, moderate weight exercises are introduced as compound sets — a time-efficient superset technique that pairs movements targeting the same muscles back-to-back without rest. The workout ends with high repetition “pump work,” leaning into the metabolic mechanisms of muscle hypertrophy. (3) This general format is repeated for workouts for all body parts.
This chest workout is designed to be performed once per week. Select weights that allow completion of repetitions is near the lower end of the repetition range. Sets need not be taken to failure but should flirt with it. Meaning, sets must reach a high level of effort. (4)(5) When you end the set, you should feel like you have three or fewer repetitions remaining “in the tank.”
When you’re able to complete sets at the top end of the repetition range, add five to 10 pounds. This progression method “resets” your sets back toward the lower bound of the repetition range, allowing your to progress repetition volume once again in subsequent weeks.
Barbell Bench Press
How to Do it: Lie on a bench with your back arched and shoulder blades pulled down and together (“in your back pockets”). Unrack the bar and lower it to your chest. Press the bar upward until your elbows are straight but not locked.
Sets and Reps: 3 x 6-8
Rest time: Rest three minutes seconds between sets.
Dip
How to Do it: Support your body from a dip bar and lean slightly forward. Lower yourself until you feel a stretch across the front of your chest and shoulders or until your upper arms break parallel. Add weight or assistance as needed to achieve the target repetition range.
Sets and Reps: 3 x 8-12
Rest time: Move immediately to the next exercise without rest.
Incline Dumbbell Flye Press
How to Do it: Lie on a 30- to-45-degree incline bench and begin with the dumbbells pressed locked out above your chest. Face your palms together and lower the weights in a flye, keeping a slight bend in your arms. From the bottom position, pull the weights in toward your shoulders and press the weights up to lockout.
Sets and Reps: 3 x 12-16
Rest time: Rest two minutes before repeating the previous exercise.
Machine Incline Press
How to Do it: Sit with your back and buttocks supported on an incline press machine. Push the handles along the arc of the machine’s path until your elbows are straight but not locked. Control back to the start position.
Sets and Reps: 2 x 16-20
Rest time: Rest 90 seconds between sets.
Muscles Trained on Chest Day
Chest day often draws added attention because the pecs are featured so prominently when you check the mirror, even more so once you get an awesome pump going mid-session. The majority of chest movements will also recruit “the pressing muscles” — your shoulders and triceps — for assistance.
Pectorals
When viewed from the front, the upper bodies of modern bodybuilders are dominated by well-developed chest muscles. The pectoralis major is the largest and most superficial chest muscle. All parts of the pectoralis major act to draw the arms toward the body, pull the arms together in front of the body, and internally rotate the arms. The upper portion of the pectoralis major also raises the arm. Therefore, a wide variety of exercises target the pecs.
Anterior Deltoids
The anterior deltoids, or “front delts,” share the same actions as the pectoralis major. Conveniently, this means that anterior deltoids are trained during chest workouts, such as the one above, and during direct shoulder workouts.
Triceps
The triceps brachii primarily serve to extend your elbows (straighten your arms). Because of this, compound movements such as pressing and dips can be counted toward total triceps training volume. This aesthetic “three-headed” muscle fills t-shirt sleeves more readily than any other arm muscle.
How to Warm-Up Your Chest
A traditional warm-up has two components: 1) the “general warm-up” and 2) the “specific warm-up.” The general warm-up elevates body temperature, improves oxygen delivery to muscle and other body tissues, and improves joint freedom of motion. It typically consists of short duration, low-to-moderate intensity cardiovascular exercise (e.g. air bike, rowing, jogging, or jumping rope).
The specific warm-up primes areas of the body and movement patterns to be used in the subsequent workout for improved technique and performance. It is also a good time for dedicated mobility exercises and/or exercises intended to reduce risk of injury.
A specific warm-up for the chest may consist of exercises to prepare the upper body and spine for proper positions during pressing, stimulate muscle contractions of the muscles to be trained, and reinforce shoulder stability. It is wise to include lower intensity sets of the workout’s first exercise at the tail end of the specific warm-up.
Chest Warm-Up
Cardio: Five minutes, low-to-moderate intensity effort
Band Pull-Apart: 2 x 15
Foam Roller Thoracic (Upper Back) Extensions: 2 x 10
Bench Press: 3 x 6–10, work-up sets at light to moderate weight (e.g. approximately 40%, 60%, and 80% of the weight to be used for the first set of the workout’s first exercise).
Best Bodybuilding Workout for Back
A muscular back supports a confident posture, adds width to your upper body, and provides visual interest for those who happen to be walking behind your statuesque physique. That visual interest will come from the various muscles of the back, which converge on the shoulder blades and shoulders.
To create desirable definition and size, training the back from multiple angles using a variety of exercises may be useful. each exercise variation biases certain areas of the back and may result in distinct patterns of muscular development. (6)(7)
Back Width and Thickness Workout
Complete this full back workout once per week. Select weights that allow you to complete repetitions on the lower end of the repetition range. Sets to failure are not necessary to build muscle. (8) However, each set should reach a high level of effort. (4) When you’re able to complete all sets at the top end of the repetition range, add five to 10 pounds.
Three-Point Dumbbell Row
How to Do it: Perform the three-point dumbbell row with the knee and hand of your non-working side on a flat bench. Initiate the movement by pulling your shoulder blade toward your spine, and row toward the outside of your hip. Lower to a full stretch without rotating or sinking your hips
Sets and Reps: 3 x 6-8
Rest time: No rest between sides. Rest three minutes between sets.
Neutral-Grip Lat Pulldown
How to Do it: As the name implies, the neutral-grip lat pulldown is performing using a handles attachment that faces your palms toward each other. Begin in a full overhead position and pull your elbows down to the midline of your ribcage — don’t force the bar to reach your chin or chest.
Sets and Reps: 3 x 8-12
Rest time: Rest two and a half minutes between sets.
Machine Wide Row
How to Do it: Set up on a machine with a chest support, grasping the handles with a wide, overhand grip. Initiate movement with your shoulder blades and pull toward your chest. Return to a fully stretched position.
Sets and Reps: 3 x 12-16
Rest time: Move immediately to the next exercise without rest.
Cable Flexion Row
How to Do it: Perform this seated row variation on a low cable machine. Allow resistance to pull your trunk and shoulder blades toward the machine — your spine should round forward, promoting a massive stretch through your back muscles. Begin by pulling the shoulder blades together and down. As you row the bar toward your torso, extend your spine but do not use momentum from the trunk to drive the movement. Reverse the movement and repeat.
Sets and Reps: 3 x 16-20
Rest time: Rest two minutes before repeating the previous exercise.
Muscles Trained on Back Day
Your back is one of the largest muscle groups on your body because a number of various individual muscles coordinate during each movement. This comprehensive workout will address and train a large number of muscles on your posterior torso including the lats, rear shoulders, and upper and mid-back. Your biceps and gripping muscles are also recruited during most exercises.
Mid-Back and Lats
Mid-back muscles, which act on the shoulder blades, create the appearance of a raised, central diamond-shape. Your latissimus dorsi (lats) sweep from the small of the back toward the outsides of your armpits and enhances the appearance of a “V-shaped” torso. These muscles comprise the bulk of the back musculature and are trained by upper-body pulling exercises.
Rear Deltoids
While your rear deltoids are traditionally trained via shoulder-specific exercises (e.g. reverse flyes and cable external rotations), wide and narrow-grip pulling movements also hit the rear deltoids. When considering total weekly training volume for the rear deltoids, it is appropriate to include pulldowns, pullovers, and rows.
Biceps and Other Elbow Flexors
Drawing a resistance toward your body, as performed during pulldowns, trains your elbow flexors. As the most visible elbow flexor, the biceps brachii gets all the glory; however, the brachialis is a deep elbow flexor that boosts the appearance of the biceps by pushing it up — kind of like the supportive parent or friend whom you should probably call and thank (after your workout, of course).
How to Warm-Up Your Back
Once again, it’s a good policy to raise the body’s temperature with some general movement and prime the areas of the body to be trained before jumping into the workout. On top of that, “back day” is a great time to incorporate some direct exercise for the midsection, as many workout splits don’t allocate ab training to one specific day.
Back Warm-Up
Cardio: Five minutes, low-to-moderate intensity effort
Three-Point Dumbbell Row: 3 x 6–10, work-up sets at light to moderate weight (e.g. approximately 40%, 60%, and 80% of the weight to be used for the first set of the workout’s first exercise).
Best Bodybuilding Workout for Shoulders
The deltoids are the muscles that envelop your shoulders. Well-developed deltoids appear full and rounded, “capping” the shoulders. The deltoid has three functional parts — anterior, middle, and posterior.
The anterior deltoid is primarily responsible for raising the arms in front of the body (e.g. pressing), pulling the raised arms in toward your midline, and internally rotating the arms. The middle deltoid raises the arms out the sides (e.g. lateral raises and overhead presses) and assists with pulling the raised arms away from your midline (e.g. reverse flye). The posterior deltoid assists with the reverse flye movement in addition to external rotation and driving your arms behind your body (e.g. rows).
While your shoulders clearly get some work on chest day and back day, a dedicated shoulder workout helps to ensure each part receives adequate training. The diverse actions of the deltoids open the door for efficient use of supersets on shoulder day.
The 3D Delt Workout
Perform once per week using weights that allow repetitions at or near the lower boundary of the stated repetition range. Once again, the majority of working sets should be high level of effort with three or fewer repetitions remaining before failure. Machine-based overhead pressing is included to allow lifters to safely approach or achieve failure without a spotter.
Once you reach the top of any repetition range, add five to 10 pounds to the exercise. Be vigilant for stagnating progress or drops in performance, as these features might indicate that it’s time for a deload.
Seated Dumbbell Overhead Press
How to Do it: Sit on a bench with a vertical back support. Rest a dumbbell on each thigh before “kicking” each weight into position at shoulder-level with your palms facing forward or angled slightly in. Press both weights overhead to full lockout before returning to shoulder-level.
Sets and Reps: 3 x 6-8
Rest time: Move immediately to the next exercise without rest.
Dumbbell Reverse Flye
How to Do it: Stand with a dumbbell in each hand at arm’s length by your sides. Hinge forward at the waist and slightly bend your legs. Slightly bend your elbows and maintain the arm angle throughout the set. Draw your upper arms toward the ceiling, stopping the your elbows are roughly in line with your shoulders. Lower under control — don’t allow the weights to build momentum in the bottom position.
Sets and Reps: 3 x 12-16
Rest time: Rest three minutes before repeating the previous exercise.
Machine Shoulder Press
How to Do it: Sit in an shoulder press machine and adjust the seat height to allow you hands to reach shoulder-height in the bottom position. Take a palms-forward grip and drive the weight up to near-lockout before lowering with control. Aim to move at a steady pace and maintain continuous tension through each repetition.
Sets and Reps: 3 x 12-16
Rest time: Rest two minutes between sets.
Face Pull
How to Do it: Set a resistance band or cable pulley at roughly eye-level. Take a palm-down grip and step back to create tension in the stretched position. Begin the face pull by driving your elbows back in line with your shoulders while pulling your hands in line with your eyes or ears. From the contracted position, reach forward until full lockout.
Sets and Reps: 3 x 12-16
Rest time: Move immediately to the next exercise without rest.
Lateral Raise
How to Do it: Stand with a dumbbell in each hand at arm’s length, resting the weights on the front of your thighs. Keep a slight bend in your arms and raise the weights “up and out” until your hands are slightly above shoulder-height. Maintain a tight core and stable torso — don’t allow your hips or back to swing. Lower to the starting position with your hands in front of your thighs.
Sets and Reps: 3 x 20-24
Rest time: Rest two minutes before repeating the previous exercise.
Dumbbell Shrug
How to Do it: Stand with a pair of dumbbells at arm’s length by your sides. Drive your shoulders toward the ceiling as high as possible — move vertically without “rolling” your shoulders or pulling your shoulder blades together. Lower to a full stretch.
Sets and Reps: 2 x 20-24
Rest time: Rest 90 seconds between sets.
Muscles Trained on Shoulder Day
The shoulder joint is arguably one of the most precarious joints in the body, responsible for a long range of motion in a variety of directions. The deltoids may be your primary “shoulder muscle,” but several muscle groups play a role in completing most shoulder-focused movements.
Shoulders
The middle deltoids widen the appearance of the shoulders, so they are an important target for physique-focused bodybuilding training. Your middle and anterior deltoids are trained by the presses in this workout. Middle deltoids get direct, high-repetition work during the lateral raises.
As previously discussed, it is fair to consider rows, pulldowns, and pullovers as rear deltoid exercises; however, these exercises alone may not result in adequate stimulation of this relatively small part of the shoulder — reverse flyes can be superior in that regard. (9) As a bonus for shoulder health, face pulls hit the rear deltoids, middle deltoids, rotator cuff, and some of the muscles acting on the scapula.
Trapezius
The traps are a diamond-shaped muscle of your mid- and upper back. The upper and lower fibers of trapezius (e.g. the top and bottom portions of the “diamond”) are trained during presses, as they act to upwardly rotate your shoulder blades. Shrugs are included in the shoulder workout to further develop the upper trapezius.
Triceps
Your triceps brachii receive additional training volume during the shoulder workout, owing to the muscle’s role as an elbow extensor. These extra sets are beneficial, especially if you’re reasonably well-trained. Recent research suggests the triceps brachii are among the muscles that grow more rapidly with higher training volumes. (10)
How to Warm-Up Your Shoulders
Prepare your shoulders for peak performance by increasing your body temperature with a small dose of rhythmic cardiovascular exercise, such as rowing, jumping rope (ideally with a heavy rope to further activate your upper body), or riding an air bike. Then, perform exercises to mobilize your shoulder joints, shoulder blades, and spine through essential ranges of motion. Wrap up the warm-up with light sets of the first exercise of the workout.
Shoulder Warm-Up
Cardio: Five minutes, low-to-moderate intensity effort
Band Pull-Apart: 2 x 15
Foam Roller Thoracic (Upper Back) Extensions: 2 x 10
Band Over and Backs: 2 x 10-12
Seated Dumbbell Overhead Press: 3 x 6–10, work-up sets at light to moderate weight (e.g. approximately 40%, 60%, and 80% of the weight to be used for the first set of the workout’s first exercise).
Best Bodybuilding Workout for Arms
Although your arms undoubtedly receive training during chest, back, and shoulder workouts, a dedicated arm day may help to accelerate muscle gain. But arm day need not be exclusively single-joint (isolation) exercises. In this workout, a pull-up variation is used as the first exercise, because it targets your biceps with the bonus of additional training volume for your lats and rear deltoids. (11)
Single-joint exercises for your biceps and triceps come next in the workout. These are performed back-to-back on the same incline bench to promote a searing stretch and enhanced growth. (12)(13) The workout concludes with training for lesser-appreciated muscles for arm thickness.
Gun Day Isn’t Only Sunday
Complete the arm workout once per week. Use weights that allow you to complete of repetitions on the lower end of the repetition range. When you’re able to complete all sets with repetitions at or exceeding the repetition range, add five pounds.
Neutral-Grip Pull-Up
How to Do it: Hang from a neutral-grip pull-up bar or freely moving handles with palms facing each other. Pull your chest toward the bar by driving your shoulders back and flexing your elbows. Lower with control.
Sets and Reps: 2 x 6-8
Rest time: Rest three minutes between sets.
Incline Dumbbell Curls
How to Do it: Perform incline dumbbell curls on a bench set at an approximately 45-degree angle. With underhanded grips on the dumbbells, allow your arms to hang vertically beneath your shoulders. Without swinging your upper arms forward, curl the dumbbells.
Sets and Reps: 3 x 12-16
Rest time: Move immediately to the next exercise without rest.
Incline Skull Crusher
How to Do it: Take a palms-down grip on the inner handles of an EZ-bar and lie on a 45-degree incline bench. Point your elbows toward the ceiling and allow the bar to lower just behind your head without moving your upper arms. Feel your triceps stretch and then straighten your arms to return to the start position.
Sets and Reps: 3 x 16-20
Rest time: Rest two minutes before repeating the previous exercise.
Reverse Biceps Curl
How to Do it: Perform the standing reverse biceps curl with an overhand grip on an EZ-bar or straight bar. Keeping your arms at your sides, curl the weight by bringing your knuckles toward your shoulders. Return to the start position.
Sets and Reps: 3 x 12-16
Rest time: Move immediately to the next exercise without rest.
Gripper
How to Do it: Hold grip trainers, or the handles of a grip machine, using a power grip with the fingers and thumb of each hand wrapped fully around each handle. Close your hands against the resistance, then slowly control the opening of the grip trainers or machine as far as possible without losing control of the implements.
Sets and Reps: 3 x 20-24
Rest time: Rest 90 second before repeating the previous exercise.
Muscles Trained on Arm Day
Arm training has a misconception of being only for vanity and appearance, but well-developed biceps and triceps can contribute to overall strength as well as shoulder and elbow joint health.
Biceps and Elbow Flexors
Your biceps brachii and brachialis add upper arm size, while the brachioradialis adds dimension to the forearm. All three of these muscles are trained via elbow flexion (bending your arms against resistance), whether in single-joint fashion as in the curl variations, or within compound pulling movements like the neutral-grip pull-up.
Triceps
The three heads of your triceps brachii can be trained via resisted elbow extension (arm straightening). Since the long head of the triceps crosses behind the shoulder, triceps exercises that place the shoulder in flexion (e.g. overhead movements including incline skull crushers) may expose the triceps to more mechanical tension. Ultimately, this can result in enhanced growth. (12)(13)
Forearms
When you train your grip, forearm muscles that flex the fingers contract forcefully. These muscles tend to bend your wrists as well. To counteract wrist flexion, the muscles on the opposite side of the forearm (i.e. wrist extensors along the top of your forearm) contract. The result is a robust forearm-training stimulus.
How to Warm-Up Your Arms
Your arm day warm-up can be straightforward: Simply get your body moving. Special attention is given to the wrists, forearms, and elbows. The exercises should be non-fatiguing.
Arm Warm-Up
Cardio: Five minutes, low-to-moderate intensity effort
Dumbbell Wrist Extension (Reverse Wrist Curl): 1 x 8-12
Neutral-Grip Pull-Up: 2 x 6–10, work-up sets at light to moderate difficulty (e.g. on an assisted pull-up machine if necessary, using a greater amount of assistance than you’d use for your working sets).
Best Bodybuilding Workout for Legs
Leg day is a longer, often more grueling workout compared to other body parts, and rightfully so. If you’re only going to train lower body once per week, you’d better make it count.
While there is debate regarding whether deadlifts belong with back day or leg day, the hamstring-dominant Romanian deadlift (RDL) is programmed in this leg workout, as this variation reduces the overall load required by reducing leg drive without sacrificing training stimulus to the target muscles. Supersets and compound sets are used extensively during this 24-set workout to save time.
The Ultimate Leg Day
Complete once per week. Select weights that allow you to complete repetitions on the lower end of the repetition range. Each set should reach a high level of effort. If you are accustomed to high-volume leg training (e.g. 25+ sets), you may consider adding a set or two to front squats, the squat machine exercise, or leg extensions, as the quadriceps have been shown to respond favorably to higher training volume among well-trained lifters. (10) When you’re able to complete all sets at the top end of the repetition range, add 10 to 20 pounds.
Front Squat
How to Do it: Support a barbell across the front of your shoulders with a palms-up or cross-arm grip. Keep your trunk as upright as possible as you squat to a comfortable depth.
Sets and Reps: 3 x 6-8
Rest time: Move immediately to the next exercise without rest.
Prone Hamstring Curl
How to Do it: Lie on a prone hamstring machine with the roller pad contacting just above your heels. Flex your knees through the longest range of motion you can achieve, then control back to the stretched starting position.
Sets and Reps: 3 x 8-12
Rest time: Rest three minutes before repeating the previous exercise.
Romanian Deadlift
How to Do it: Hold a barbell in front of your thighs. Begin by lowering from the hips, keeping your knees slightly bent throughout the exercise. Aim to feel a strong stretch in your hamstrings before returning to standing upright.
Sets and Reps: 3 x 8-12
Rest time: Move immediately to the next exercise without rest.
Leg Extension
How to Do it: Sit in a leg extension machine with your knee joint aligned with the pivot point of the moving part of the machine. Straighten your knees, pause very briefly at lockout and then lower slowly with control. Keeping your feet pulled up toward your shins (ankle dorsiflexion) may help you feel a stronger quadriceps contraction.
Sets and Reps: 3 x 12-16
Rest time: Rest two and a half minutes before repeating the previous exercise.
Machine Squat
How to Do it: Pendulum or lever-style squat machines are becoming more popular in gyms; however, if your gym does not have one, a hack squat or leg press machine is an acceptable substitute. Set up under the padded “yoke” of the squat machine, keep your feet flat as you lower into a deep squat. Use a controlled motion at your hips, knees, and ankles. Push back to a nearly locked out position.
Sets and Reps: 3 x 12-16
Rest time: Move immediately to the next exercise without rest.
Calf Machine
How to Do it: Locate a calf machine that allows a relatively straight knee position during operation (e.g. standing calf machine or leg press). Lower slowly through your entire ankle range of motion. Without bouncing out of the bottom position, push through the ball of your foot and big toe until you’ve reached the top of your available ankle range of motion. Pause briefly in both the fully stretched and fully contracted positions.
Sets and Reps: 3 x 16–20
Rest time: Rest two and a half minutes before repeating the previous exercise.
Back Extension
How to Do it: Hit your lower back, hamstrings, and glutes by setting up in a glute-ham developer (GHD), as shown, or in a 45-degree Roman chair (back extension) with the top of the pad set just below your hip joints. Lower and raise your trunk primarily from the hips; however, it is acceptable to permit some low back movement as well.
Sets and Reps: 3 x 12-16
Rest time: Move immediately to the next exercise.
Seated Calf Machine
How to Do it: Set the pads atop your thighs with your knees bent approximately 90-degrees. Lower to the bottom position by allowing your ankles to full dorsiflex. Without bouncing out of the bottom position, raise to the top position of full plantar flexion (rising onto the ball of your foot).
Sets and Reps: 3 x 20-24
Rest time: Rest 90 seconds before repeating the previous exercise.
Muscles Trained on Leg Day
Working entire lower body, leg day involves a significant number of separate body parts working in unison for many movements. Targeted isolation exercises will emphasize your quadriceps, hamstrings, or calves for further muscle-building stimulus.
Quadriceps
The quadriceps femoris, or “quads,” refers to the four muscles on the front of your thigh. All four act to extend your knee, and the centermost quadriceps muscle also contributes to hip flexion. You can train these muscles with squats, squat-type movements, and isolated knee extension exercises. For safety and confidence, machine-based exercises may be helpful, especially toward the end of the workout as fatigue sets in.
Glutes
Few muscle groups enhance the image of athleticism like the glutes. Therefore, the glutes are a common target for physique-based training. Although the glutes have various actions at the hip, all three “glutes” — gluteus maximus, gluteus medius, and gluteus minimus — act to extend your hips.
Hamstrings
While your quadriceps are prominent when the legs are viewed from the front, well-developed hamstrings steal the show when the legs are viewed from the side. Composed of four muscles, the hamstrings act to flex the knee, and three of them act to extend the hip. Leg curls train the hamstrings as knee flexors, while the Romanian deadlift and back extension are the primary exercises in the workout for training hamstrings as hip extensors.
Calves
Even if you favor baggy cargo shorts as your go-to warm weather attire, your calves are likely to be the most readily visible lower body muscle group. Although they may receive a modest training stimulus during squats and other squat-like movements, direct calf exercises are typically needed to stimulate meaningful growth.
How to Warm-Up Your Legs
Prepare your lower body for this leg workout with a warm-up that mobilizes stiff hips and lengthens tight muscles. Use front squat warm-up sets to hone technique and dial-in a strong squat stance.
Leg Warm-Up
Cardio: Five minutes, low-to-moderate intensity effort
Front Squat: 3 x 6–10, work-up sets at light to moderate weight (e.g. approximately 40%, 60%, and 80% of the weight to be used for the first set of the workout’s first exercise).
On the Road to Ripped
You’ve probably heard of the “Stairway to Heaven” and the “Highway to Hell,” but the roadmap provided here gets you on the Road to Ripped. When all five workouts are performed once per week, total training per major muscle group is consistent with current best practice recommendations for building muscle. (1)(14) Those accustomed to lengthy or convoluted training sessions will find this program to be refreshingly simple. Simple, but not easy.
References
Schoenfeld, B., et al. (2021). Resistance training recommendations to maximize muscle hypertrophy in an athletic population: Position stand of the IUSCA. International Journal of Strength and Conditioning, 1(1).
Lacio, M., et al. (2021). Effects of resistance training performed with different loads in untrained and trained male adult individuals on maximal strength and muscle hypertrophy: a systematic review. International Journal of Environmental Research and Public Health, 18(21), 11237.
Schoenfeld, B. J. (2013). Potential mechanisms for a role of metabolic stress in hypertrophic adaptations to resistance training. Sports Medicine, 43, 179-194.
Helms, E. R., et al. (2016). Application of the repetitions in reserve-based rating of perceived exertion scale for resistance training. Strength and Conditioning Journal, 38(4), 42-49.
Refalo, M. C., et al. (2022). Influence of resistance training proximity-to-failure on skeletal muscle hypertrophy: A systematic review with meta-analysis. Sports Medicine, 1-17.
Lehman, G. J., et al. (2004). Variations in muscle activation levels during traditional latissimus dorsi weight training exercises: An experimental study. Dynamic Medicine, 3, 1-5.
Wakahara, T., et al. (2012). Association between regional differences in muscle activation in one session of resistance exercise and in muscle hypertrophy after resistance training. European Journal of Applied Physiology, 112, 1569-1576.
Grgic, J., et al. (2022). Effects of resistance training performed to repetition failure or non-failure on muscular strength and hypertrophy: a systematic review and meta-analysis. Journal of Sport and Health Science, 11(2), 202-211.
Franke, A. R., et al. (2015). Analysis of anterior, middle and posterior deltoid activation during single and multijoint exercises. J Sports Med Phys Fitness, 55, 714-721.
Brigatto, F. A., et al. (2022). High resistance-training volume enhances muscle thickness in resistance-trained men. Journal of Strength and Conditioning Research, 36(1), 22-30.
Youdas, J. W., et al. (2010). Surface electromyographic activation patterns and elbow joint motion during a pull-up, chin-up, or perfect-pullup™ rotational exercise. The Journal of Strength & Conditioning Research, 24(12), 3404-3414.
Wackerhage, H., et al. (2019). Stimuli and sensors that initiate skeletal muscle hypertrophy following resistance exercise. Journal of Applied Physiology, 126(1):30-43.
Maeo, S., et al. (2022). Triceps brachii hypertrophy is substantially greater after elbow extension training performed in the overhead versus neutral arm position. European Journal of Sport Science, 1-11.
Schoenfeld, B. J., et al. (2019). Calculating set-volume for the limb muscles with the performance of multi-joint exercises: implications for resistance training prescription. Sports, 7(7), 177.
Due to their prominence, well-developed back muscles have been described as wings. Want wing-like back muscles? On the short list of things that allegedly “give you wings” are energy drinks, good deeds, and upper body vertical pulling.
After consuming energy drinks throughout my younger years, I can dispatch the first claim. Alertness and insomnia? Yes. Back muscles? No. As for good deeds, this is a fitness article so it shall be kept secular. That leaves vertical pulling — pull-ups and pulldowns.
Credit: lunamarina / Shutterstock
Although pull-ups can be modified for nearly everyone, nothing beats the adjustability and convenience of cable-stack pulldowns. But the traditional overhand grip isn’t for everyone, especially those with shoulder issues. (1)(2)(3)
The neutral-grip lat pulldown is a shoulder- and elbow-friendly alternative to standard lat pulldowns. Find out how to perform, program, and modify this big back builder.
Neutral-Grip Lat Pulldown
Neutral-Grip Lat PulldownTechnique Breakdown
Dr. Merrick Lincoln demonstrates how to do a neutral-grip pulldown and talks you through a complete repetition. Check to see what form looks like before reading on for the details.
How to Do the Neutral-Grip Lat Pulldown Step By Step
As opposed to using a straight or cambered “lat bar,” the neutral-grip pulldown requires use of a bar with grips running perpendicular to the length of the bar. This allows you to keep your forearms in a “neutral” rotation, with your palms facing each other, halfway between full supination (palms facing toward you) and full pronation (palms facing away from you).
Step 1 — Establish Points of Contact
Credit: Merrick Lincoln, DPT, CSCS / YouTube
Face a cable machine with your glutes on the seat, both feet flat on the floor, and your upper legs under the thigh pad. If necessary, adjust the height of the thigh pad or seat for secure fit.
Form Tip: When setting the height of the thigh pad or seat, ensure your feet are flat on the floor with your heels slightly behind your knees. This enables you to easily slide your feet back to stand when it’s time to retrieve or return the pulldown bar.
Step 2 — Grab the Bar and Set Your Trunk Angle
Credit: Merrick Lincoln, DPT, CSCS / YouTube
Grab the handles with a shoulder-width, or slightly narrower, position. If the bar has traditional cylinder-shaped grips, use a fully closed grip with your fingers and thumb wrapped around the bar. If the bar has more modern paddle-style or angled grips, ensure the palms of your hands make maximum contact with the paddles. With this handle, the knuckles of your fingers should be flexed over the top of the handle.
Once your grip is secure, lift your chest, lean back slightly (e.g. 10 to 30-degrees from vertical), and brace your core. Maintain this trunk position throughout the exercise. In the stretched position, your elbows should be locked completely straight.
Form Tip: If you have range of motion limitations in the overhead position, you may benefit from leaning back slightly further (e.g. approximately 30-degrees from vertical). This changes the pulling angle and reduces stress on your shoulder joints.
Step 3 — Pull Down to Peak Contraction
Credit: Merrick Lincoln, DPT, CSCS / YouTube
Initiate the movement by drawing your shoulder blades together and down, and “pull your shoulder blades into your back pockets.”
Immediately after beginning to move your shoulder blades, begin pulling your elbows toward the sides of your ribcage. Peak contraction is achieved when your shoulder blades are squeezed together and down, and your upper arms are pinned to your sides.
Form Tip: Don’t worry about getting the bar to your chest, below your chin, or to some other arbitrary position. Focus on achieving a strong contraction in your back muscles when you reach the bottom position.
Step 4 — Return and Seek Stretch
Credit: Merrick Lincoln, DPT, CSCS / YouTube
Lower the weight and allow your arms to be drawn upward, slowly letting your elbows extend. At the same time, allow your shoulder blades to be elevated. The upward movement phase ends when elbows are completely straight and a strong sensation of stretch is felt across the outside of your armpits — that feeling is your lat muscles being properly stretched.
Form Tip: As your arms are drawn overhead and your latissimus dorsi are stretched, your low back might tend to arch. Avoid this by keeping your abdominal muscles engaged to maintain a neutral torso.
Neutral-Grip Lat Pulldown Mistakes to Avoid
Common errors in the neutral-grip pulldown occur when range of motion goes unchecked, when compensations are permitted, and when your arms “out-muscle” your back.
Excessive Range of Motion
The uninitiated often assume the pulldown is not complete until the bar touches their chest. This is erroneous. Hyperextension of your shoulder places additional stress on the front of the shoulder. (4)(5) This is not typically good for folks with anterior shoulder instability, a prevalent issue among lifters. (4) Also, consider the physics of hyperextending the shoulders at the bottom of the pulldown — Demand on the shoulder muscles actually decreases due to a shortened resistance lever.
Credit: Kitreel / Shutterstock
Still convinced touching the bar to your chest is “necessary?” Watch a handful of folks with barndoor backs perform neutral-grip pulldowns. They don’t touch the bar to their chest — Albeit, they likely couldn’t if they wanted to due to the size of their latissimus dorsi and teres major muscles.
Avoid it: A good rule of thumb for pulldown range of motion is to pull down and back until your triceps squeeze against your lats. Achieve a strong contraction, then begin the upward movement.
Slouching Into the Repetition
The sticking point, or most challenging part of the repetition, occurs near the bottom of the downward pulling phase. Novice lifters often work through this portion of the lift by rounding their shoulders forward and flexing their mid-back. This gives the appearance of “crunching” or slouching at the bottom of the repetition.
Credit: pnarongkul / Shutterstock
Avoid it: As you pull, keep focus on your back muscles by reminding yourself to create space between the front of your shoulder and the cable pulley.
“Curling” the Weight Down
While it’s true the neutral-grip pulldown can be a great biceps-builder, it is not intended to be an arms-focused exercise. Lifters who initiate the pulldown with elbow flexion and “muscle” the bar down with their elbow flexors are missing out on back gains.
Credit: Vladimir Sukhachev / Shutterstock
Avoid it: Performed properly, upper body vertical pulling exercises (i.e. pull-ups and pulldowns) are initiated by back muscles, specifically your lower trapezius and latissimus dorsi. (8) These muscles should activate a split-second before your biceps. Ensure this sequence by downwardly rotating and depressing your shoulder blades to begin each rep or “pull your shoulder blades into your back pockets.”
How to Progress the Neutral-Grip Lat Pulldown
To learn the neutral-grip pulldown, start with light weight. Over time, progress the exercise by adding weight and/or repetitions. Incorporating strategic pauses may also be useful for dialing-in proper form and building strength.
Start Light, Add Weight and Reps
Once proper form is dialed in, progress the pulldown by adding weight. The amount of weight you add should be related to your primary training goal. A weight that allows four to six good repetitions is an effective target when you’re prioritizing strength. A wide range of weights can be effective for hypertrophy, so pick a weight that allows a repetition target you prefer (e.g. eight to 12 repetitions, 12 to 16 repetitions, or 16 to 20 repetitions).
Once you’ve established your working weight, you will need to add weight or repetitions over time to ensure you are progressively overloading your muscles. A simple strategy is to add repetitions, then add weight once you’ve exceeded the top end of your target repetition range. For example, if you/re aiming for eight to 12 repetitions per set, start by identifying a weight that allows you to perform approximately eight repetitions.
In a week or two, you’ll likely be hitting nine or 10 repetitions with the same weight. Eventually, you’ll reach 13 repetitions, which is the signal to add weight. Note: If you have a bit more training experience, gains sometimes come more slowly and you might consider the occasional deload to ensure ongoing progress.
Add “Iso-Holds”
Near the bottom position of a pulldown, when your elbows are bent and just in front of your chest, the resistance at the shoulder is amplified by the length of the humerus (upper arm bone). This is the sticking point, or portion of the exercise where muscular failure or form breakdown is most likely to occur. It’s also the perfect position for adding an isometric hold or “iso-holds.” This is an intensification technique used to prolong time under tension and improve strength at targeted positions.
Credit: Vladimir Sukhachev / Shutterstock
To add an iso-hold, simply stop at the most challenging portion of the pulldown. Hold for four to six seconds, and then complete the repetition. Iso-holds can be performed on the final repetition to maximize set performance or incorporated on every repetition. Keep in mind, you will likely need to lower the weight or repetition target if you intend to use iso-holds on every rep.
Benefits of the Neutral-Grip Lat Pulldown
Sure, there are a lot of back exercises you could do at the gym, so why focus on this pulldown variations? With good effort and decent programming, lifters can build respectable size and strength with the neutral-grip pulldown due to the setup, range of motion, and user-friendliness.
Works Back Muscles Through a Full Range of Motion
During pulldowns, shoulders reach the overhead position at the top of every repetition. This exposes the target muscles to substantial stretch and load. This mechanical tension is a key driver of muscle growth. (6) Unlike rows, for example, which only train the muscles through a relatively partial range of motion, pulldowns reach maximum or near-maximum stretch on the target muscles.
Full range of motion training may result in more muscle gain over time. (7) As a bonus, full range of motion training is likely to improve flexibility as effectively, or even more effectively, than stretching. (9)
An Alternative for Banged Up Shoulders and Elbows
Although traumatic injuries among resistance trainees are somewhat uncommon, a large percentage of lifters complain of painful shoulders and elbows. (4)(10) The lion’s share of these issues can often be attributed to overuse or training errors.
Forearm position during exercise affects the stress and strain experienced by joint structures, connective tissues, and muscles around the elbow. (11) Structures around the shoulders experience different patterns of stress based on your arm path. For example, the “high five” position of abduction and external rotation passed through during traditional lat pulldowns is associated with increased stress the front of the shoulder. (4)(1)(3) Temporarily avoiding this position may be indicated in the presence of certain shoulder injuries.
Credit: MDV Edwards / Shutterstock
It may be prudent for lifters to incorporate neutral-grip variations to reduce the risk of overuse. Periodically switching out pull-ups or traditional lat pulldowns for a slightly different vertical pulling exercises, such as neutral-grip pulldowns may help to ward off overuse-type injuries.
Lifters already contending with overuse injuries related to upper body pulling may wish to experiment with variations such as the neutral-grip pullover to determine whether it’s better tolerated than previous exercises.
Allows Easy Use of Advanced Training Techniques
Advanced training techniques can include methods used to take sets past failure (e.g. forced reps, drop sets, rest-pause), delay failure (e.g. cluster sets), or increase time under tension by imposing a tempo (e.g. lowering the weight very slowly with six-second eccentrics). (12) The neutral-grip pulldown is typically performed on a stable and safe machine that allows for efficient use of these techniques.
The pulldown machine enables quick manipulation of weight — Just move the pin or slide plates on or off. This allows for efficient performance of drop sets. The machine is also self-contained and “self-spotting.” If muscular failure is reached, there is very little chance of getting pinned under weight. Just stand up and control the pulldown bar back to the top position.
Similarly, if the lifter wishes to take rest within a given set (i.e. cluster set training), the machine allows for quick stops and starts. Finally, the seated position on the machine allows for a training partner to safely and efficiently assist the lifter to perform additional reps. Advanced training techniques are far from easy, but the pulldown setup makes them about as efficient as they can be.
Muscles Worked by Neutral-Grip Lat Pulldown
The neutral-grip pulldown hammers muscles of the back, shoulders, and arms. (3)(13)(14) The pulldown is a relatively fundamental movement because it recruits a number of upper body muscles and works them through a significant range of motion.
Shoulder Extensors — Lats, Upper Back, Deltoids
The neutral-grip pulldown targets the muscles that extend the shoulders or draw the arms from in front of the body toward the back of the body. They primarily include the latissimus dorsi, teres major, rear deltoids, and the long head (or innermost portion) of the triceps brachii. Interestingly, the lower part of the pectoralis major (“costal fibers” of the chest) contribute to the pulldown as well. (14)
Credit: Vladimir Sukhachev / Shutterstock
Collectively, the shoulder extensors have the potential to be highly aesthetic muscles. Well-developed latissimus dorsi gives the back breadth, while teres major and rear deltoid enhance shoulder dimensions. And if any gap remains between the arms and upper sweep of the lats, building the long head of triceps brachii will appear to fill it in. “Wings” achieved.
Mid-Back
Sometimes called “scapular muscles,” the muscles of the mid-back act on your shoulder blades. No big back is complete without the visual interest and depth of well-developed scapular muscles.
While these muscles may not be the primary target of the pulldown, they will receive a training effect. During the pulldown, the rhomboids, lower trapezius, and middle trapezius rotate the shoulder blades downward, pull them together, and draw them toward the small of your back.
Elbow Flexors
Curls aren’t the only way to build big biceps. Drawing resistance toward the body trains the muscles of elbow flexion (bending your arms) — Specifically, your biceps brachii, brachioradialis, and brachialis. Functional importance notwithstanding, these muscles give your arms a more muscular, anaconda-like appearance.
How to Program the Neutral-Grip Lat Pulldown
Neutral-grip pulldowns can fit nicely into most lifters’ programs in a full body workout, back day, or pulling session. Whether your major training goal is strength or muscle gain, an overarching recommendation is to perform neutral-grip pulldowns earlier in the workout to maximize adaptations.
As a Primary Exercise for Strength
The neutral-grip lat pulldown is long range-of-motion, multi-joint exercise that allows incremental loading. These features make it ideal for use as a primary exercise in your “back day” or “pull day” routine. Primary exercises, sometimes termed “core exercises” in some circles, are typically placed earlier in the workout before any “accessory exercises,” which are typically single-joint exercises or rehab/prehab work.
This exercise order is preferred, because multi-joint exercise performance tends to suffer when performed after isolation exercise. (15) Moreover, exercises performed earlier in the workout tend to stimulate greater improvement in strength. (16)
To prioritize back strength, hit two to five sets of four to six repetitions using 85% or greater of your one-repetition maximum (1RM), ideally early in your workout. (17)
As High-Volume Hypertrophy Work
If your training focus is building a big back, address neutral-grip pulldowns toward the beginning of your workout. Due to heavy involvement of the biceps brachii and other elbow flexors, it is best practice to perform pulldowns before curls or other direct biceps exercises.
Some research has shown that as few as three sets of barbell curls performed before pulldowns can decrease back-training performance by three to five repetitions. (13) Lost repetitions does not bode well for optimal muscle gain, as hypertrophy is positively related to exercise volume (i.e. total weekly sets x reps). (18) Maximize pulldown volume by performing this exercise early in the workout.
For building bigger back and biceps, perform three to six sets of eight to 20 repetitions using a weight that brings each set within three or fewer repetitions of failure.
Neutral-Grip Lat PulldownVariations
On your back-building quest, there are many variations of the neutral-grip pulldown to help move you forward. Select the most appropriate variation based on personal preference, equipment availability, and goals.
Neutral-Grip Pull-Up
No pulldown machine? Prefer pull-ups over pulldowns?— Swap neutral-grip pulldowns for pull-ups. If multiple neutral-grip widths are available, start with the ones closest to shoulder-width or slightly narrower.
Despite the fact your bodyweight provides the resistance, the mechanics of the neutral-grip pul-up are similar to the neutral-grip pulldown. Start from a dead-hang, initiate from your shoulder blades, and pull your elbows down to your sides.
V-Bar Lat Pulldown
Using a narrow v-bar or “chinning triangle” attachment results in a tighter arm path and hits your back and arms differently. Neutral-grip pulldowns with the v-bar appear to rely more heavily on the biceps brachii than shoulder-width and wide neutral-grip variations. (13) So the v-bar pulldown is a great option for those prioritizing strong, thick arms.
The v-bar pulldown is performed much like the neutral-grip pulldown except the lifter should focus on squeezing the elbows and forearms together throughout the exercise. Elbows should graze your ribcage below your pecs as you approach the bottom position of the exercise.
Half-Kneeling Single-Arm Lat Pulldown
Single-arm lat pulldowns are wonderful for feeling the stretch and contraction of your latissimus dorsi and other shoulder extensor muscles through a large arc and long range of motion. Because each arm is worked individually, they can also help to address any possible side-to-side strength asymmetries.
The half-kneeling single-arm lat pulldown is the next level of single-arm pulling. The “half-kneeling” position (i.e. one knee down) provides a large, stable footprint for the addition of subtle trunk movements. These trunk movements allow more stretch at the top followed by a stronger peak contraction at the bottom of each rep. The former may enhance “stretch-mediated” muscle growth, while the squeeze at the bottom promotes mind-muscle connection and increased latissimus dorsi activity. (6)(19)
Face the cable stack and kneel with the working side knee down. Allow your shoulder blade to be pulled up for a full stretch through your lat. Side-bend your trunk slightly away from your working arm. Pull by drawing your shoulder blade and elbow down and in. Achieve peak contraction by aggressively pulling your arm to your ribcage and side-bending slightly toward the working side. Focus on feeling your lats “cramp” at the bottom of each rep.
Swiss Bar Pullover
The pullover is a phenomenal exercise for the shoulder extensor muscles — Latissimus dorsi, posterior deltoid, part of your pectoralis major, etc. Although commonly done with a both hands on a single dumbbell, the pullover may also be performed using a neutral-grip implement such as a Swiss bar, a multi-grip barbell, or triceps bar.
The Swiss bar may enable those with less-than-ideal range of motion (i.e. limited forearm pronation or shoulder external rotation) to reap the benefits of pullovers – Namely, heavy loading overhead when the target muscles are at their longest lengths, which may enhance growth.(6)(20)(21) Just be sure to have an attentive spotter due to free weights passing over your head and face during the movement.
FAQs
Should I use lifting straps for neutral-grip lat pulldowns?
It is common to use lifting straps during pulling exercises such as deadlifts and barbell rows. Lifting straps may increase the amount of weight a lifter can handle,prolong the set by minimizing grip fatigue, and spare your grip for subsequent exercises. While it is possible to use straps for neutral-grip pulldowns, it is typically not necessary. The neutral-grip position tends to stronger than apronated (overhand) grip, though not as strong as supinated (underhand) grip. (22) Moreover, trained lifters have demonstrated no beneficial effects of lifting straps on pulldown one-repetition maximum, repetitions to failure, or total repetitions across three sets to failure. (23) That being said, if you traindeadlifts during a back workout, there might be benefits to using straps to preserve your grip if you’re performing heavier pulls later in the workout.
Can different pulldown variations be used to target different portions of the lats or back?
Compared to other pulldown variations, the neutral-grip pulldown may bias certain shoulder muscles and even certain parts of the lats. While some neuromuscular strategies may differ due to grip orientation, more notable differences can be attributed to differences in grip width. The lat pulldown traditionally uses a relatively wide grip, which results in resisted shoulder adduction (i.e. pulling your arms down and into the sides of your body). (24) neutral-grip pulldown typically uses a shoulder-width or slightly narrower grip. This grip width results in resisted shoulder extension (i.e. pulling your arms toward the back of your body). The most reliable method of determining a muscle’s action is to analyze its moment arm (how a muscle crosses the joint and how much leverage it has over the joint). For example, muscles crossing behind the shoulder will extend the shoulder when they shorten. Shoulder extensors with a larger moment arm extend the shoulder more efficiently. Since the posterior deltoids and teres major have the greatest moment arms for shoulder extension through much of the pulldown’s range motion, it could be inferred that the neutral-grip pulldown will emphasize these muscles. (14) The latissimus dorsi is a broad, multi-part muscle with fibers originating on the pelvis (“iliac part”), lumbar region (“lumbar part”), and lower thoracic spine (“thoracic part”). Certain parts are mechanically better suited to adduct the shoulder (i.e. iliac- and lumbar parts), whereas the upper portion of latissimus dorsi (i.e. thoracic part) is a strong shoulder extensor. (14) Putting that all together, from a mechanical standpoint, traditional lat pulldowns may best target the iliac and lumbar parts of the latissimus dorsi (“lower lats”), while neutral-grip pulldowns may better target the thoracic part of latissimus dorsi (“upper lats”), teres major, and posterior deltoid. Ultimately, more research is needed. To cover your bases for complete back development, incorporate both pulldown variations into your training plan.
Is there any benefit to using rotating handles?
First, let’s examine how these rotating handles are often used. The handles are commonly held in the pronated (“overhand grip”) position at the top of the pulldown then gradually twisted into the supinated (“underhand grip”) position at the bottom of the repetition. Another option is to maintain the same grip and forearm position throughout the pulldown. You could hold the rotating handles in a neutral position (or any other position) throughout the repetition; however, this option introduces an additional degree of freedom (read: “instability”) and may result in reduced maximum weight or repetition performance. The rotating method feels very natural for some lifters. Anecdotally, twisting the handle throughout the repetition promotes shoulder external rotation during the pulldown. This might be useful for keeping tension on primary muscles like latissimus dorsi and teres major. Objective research on rotating handles is sparse, however. Some research has reported pull-ups performed with rotating handles increased latissimus dorsi muscle electromyography (EMG) activity, albeit not to a level reaching statistical significance. (8) But interpret these findings with caution. It must be stated that muscle activity via surface EMG is not an indicator of the quality of an exercise and it does not necessarily mean rotating handles promote better lat growth or strength. (25)(26) Ultimately, if rotating handles feel more natural or more comfortable to you, go ahead and use them instead of a rigid pulldown bar.
Earn Your Wings
The neutral-grip lat pulldown builds a wide back and thick arms to boot. When performed with a shoulder-width or slightly narrower grip, it tends to be a joint-friendly exercise for your lats, upper back, mid-back, and biceps. Altogether, neutral-grip lat pulldowns may be among the best options for building a set of wings when your shoulders have other plans.
References
Escalante, G. (2017). Exercise modification strategies to prevent and train around shoulder pain. Strength & Conditioning Journal, 39(3), 74-86.
Ribeiro, A. S., Nunes, J. P., & Schoenfeld, B. J. (2020). Selection of resistance exercises for older individuals: the forgotten variable. Sports Medicine, 50, 1051-1057.
Fees, M., et al. (1998). Upper extremity weight-training modifications for the injured athlete. The American journal of sports medicine, 26(5), 732-742.
Kolber, M. J., Corrao, M., & Hanney, W. J. (2013). Characteristics of anterior shoulder instability and hyperlaxity in the weight-training population. The Journal of Strength & Conditioning Research, 27(5), 1333-1339.
Watson L, et al. (2016). The treatment of multidirectional instability of the shoulder with a rehabilitation program: Part 1. Shoulder & Elbow. 8(4):271-278
Wackerhage, H., et al. (2019). Stimuli and sensors that initiate skeletal muscle hypertrophy following resistance exercise. Journal of Applied Physiology, 126(1):30-43.
Kassiano, W., et al. (2022). Which ROMs Lead to Rome? A Systematic Review of the Effects of Range of Motion on Muscle Hypertrophy. The Journal of Strength & Conditioning Research, 10-1519.
Youdas, J. W., et al. (2010). Surface electromyographic activation patterns and elbow joint motion during a pull-up, chin-up, or perfect-pullup™ rotational exercise. The Journal of Strength & Conditioning Research, 24(12), 3404-3414.
Morton, S. K., et al. (2011). Resistance training vs. static stretching: effects on flexibility and strength. The Journal of Strength & Conditioning Research, 25(12), 3391-3398.
Siewe, J., et al. (2014). Injuries and overuse syndromes in competitive and elite bodybuilding. International Journal of Sports Medicine, 35(11), 943-948.
Bryce, C. D., & Armstrong, A. D. (2008). Anatomy and biomechanics of the elbow. Orthopedic Clinics of North America, 39(2), 141-154.
Krzysztofik, M., Wilk, M., Wojdała, G., & Gołaś, A. (2019). Maximizing muscle hypertrophy: a systematic review of advanced resistance training techniques and methods. International journal of environmental research and public health, 16(24), 4897.
Vilaça-Alves, J., et al. (2014). Effects of pre-exhausting the biceps brachii muscle on the performance of the front lat pull-down exercise using different handgrip positions. Journal of Human Kinetics, 42(1), 157-163.
Ackland, D. C., Pak, P., Richardson, M., & Pandy, M. G. (2008). Moment arms of the muscles crossing the anatomical shoulder. Journal of Anatomy, 213(4), 383-390.
Figueiredo, T., et al. (2016). Influence of Exercise Order on One and Ten Repetition Maximum Loads Determination. Journal of Exercise Physiology Online, 19(2).
Nunes, J. P., et al. (2021). What influence does resistance exercise order have on muscular strength gains and muscle hypertrophy? A systematic review and meta-analysis. European Journal of Sport Science, 21(2), 149-157.
Peterson, M. D., Rhea, M. R., & Alvar, B. A. (2004). Maximizing strength development in athletes: a meta-analysis to determine the dose-response relationship. The Journal of Strength & Conditioning Research, 18(2), 377-382.
Figueiredo, V. C., de Salles, B. F., & Trajano, G. S. (2018). Volume for muscle hypertrophy and health outcomes: the most effective variable in resistance training. Sports Medicine, 48, 499-505.
Snyder, B. J., & Leech, J. R. (2009). Voluntary increase in latissimus dorsi muscle activity during the lat pull-down following expert instruction. The Journal of Strength & Conditioning Research, 23(8), 2204-2209.
Maeo, S., et al. (2022). Triceps brachii hypertrophy is substantially greater after elbow extension training performed in the overhead versus neutral arm position. European Journal of Sport Science, 1-11.
Pedrosa, G. F., et al. (2021). Partial range of motion training elicits favorable improvements in muscular adaptations when carried out at long muscle lengths. European Journal of Sport Science, 1-11.
Murugan, S., et al. (2013). Grip strength changes in relation to different body postures, elbow and forearm positions. Int J Physiother Res, 1(4), 116-121.
Valério, D. F., etal. (2021). The effects of lifting straps in maximum strength, number of repetitions and muscle activation during lat pull-down. Sports Biomechanics, 20(7), 858-865.
Snarr, R., Eckert, R. M., & Abbott, P. (2015). A comparative analysis and technique of the Lat Pull-down. Strength & Conditioning Journal, 37(5), 21-25.
Vigotsky, A. D., et al. (2018). Interpreting signal amplitudes in surface electromyography studies in sport and rehabilitation sciences. Frontiers in Physiology, 985.
Vigotsky, A. D., et al. (2017). Greater electromyographic responses do not imply greater motor unit recruitment and ‘hypertrophic potential’ cannot be inferred. The Journal of Strength & Conditioning Research, 31(1), e1-e4.
It might be the most frequently asked question among hardcore “gym bros” and experienced gym veterans looking to establish a pecking order, as well as curious beginners looking to strike up a conversation. It’s also one of the most popular (if misguided) ways to inquire about someone’s strength, fitness, and general capability in the gym.
Credit: antoniodiaz / Shutterstock
Some might consider the notion of bench press-specific status ridiculous, but you can’t erase the reality of the situation. Also, some people just want to have a big bench press for themselves. You may as well position yourself to move some impressive numbers, and move the weight safely.
Here’s how to fine-tune your bench press, optimize your technique, and set up a plan to start pushing bigger weights.
Bench Press Technique Review
A strong bench press is built around one thing: Stability. Here’s a step-by-step approach to creating a good environment for a big lift. It all begins with a good starting position before you even unrack the weight.
Step 1 — Find Your Contact Points
Credit: Morit Summers
Once you’re positioned on the flat bench, the bench press requires four points of contact. Your two feet placed firmly on the floor counts as one point. Your butt and upper back are two more points, as they’re pressed hard against the bench and remain in place throughout the lift.
Lastly, your head must also be firmly against the bench and stay put during each repetition. When you set up, get your eyes directly under the bar before taking the weight out of the rack. This four-point setup is the foundation for a good quality set.
You may have noticed that your lower back is not in contact with the bench, and that’s actually an important distinction. Some lifters believe that having an arch in the lumbar region (lower back) when bench pressing is dangerous for your spine, when truthfully, the arch must be there.
The bench press is considered a horizontal pushing exercise (due to the position of the load relative to your body), which means the force angle doesn’t line up to create spinal loading the way a standing overhead press, squat, or deadlift would affect your lower back. The joint that bears the most load during a bench press is your shoulder joint, not your spine, so arching your lower back doesn’t expose it to any significant strain.
Once you’re in place, it’s time to get your hands on the bar.
Step 2 — Get a Grip
Credit: MDV Edwards / Shutterstock
Most barbells you’ll find at a typical gym will have knurling on either side for grip, but also some shiny “rings” on even points on each side. In competitive powerlifting, those rings represent grip-width boundaries a lifter isn’t allowed to exceed.
If you’re not a competitive powerlifter, you can use the rings as reference points as to where your hands belong. Depending on what’s comfortable for your arm length, align the same finger on each hand with the ring on either side. Many lifters will opt for either their middle or ring fingers, but everyone’s preferred grip will be slightly different.
Just be aware of setting your hands too close together with your pinkies far inside of the rings. This morphs the exercise from a standard flat barbell bench press to a close-grip bench press which emphasizes your triceps. (1)
Once your hands are in place, close a strong fist around the bar and you’re ready to lift.
Step 3 — We Have Lift Off
The way you take the bar out of the rack is more important — and more technical — than meets the eye. Safe and efficient technique requires your shoulder blades to remain retracted (pulled together) on the bench. This helps to arch your lower back while elevating your chest and ribcage.
The small “press” that might happen as a lifter takes the bar out of the rack can pull your shoulders out of position (with protraction, the opposite of retraction). Protracted shoulders will make your chest sink down and place more stress on the shoulder joints as a result. This is difficult to correct by the time the weight is in your hands, making it tough to re-adjust.
Making the effort to raise your hips during lift off can help with this, placing them back down as soon as the bar’s unracked and in position over your chest. Lifters without a spotter can use this method to begin the movement in a strong position without sacrificing form.
Step 4 — Lower and Press
Credit: Hryshchyshen Serhii / Shutterstock
The bar should descend under control to make contact on your chest. Aim for touching the bar to your mid- or lower chest, and make that point of contact consistent from rep to rep. The finished, locked out position should be a bit more in line with your upper chest or shoulder-level, meaning the bar will travel on a slightly slanted path.
Always remember that a true testament of strength in a big lift like this doesn’t come from how quickly you can perform the reps, it comes from how slowly and well-controlled you can perform them. Especially on the eccentric (lowering) phase, take the speed down a couple of notches. You can even add a pause with the bar on the chest to exert even more control over the weight — just be sure to stay tight and not relax under the weight.
Make each individual rep count and you’ll slap on strength and size.
Bench Press Mistakes to Avoid
Nobody wants to become the next “YouTube fail” video, usually featuring people butchering the bench press movement or, worse, getting into life-threatening situations due to a disregard for safety. Make sure you’ve got your bases covered by stopping these issues before they start.
Lifting Your Hips
Aside from giving yourself a lift off (if needed), your glutes should never leave the bench during the exercise. Lifting your hips won’t make you any stronger on the lift. It’s simply a cheat tactic and an indicator that the weight is too heavy to lift properly. This is the bench press equivalent of doing standing biceps curls and leaning your upper body back to get the weight up.
Credit: Serghei Starus / Shutterstock
Keep the movement honest to your ability. You’ll build strength over time when you apply good form.
Half-Repping
Stopping shy of full range of motion — from full lockout to the bar touching your chest — does nothing to properly service your chest muscles (the prime movers of the bench press) or access the strength the body can put into the weight. (2)
If you feel like you can only perform half reps, chances are the weight is too heavy, your shoulders are too unstable, or both. Instead, reduce the load and practice staying tight through full range of motion.
Credit: Sarayut Sridee / Shutterstock
If that still hurts your shoulders, it could be due to weakness in the movement itself or it could stem from a lack of upper back strength to stabilize and protect the shoulder. Make sure your training plan includes plenty of upper-back pulling exercises like face pulls or reverse flyes.
Using Collars on the Bar
This isn’t necessarily a point about increasing your bench press, but it’s an important issue any time you’re benching heavy. It might sound counterintuitive or controversial but, if you’re lifting alone, securing the weight plates with collars is a potentially high-risk maneuver.
Credit: antoniodiaz / Shutterstock
Common sense would say you usually “should” secure the weights to prevent them from moving around. The truth is that, if you do fail a rep and manage to get pinned to the bench, it could spell danger if you’re not strong enough to press the bar off your chest all the way back up to the rack. You can’t always rely on rolling it down over your hips and waist (which can be extremely painful and uncomfortable on its own).
If you’re a person who lifts unsupervised at home, it’s best to leave the weights unclipped so that, in the event of failure, you can tip the weights off one end of the bar and free you from being stapled. It’s better to crack a couple of tiles on the workout room floor than to crack a couple of ribs or your larynx.
Three Tips for More Gains
Getting the basics down is a good first step, but taking things to the next level involves a little deeper thinking, where this exercise is concerned.
Leg Drive
Tuck your feet closer to your butt to create a knee angle inside 90-degrees. This is essential to taking advantage of a very important and overlooked principle — the bench press is more than just an “upper body” exercise.
Credit: MDV Edwards / Shutterstock
In truth, your legs have a serious role to play in promoting overall bracing and tightness. As you press, think about driving your feet into the ground hard. The bar isn’t just moving away from your chest, it’s moving away from the floor, so this cue will come in handy to add more strength to your lift by increasing overall muscle recruitment. (3)
Tuck Your Elbows
If you want to protect your shoulder joints, focus on improving bench performance while using a slightly narrower grip (as opposed to a relatively wide grip) and tucking your elbows during the movement.
Credit: MDV Edwards / Shutterstock
The closer your upper arm is to your torso, the less vulnerable position your shoulder joints will be put into. Your shoulders will instantly feel happier, more stable, and more powerful by aiming your elbows more forward than sideways.
Use a Thicker Bar or Thick Grip Attachments
Using a larger diameter bar with more surface area spread across the palms of your hands usually feels more comfortable once you get used to the unique grip. It also can reduce joint stress in the elbows and shoulders by increasing forearm recruitment and muscle tension for added stability. (4)
The greater diameter disperses the load and reduces the pressure transferred to your joints. If you don’t have access to thick barbells, you can use thick grip attachments like “Fat Gripz.” This simple pair of removable handles can be one of the most useful tools to have in your gym bag, since it can be used with any exercise that requires grabbing a barbell, dumbbell, or handle.
Build a Better Bench: Methods That Work
If you’ve been training in the gym for a while, the classic 3 x 10 or 4 x 6 might not really be doing the job to get you past your strength or size plateau. If your lifting numbers aren’t budging, it’s worth thinking a bit further outside the box to find ways to stimulate your chest.
One-and-a-Half Rep Bench Press
Especially if a lifter has longer arms, it can be a hassle adding muscle to the chest for a better aesthetic. The relatively long range of motion and massive amount of lockout space a lifter will have to move through can make the triceps and shoulders take over a typical chest pressing pattern. This leaves the chest less fatigued over the course of a set.
Performing a “one and a half rep” bench press involves unracking the barbell and lowering it all the way to chest level. Remain tight and press the weight from chest level to halfway up, and pause. Your upper arms should be at roughly 90-degrees. Lower the weight once more to chest level, and then press all the way up to the top — that entire series counts as one single repetition.
This high-tension technique will make your chest work more than your triceps and shoulders because the latter two muscle groups aren’t significantly involved in the bottom-half of the movement.
Your chest is in the strongest biomechanical position, and is the most involved, through this section of the exercise, and the one-and-a-half rep technique takes advantage of that. Three to four sets of four to six reps would be ideal here, remembering that each “one and a half” equals one rep.
Cluster Sets
Cluster sets deserve more mention than they often get when it comes to increasing your strength and size. Understanding how the body works from a physiological level can help create more appreciation for cluster training and its import.
When it comes to short bouts of explosive power like a 100-meter dash, a first down in football, or a heavy, low-rep set of weight training, the body relies on adenosine triphosphate (ATP) as its primary source of energy to make muscles work hard.
The ATP stores leave the body after 10 to 15 seconds and the primary muscles in use begin to shut down and create lactic acid as a byproduct. It usually takes one to two minutes to sufficiently replenish these stores of ATP in the affected muscles.
Knowing that, you can take advantage of this replenishment phase while still lifting heavy weights. A set of three reps can be extended to four or even five total reps if short breaks are taken between each individual repetition.
This mini-rest will partially replenish the stores of ATP available in the body. This can improve your strength over time and also expose you to a higher cumulative volume of heavy reps, which can lead to more muscle growth. Here are some of the most effective ways to use clusters.
Single-Rep Clusters
Put 90-95% of your one-repetition max on the bar. This weight is typically a two-rep max, but you’re about to do four reps with it. Perform one repetition, and rack the weight for 10 to 15 seconds. Then take the weight off the rack and perform another before re-racking it. Repeat until you’ve performed four reps. Rest at least two minutes and perform a total of two to three full sets.
Resetting between single reps also allows you to ensure correct technique on each separate effort.
Multi-Rep Clusters
Put your five-repetition max on the bar. Perform four reps before racking the weight and resting for 10 seconds. Take the bar off the rack and perform two more reps. You’ve just performed six reps with your five-rep max. Complete three to five full sets.
This is a good way to increase time spent under tension (TUT), which benefits muscle growth, while working with slightly lighter-than-max loads, which won’t impact recovery as much as very heavy lifting. (5)
High-Rep Clusters, aka Ladders, for Size
Plenty of heavy lifting can do a number on the nervous system, especially if heavy lifts are employed on the regular. A good change of pace (that doubles as a great way to break a size plateau) is to use high-rep methods with the same approach.
Ladder sets are just the ticket. Use your 10 to 12-rep max weight. Perform a mini-set of two reps, then three reps, then five reps, and finally 10 reps with 10-second breaks between each mini-set.
This creates 20 reps of muscle-building stimulus with a weight that “should have” only allowed 10 to 12 reps. One or two sets can be plenty. It’s a psychological killer as much as it is a muscular killer, all while keeping the nervous system in check due to the higher rep range and relatively lighter weight.
Go Build a Bigger Bench
The bench press is arguably the most popular lift in the gym. With that prestige, it should be the most properly executed, but that’s not always the case. With this information now in hand, you’ll be set apart in the gym and will have found a way to train smart while also training hard. Soon your performance will be turning heads and you’ll have a reliably impressive answer next time you’re asked “how much do you bench?”
References
Saeterbakken, A. H., Stien, N., Pedersen, H., Solstad, T. E. J., Cumming, K. T., & Andersen, V. (2021). The Effect of Grip Width on Muscle Strength and Electromyographic Activity in Bench Press among Novice- and Resistance-Trained Men. International journal of environmental research and public health, 18(12), 6444. https://doi.org/10.3390/ijerph18126444
Pinto, R. S., Gomes, N., Radaelli, R., Botton, C. E., Brown, L. E., & Bottaro, M. (2012). Effect of range of motion on muscle strength and thickness. Journal of strength and conditioning research, 26(8), 2140–2145. https://doi.org/10.1519/JSC.0b013e31823a3b15
Gontijo, L. B., Pereira, P. D., Neves, C. D., Santos, A. P., Machado, D.deC., & Bastos, V. H. (2012). Evaluation of strength and irradiated movement pattern resulting from trunk motions of the proprioceptive neuromuscular facilitation. Rehabilitation research and practice, 2012, 281937. https://doi.org/10.1155/2012/281937
Krings, B. M., Shepherd, B. D., Swain, J. C., Turner, A. J., Chander, H., Waldman, H. S., McAllister, M. J., Knight, A. C., & Smith, J. W. (2021). Impact of Fat Grip Attachments on Muscular Strength and Neuromuscular Activation During Resistance Exercise. Journal of strength and conditioning research, 35(Suppl 1), S152–S157. https://doi.org/10.1519/JSC.0000000000002954
Burd, N. A., Andrews, R. J., West, D. W., Little, J. P., Cochran, A. J., Hector, A. J., Cashaback, J. G., Gibala, M. J., Potvin, J. R., Baker, S. K., & Phillips, S. M. (2012). Muscle time under tension during resistance exercise stimulates differential muscle protein sub-fractional synthetic responses in men. The Journal of physiology, 590(2), 351–362. https://doi.org/10.1113/jphysiol.2011.221200
When it comes to building muscle one leg at a time, the Bulgarian split squat, also known as the rear foot elevated split squat, usually gets all the praise and attention. But the real ones know how underrated the front foot elevated split squat truly is.
Credit: Zoran Pucarevic / Shutterstock
The unfairly overlooked front foot elevated split squat is gaining quite the popularity surge, especially from its use in rehab and athletic settings. This upgraded split squat variation is typically a little more comfortable to set up than the rear foot elevated option and it can skyrocket your lower body muscle, strength, and athleticism. Here’s a closer look at this unique exercise.
Front Foot Elevated Split Squat
The front foot elevated split squat, or FFESS, requires a high-level of stability across a long range of motion, which can make the exercise difficult to master. Follow these technique cues to tackle this single-leg exercise.
Step 1 — Set Up Your Platform
Credit: Balance in Motion / YouTube
You will notice a massive benefit from even the slightest elevation. Any platform that is at least two to four inches high will be sufficient. A small aerobic step or one or two weight plates work nicely. Use bumper plates, if possible, to prevent sliding. If your gym has an Olympic lifting platform with a raised edge, that can work too.
Form Tip: A staircase might seem like a convenient option, but it’s likely too high to start with and can make the movement too awkward. It will end up feeling more like an indecisive hybrid between a split squat and a step-up while delivering the results of neither.
Step 2 — Elevate Your Front Foot
Credit: Iron Monk / YouTube
Having a strong and stable front foot is, obviously, key to the front foot elevated split squat. Stand upright and set one foot flat on the platform. Keep your entire foot in contact throughout each repetition. Don’t raise up onto your toes or heel.
Form Tip: Supportive shoes can play a surprisingly significant role in your mobility, stability, and force production. (1) Old school Chuck Taylor sneakers, dedicated weightlifting shoes, or any stable-soled shoe is preferable. Super-floppy, extremely cushioned running shoes are not ideal because stability will be compromised as your foot compresses into the cushioning.
Step 3 — Set Your Back Foot
Credit: PriorityStrength / YouTube
Your back foot should be as secure and stable as your front foot. Keep your front foot in place and step back a comfortable distance for you, depending on your leg length and general mobility.
Depending on your ankle mobility, your back foot will likely be on the ball rather than flat on the ground. This is acceptable because this foot is primarily for support and balance, and will not be producing much force into the floor.
Form Tip: For maximum balance and stability, make sure your back foot is in its own “lane,” not directly in line with your front foot. You shouldn’t feel like you’re perched on a thin balance beam. You should feel stable and grounded.
Step 4 — Lower Yourself With Control
Credit: PriorityStrength / YouTube
Take a deep breath and feel both feet securely in place before descending into the rep. Feel your lower body and your core being still before descending. Keep your upper body upright with your shoulders pulled back.
Bend your front leg and lower yourself with control. Descend as low as possible, ideally reaching your back knee to the ground.
Form Tip: Depending on your mobility, your back knee should gently graze the ground — with an emphasis on gently. Some lifters fail to pay attention during the descent and quickly smash their back knee into the ground. Don’t do that.
Step 5 — Drive Up to the Starting Position
Credit: PriorityStrength / YouTube
When you’ve reached the deepest position your hip and leg mobility allows, push through your front leg to drive up to a standing position
Keep your upper body close to vertical as you drive up. Don’t allow yourself to bend forward at the waist. Repeat all repetitions with one leg before switching sides.
Form Tip: It can be tempting to bounce out of the bottom by leveraging the stretch reflex — a muscle’s ability to “rebound” during the transition from a stretched position to a full contraction for increased momentum and power. (2) Avoid it to allow your glutes and quads to do all the work. This will build more muscle by increasing the time under tension, while keeping you safer by reducing ballistic forces.
This exercise can feel tricky, especially when you’re awkwardly setting up for the first time. Here are some common mistakes to avoid.
Not Being Mobile Enough
While this exercise can be great for building mobility, if your hip and ankle mobility resemble the Tin Man, you will struggle to go deep enough to reap the muscle- and strength-building benefits. (3)
Credit: GrowFormance / YouTube
If you’re unable to descend near full-depth, the exercise won’t be any different for building size or strength than a standard split squat, but it can still be beneficial as a mobility drill if you focus on improving your depth instead of adding reps or weight.
Avoid it: To perform the exercise efficiently, do a dynamic warm-up prior to your leg workout to ensure your hips and ankles are thoroughly mobilized and prepared for training. Over time, this should help to get into the deeper positions of knee flexion and hip flexion needed to reach the bottom position.
Not Going Low Enough
The purpose of the platform elevation is to increase the range of motion. It lets you get into degrees of knee and hip flexion that you couldn’t access with other exercises.
Credit: Kevin Maxen / YouTube
However, it’s common to see people do the first few reps with a perfect deep reps but, when the pump sets in, they start to compromise the range of motion. Soon enough, the “front foot elevated split squats” appear to be using less range than traditional split squats with both feet on the ground.
Avoid it: Choose an elevation level that works for you and keep every rep consistent. Try to lightly touch your back knee to the ground each rep, or at least get close. Using a folded towel or padded mat under your back knee can serve as a reliable target as long as it allows your back knee to reach lower than your front foot.
Being Too Wobbly
The elevated front foot-position will make balance more challenging. The more wobbly you are, the less muscle-building force you can generate. Not to mention, you’ll feel self-conscious if you topple over while holding a pair of light dumbbells.
If you’re focused on maintaining balance more than you’re focused on actually training your legs, the overall stimulus will be reduced and you’ll waste energy.
Credit: kristifitnick / YouTube
Avoid it: Take your time to secure your foot position before doing a couple of warm-up sets. Even if your working weight will be relatively light, a warm-up set or two with only your body weight can be a game changer in preparing your nervous system and core musculature to stabilize the load effectively.
Consider including the FFESS in your program because it’s simple to progress. It also never runs out of progression because, if you do manage to run out of weights, your legs will be beyond elite status at that point.
Begin with Bodyweight
The bodyweight-only FFESS can be quite humbling. Even for some advanced lifters, the exercise can be challenging especially when done toward the latter part of a workout. Performing the exercise as a “finisher” when your legs are pre-fatigued from heavy training can be an eye-opening, leg-burning experience.
The bodyweight FFESS is also an excellent go-to exercise when you have limited equipment, like when you’re training at home or on the road.
Loading with Dumbbells
Once you master bodyweight FFESS, consider adding load via dumbbells. This is the easiest and most common setup for loading — simply hold a pair of dumbbells at your sides.
Using a narrow platform helps prevent the dumbbells from clashing with the platform, especially if you have longer arms and reach maximum depth. Controlling the weight and not allowing the dumbbells to hit the platform works fine, as well.
As the weights get heavier, and as you’re able to do more reps per set, your grip will likely fatigue quite a bit over the course of multiple sets. Once you feel it kick in, you should use lifting straps or some sort of assistance to eliminate your grip as a weak link.
Barbell Front Foot Elevated Split Squat
Barbells allow for the most loading, but they are also the most time consuming to set up along with adding more instability. However, this is a necessary compromise once you get strong.
Make sure you have a strong, stable platform to support the added weight. Set up in a rack with safety pins, similar to performing squats. Progress like most barbell exercises, adding a little more weight and a few more reps from week to week.
This exercise has some unique ways of delivering its benefits. Here’s why you should incorporate the FFESS as soon as possible.
Hypertrophy and Strength
The front foot elevated split squat will produce single-leg strength and hypertrophy thanks to a long range of motion and unique positioning compared to other exercise options. The front foot elevation allows you to push your center of mass forward, bringing your hamstring against your calf without compromising torso position.
This stretches the muscles of the quads and glutes under load and increases mechanical tension compared to bilateral squat variations. The unilateral (single-leg) nature helps with addressing potential imbalances and also maximizes range of motion, which increases hypertrophy. (3)
The strength you gain from this exercise translates efficiently to many other exercises. You’ll notice your single-leg and bilateral (two-leg) lower body exercises getting stronger after focusing on the FFESS as an accessory movement.
Pain-Free Training
One of the main benefits people explore this exercise in the first place is to find pain-free alternatives to barbell squatting. If your joints are achy, this exercise can be a perfect option.
Credit: Anatoliy Karlyuk / Shutterstock
It allows you to lighten the load while achieving ranges of motions you likely didn’t have access to. Over time, you achieve pain-free muscle building. In addition, the FFESS reinforces new degrees of hip, knee, and ankle mobility.
The FFESS prioritizes your lower body muscles — perfect for your favorite leg day. Some core stability and upper body stability is trained as well, especially when using added load.
Quadriceps
The front foot elevated split squat primarily trains your quads. The front thigh muscle gets worked through a long range of motion as you get into deep angles of knee flexion (bending). With your front foot elevated, you have the opportunity to drive your knee forward for a deep weighted stretch in the quads.
Glutes
Similar to many squat variations, your glutes are also going to get a significant stimulus during the FFESS, especially in the bottom stretched position.
Credit: Sergii Gnatiuk / Shutterstock
You’ll likely feel more glute soreness, especially if you’re used to a relatively shortener range of motion from traditional squats and split squats.
Adductors
The FFESS will also nail your inner thighs (adductors), particularly in your front leg. This muscle gets a high degree of stabilizing action during the exercise, along with some dynamic contraction to extend your hips at the top of the movement.
Generally speaking, it’s best to do unilateral exercises after heavier bilateral exercises to avoid fatiguing important stabilizers. You can program the FFESS after your heavy sets of squats, possibly as the second or third exercise of a lower body day.
However, the stimulus from the FFESS is effective and comprehensive for the quads, glutes, and adductors, so it’s can also be valid to program them as your first exercise. This is ideal, for example, for lifters with achy knees who don’t do well with heavy bilateral movements early in the workout. Prioritizing the front foot elevated split squat allows your hips, knees, and ankles to be more thoroughly warmed up before proceeding to relatively heavier lifting.
Moderate to Light Weight, High Reps
This exercise is best suited for moderate to light weight. This allows for less joint strain and connective tissue stress, and allows you to better control the weight which can give you a better mind-muscle connection.
Credit: BarBend / YouTube
Most people will prefer to do these with relatively light weight and higher reps to create a strong pump and an even stronger mind-muscle connection. With this approach, some lifters may even be able skip any warm-up sets, depending on how they feel and how their body responds. Pick a load you can do for at least 12 reps, and crank out two or three sets of 10 to 20 per leg.
Heavy Weight, Low Reps
If you do FFESS early in the workout, you can go heavier. Your nervous system will be fresh and you can stabilize heavier loads. Three or four sets of five to 10 reps (per leg) is already pretty heavy for this exercise. You will still need one or two warm-up sets, especially if you’re strong and plan on approaching your limits.
Using extremely heavy weights for very low reps is not advisable because the stability required for them may not be worth it. It’s not the type of exercise to test your one-rep max because the risk:reward just isn’t worth it.
There’s a couple of effective variations of the front foot elevated split squat for those that are more adventurous or want to progress beyond the standard movement.
Heel-Elevated Split Squat
Instead of just elevating your front foot, add an additional plate or ramp to elevate your heel even higher. This puts your foot into a steep angle, creating even more knee flexion and makes an already quad-dominant split squat even more quad-dominant.
This is great for those in need of serious quad growth or for athletes who want to get used to deeper ranges of knee flexion, including combat sports athletes, strength sports athletes, football players, or sprinters.
Double-Elevated Split Squat
If you want to maximize your mobility and range of motion, you can elevate both the front and back foot. Essentially, you are combining the FFESS with a Bulgarian split squat. More range of motion for both the front leg and the back leg can help to skyrocket your quad and glute gains.
Setting this up can be cumbersome and requires some extra space, but once you’ve determined a good set up and know an effective distance to set each platform, it should be pretty smooth each time you’re in the gym.
Frequently Asked Questions
What makes the front foot elevated split squat different than the rear foot elevated split squat (Bulgarian split squat)?
Depending on your structure and mobility level, the two exercises might not be all that different. However, most people will feel their quads more during the FFESS. You can think of the front foot elevated split squat as a more “quad-dominant version” of Bulgarian split squats. FFESS are also easier to setup and generally feel more comfortable to perform. Elevating your back foot with Bulgarian split squats usually requires more hip and ankle mobility and can be a bigger challenge to maintain balance.
Why don’t I see more people in the gym doing the front foot elevated split squat?
Bulgarian split squats are simply more popular in recent years. They’ve garnered a reputation for being painful — the “good kind” of pain from post-workout soreness — and more “hardcore.” They are a great exercise, but the front foot elevated split squat is starting to catch up in popularity thanks to the rehab world. Many physiotherapists assign the FFESS as a way to train deep ranges of motion with reduced knee pain. Many people learn the movement and end up realizing, “Oh, snap, these are great even if I’m not trying to rehab my knee thanks to the gnarly quad pump.”
Single-leg training is often overlooked in many training routines. Performing exercises with an increased range of motion, even moreso. The FFESS is a straightforward solution to both of these deficiencies. This comprehensive exercise will payoff with more size, more strength, better mobility, and improved all-around performance. You just need to step up to the challenge.
References
Legg, H. S., Glaister, M., Cleather, D. J., & Goodwin, J. E. (2017). The effect of weightlifting shoes on the kinetics and kinematics of the back squat. Journal of sports sciences, 35(5), 508–515. https://doi.org/10.1080/02640414.2016.1175652
Seiberl, W., Hahn, D., Power, G. A., Fletcher, J. R., & Siebert, T. (2021). Editorial: The Stretch-Shortening Cycle of Active Muscle and Muscle-Tendon Complex: What, Why and How It Increases Muscle Performance?. Frontiers in physiology, 12, 693141. https://doi.org/10.3389/fphys.2021.693141
Schoenfeld, B. J., & Grgic, J. (2020). Effects of range of motion on muscle development during resistance training interventions: A systematic review. SAGE open medicine, 8, 2050312120901559. https://doi.org/10.1177/2050312120901559
The gym is for everyone. It’s for bodybuilders working to reach 5% body fat on stage and powerlifters who want to bench press 500 pounds. The gym is also for folks who have some gray in their hair, some well-earned laugh lines, and a few general aches and pains from more than two decades of “adulting” — that’s a term today’s kids use for the thing we just call “life.”
Credit: Lestertair / Shutterstock
If you’re checking the 40 or above age bracket on doctors’ forms, right before that doctor says, “You really should get more exercise,” you need to approach the gym with a few rules in mind. Not to be a buzzkill, but you can’t train like a 20-something because you don’t recover like a 20-something.
That certainly doesn’t mean Gen-Xers in the gym (Gym Xers?) are as delicate as the splinter-laden seesaws that used to be on the playground. You’re not stuck with light weight machine-based training or water aerobics, but you need to follow a few guidelines to get results with less pain. Here’s what to know about getting fit when you’ve got decent mileage on the chassis.
Over 40 Training Guide
Why Age Matters
The years eventually pile up on everyone and force change. Whether it’s Jennifer Grey going from an “it girl” to “who’s that girl?” or Green Day moving from punk rock revolution to Broadway musical, what matters most is acknowledging and accepting that everyone does, eventually, grow up. Just as sure as you can count on your favorite ’80s flick being resurrected as a weak remake, you can count on your body adapting to the added years. And, in both cases, it happens whether or not you want it to.
As you get older, wear and tear will eventually affect you whether it comes from lifting weights, playing tennis, working manual labor, or basic day-to-day activities. If you want to continue performing any of those activities for the long haul, it’s critical that you approach them with some kind of plan in mind.
However, this isn’t a proverbial (let alone literal) death sentence. It simply means that, if you want to begin weight training and other forms of exercise, you need to take a well-thought-out approach that will let your current body carry out the necessary pursuits.
Credit: wavebreakmedia / Shutterstock
Particularly when it comes to weight training, research suggests that muscular recovery takes longer as a person ages. (1) So your weekly weight training plan needs to accommodate a slightly longer recovery period between sessions.
A relatively older body also doesn’t respond to volume or intensity the same way a younger body responds, so you need to establish a more carefully calculated approach to sets, repetitions, and load (weight). (2)
Lastly, if you’re coming in to the gym with any pre-existing injuries or conditions — which, of course, were totally caught early because you’ve gotten the classic full medical check-up before starting a training routine — those issues will directly impact the exercises you can or cannot (and should or should not) do. You might have your heart set on benching 315, but if you’ve lived with a torn rotator cuff since college, the lift probably isn’t in the cards.
Training for the Over 40 Beginner
There are plenty of successful competitive bodybuilders, powerlifters, Olympic weightlifters, and CrossFit athletes in their 40s, 50s, and beyond. That should indicate a clear sign that you can and should participate in some type of weight training at any age. But unless your actual goal is to compete in a specific strength sport, you’ll be best served by taking a wider outlook on how you plan your training program.
Remember in the early ‘90s when a new sport called “mixed martial arts” appeared on the scene? It highlighted what happened when a kickboxer fought a wrestler or a karate practitioner tussled with a taekwondo expert.
What eventually became obvious (over sequential MMA events and, inevitably, over the years) was that hyper-focusing on one single avenue of training limited overall development. The best modern-day mixed martial artists aren’t just a master of a single fighting style — they’re excellent at a few forms of combat.
Credit: Diana Lopes / Shutterstock
To safely and effectively start training as a mature lifter, you must adopt that same well-rounded mindset. Train like a mixed martial artist. More specifically, don’t come into the training world expecting to train “like a powerlifter,” or “like a bodybuilder,” or any other relatively narrowed lens unless you have intentions of competing in a particular strength sport. But the odds are you don’t; you’re probably just here to get in shape. Here’s how you’ll get it done.
Choose The Right Exercises
Generally speaking, when it comes to picking your exercises, forget anything you’ve heard about “must-do” movements. The powerlifting big three — back squat, bench press, and conventional deadlift — are often touted as “the way” to build a base of size and strength. That’s well-intentioned advice but inapplicable and unnecessary for the over-40 crowd.
While there’s nothing inherently wrong with those three specific exercises, they’re not overwhelmingly more effective than, say, front squats, overhead presses, and trap bar deadlifts. Again: If you’re not going to be a competitive powerlifter, you’re not limited to training like a competitive powerlifter.
Choosing a variety of multi-joint and single-joint exercises will efficiently target your entire body without neglecting or over-emphasizing anything. Be sure to incorporate a range of equipment like barbells, dumbbells, cable pulleys, machines, resistance bands, kettlebells, and any useful gear you find in the gym. This can help reduce potential overuse pattern injuries compared to performing the same five exercises for months.
Most importantly, don’t force-feed your body any exercise that doesn’t mesh with your pre-existing joint issues. Suppose you have long legs for your height. In that case, you may be more comfortable performing sumo deadlifts instead of using a closer, conventional stance, even though Internet meme culture will try to convince you that sumo deads are a lesser choice.
Sets and Reps
A popular old school mindset used to advocate throwing everything plus the kitchen sink into a training session. The goal was to thoroughly breakdown the muscle fibers and dig a deep trench of fatigue that “should” later be filled in with an abundance of new muscle tissue. However, a moderate workload can stimulate muscle and strength gains more efficiently than a super-high volume plan that blasts every body part with multiple exercises for a half-dozen sets of each movement.
Credit: YAKOBCHUK VIACHESLAV / Shutterstock
The specific exercises will play a factor in determining adequate volume for each movement. For example, you typically wouldn’t perform a deadlift for sets of 20 reps because cardiovascular conditioning and low back fatigue would become the limiting factor before other target muscles.
Generally speaking, six to 10 sets of five to 12 reps per body part per week is an effective place to start. (3) Ideally, this would be split into multiple movements across multiple weekly training sessions. Relatively larger body parts like your back and legs could necessitate the higher end of the workload. Smaller body parts like biceps or abdominals can be sufficiently trained with a lesser amount of direct training.
As a very general rule, strength-focused lifts that let you load relatively heavier weights are effective when trained with three to five sets of four to six reps. Exercises that aren’t conducive to heavy loading, like many single-joint movements, can be more effectively trained with two to four sets of eight to 12 reps.
How Heavy, How Hard?
Due to a relatively reduced capacity to recover, don’t turn the dial up to 11 in any particular training session. You want to make it through your workout and walk out of the gym feeling successful, not beaten down.
Avoid taking too many (if any) sets to complete muscular failure. Pushing to failure too often can potentially compromise technique, which can invite injury. It also increases overall recovery demands while providing little to no extra stimulus for building size or strength. (4)
Similarly, the weight used for any set should allow you to reach your target rep range with solid form. Struggling to complete a set whenever needed is fine; compromising your form and cheating the movement to get an extra rep or two is a high-risk/low-reward idea.
How Many Days Per Week?
Many people spend 40 to 50 hours per week working. Add in a daily commute, time with family, and maybe even a little time to eat every day, and your schedule can quickly become too crowded for the gym. Making time to train is one of the biggest hurdles you’ll need to overcome before you even touch a weight.
Rather than overwhelm your week by trying to fit five or more workouts into an already crowded schedule, consider starting with three weight training sessions per week. When properly programmed, and paired with a little non-gym activity, that can be a highly effective approach.
Credit: Paul Aiken / Shutterstock
Rather than training just one or two body parts per day, which would require at least five training days to target your entire body, consider following an upper/lower split, apush/pull/legsplan, or a full-body training routine to set up more efficient training within the framework of three sessions per week.
On any non-lifting days, you can perform short conditioning workouts or some type of cardio training to complement the gym sessions. By staying active throughout the week, you’ll burn a few extra calories and improve your cardiovascular health. In fact, when performed as part of a comprehensive program, doing some type of cardio exercise for as little as three hours (total) per week has been associated with a reduced mortality risk. (5)
Combine that with research indicating that weight training for 60 minutes per week (a bare minimum target) is also associated with reduced mortality risk, and it’s clear why the doctor keeps harping on you to start exercising. (6) If you’re active more days of the week than not, you’ll be moving in the right direction in terms of health, physique, and performance.
Nutrition and Recovery Tips
If going to the gym was all it took to get into great shape, well, it would be a lot easier for everyone to get into great shape. However, training is only one part of the puzzle. Just like Ferris had Sloane and Cameron, your training needs support from good nutrition habits and recovery methods.
Nutrition
Once you’ve made the decision to begin training, you’ve also made the decision to support that training with a goal-focused nutrition plan. They’re linked. Otherwise, you’ll end up wasting time and energy because you won’t be able to capitalize on the fat-burning, muscle-building training stimulus.
Whether your goal is to drop some body fat or pack on more lean muscle, it’s important to pay attention to your protein intake (the critical building block for muscle tissue), monitor your total calories, and adjust on a weekly or biweekly basis according to results.
Credit: OPOLJA / Shutterstock
There are countless specific nutrition plans available, with varying degrees of effectiveness. If you can adhere to a handful of tips, you’ll be able to stay on course.
Drink as few calories as possible — This includes fruit juice, soda, high-sugar coffee drinks, and alcohol.”Liquid calories” often add up quickly and sneakily, which can be a deal-breaker if you’re trying to shed some pounds.
Drink more water — Inconceivable, right? Drink water to improve your health. It’s still worth repeating. Proper hydration can improve everything from your blood pressure to your in-gym performance. (7) Get a half-gallon jug and finish it every day.
Have high-quality protein every time you eat — Carbohydrates and fats can be very important nutrients to fuel performance in and out of the gym. However, ample protein from quality sources is the only way to build more muscle tissue. Aim for .75 to one gram of protein per pound of body weight. (8)
Eat fresh, home-cooked food more than you eat out — Consider this the “pack a lunch, don’t hit the drive-thru” rule. Highly processed foods have been associated with higher saturated fat, higher sugar, and increased body fat gain compared to less processed foods. (9)(10)
Recovery
Train all you want, but without ample recovery, you won’t get any closer to your goals. As a slightly older lifter, you’ll benefit from focusing on general recovery methods to support your training efforts. (1)
One of the most efficient ways to improve your daily recovery is to improve your sleep quality and, as best as possible, sleep quantity. Poor sleep habits have been shown to negatively impact hormone levels, strength levels, and lean muscle mass. (11)
Another overlooked recovery booster is going for a walk. Daily or frequent walks have been shown to improve cardiovascular health and fat loss. (12) Walk the dog, walk your kids to the bus stop, walk the grandkids to the playground, whatever gets the job done.
If you start your training plan and feel like it’s still too much to handle, consider swapping one workout day for a day of exercise “snacks.” These brief mini-sessions, lasting less than five minutes each, can be used either as a cardio alternative or for strength training. When done consistently, this can boost cardiovascular fitness. (13)
When you apply this throughout-the-day method to strength training exercises, it’s known as “greasing the groove” and it can be an excellent way to improve exercise technique, build strength, and trigger muscle growth. It’s most commonly applied to bodyweight exercises like push-ups or pull-ups, but it can be performed with weighted movements as well.
Mobility
If you’ve started calling your ankles, knees, and wrists “Snap, Crackle, and Pop” because of the constant noises they make, it’s probably time for some mobility work. Whether it’s a few minutes of simple stretching, an online yoga class, or some time spent on a foam roller, you can significantly reduce the general aches and pains by treating mobility work with a bit of attention.
Mobility training could technically be considered an adjunct to recovery, since it can enhance general blood flow, improve flexibility, and reduce post-workout soreness. Whichever way you want to categorize it, make sure it’s on your weekly to-do list.
Don’t want to spend an entire session on mobility drills? Then try starting every weight training workout with two or three reps of the Turkish get-up. That’s one “hack” to finding out exactly where your body needs work since it’s a total-body movement that involves your ankles, knees, hips, core, elbows, shoulders, and upper back in a single go.
Sample Workout Plan
You need some strength work, and some muscle-building work, and some conditioning, and some mobility training. Fortunately, you don’t have to do everything in every workout. Plan on hitting the gym three days per week, alternating between two basic full-body workouts. Save one or two additional days for cardio/conditioning sessions and plug them in according to your schedule.
The only rule with this workout design is to not perform the same type of workout two days in a row. For example, a weight training workout can be followed by a rest day or a cardio/conditioning day, not another weight training workout.
Credit: Leika production / Shutterstock
The details of the program (exercises, sets, and reps) can be adjusted according to your specific goal, but this is an effective “all-around” starter program to become acclimated to consistent training.
Weight Training Workout One
Rest two minutes between sets of the first exercise. Rest 45 to 60 seconds between sets for other exercises.
Weight Training Workout Two
Rest two minutes between sets of the first exercise. Rest 45 to 60 seconds between sets for other exercises.
Cardio/Conditioning Workout One
Perform the following as a complex — perform one set of each exercise with no rest between movements. Rest 90 seconds after the final exercise before repeating the entire sequence. Use the same barbell and the same weight for each exercise.
Cardio/Conditioning Workout Two
Complete the farmer’s walk. Follow with a regular, plain ol’, unweighted walk either immediately or later in the day.
Welcome to the First Day of the Rest of Your Life
The Kurgan was wrong. It’s definitely not better to burn out than to fade away. Fortunately, with the right approach, you don’t have to do either. Whatever prompted you to start hitting the gym — whether it was a health scare, a little grandbaby you want to see get married some day, or just a desire to look great at your 30th high school reunion — follow the plan and you just might feel like you’ve gone back in time.
References
Fell, J., & Williams, D. (2008). The effect of aging on skeletal-muscle recovery from exercise: possible implications for aging athletes. Journal of aging and physical activity, 16(1), 97–115. https://doi.org/10.1123/japa.16.1.97
Foster, Carl & Wright, Glenn & Battista, Rebecca & Porcari, John. (2007). Training in the aging athlete. Current sports medicine reports. 6. 200-6. 10.1007/s11932-007-0029-4.
Borde, R., Hortobágyi, T., & Granacher, U. (2015). Dose-Response Relationships of Resistance Training in Healthy Old Adults: A Systematic Review and Meta-Analysis. Sports medicine (Auckland, N.Z.), 45(12), 1693–1720. https://doi.org/10.1007/s40279-015-0385-9
Grgic, J., Schoenfeld, B. J., Orazem, J., & Sabol, F. (2022). Effects of resistance training performed to repetition failure or non-failure on muscular strength and hypertrophy: A systematic review and meta-analysis. Journal of sport and health science, 11(2), 202–211. https://doi.org/10.1016/j.jshs.2021.01.007
Coleman, Carver & McDonough, Daniel & Pope, Zachary & Pope, C.. (2022). Dose-response association of aerobic and muscle-strengthening physical activity with mortality: a national cohort study of 416,420 US adults. British Journal of Sports Medicine. bjsports-2022. 10.1136/bjsports-2022-105519.
Momma H, Kawakami R, Honda T, et alMuscle-strengthening activities are associated with lower risk and mortality in major non-communicable diseases: a systematic review and meta-analysis of cohort studiesBritish Journal of Sports Medicine 2022;56:755-763.
Popkin, B. M., D’Anci, K. E., & Rosenberg, I. H. (2010). Water, hydration, and health. Nutrition reviews, 68(8), 439–458. https://doi.org/10.1111/j.1753-4887.2010.00304.x
Morton, R. W., Murphy, K. T., McKellar, S. R., Schoenfeld, B. J., Henselmans, M., Helms, E., Aragon, A. A., Devries, M. C., Banfield, L., Krieger, J. W., & Phillips, S. M. (2018). A systematic review, meta-analysis and meta-regression of the effect of protein supplementation on resistance training-induced gains in muscle mass and strength in healthy adults. British journal of sports medicine, 52(6), 376–384. https://doi.org/10.1136/bjsports-2017-097608
Poti, J.M., Braga, B. & Qin, B. Ultra-processed Food Intake and Obesity: What Really Matters for Health—Processing or Nutrient Content?. Curr Obes Rep 6, 420–431 (2017). https://doi.org/10.1007/s13679-017-0285-4
Hall, K. D., Ayuketah, A., Brychta, R., Cai, H., Cassimatis, T., Chen, K. Y., Chung, S. T., Costa, E., Courville, A., Darcey, V., Fletcher, L. A., Forde, C. G., Gharib, A. M., Guo, J., Howard, R., Joseph, P. V., McGehee, S., Ouwerkerk, R., Raisinger, K., … Zhou, M. (2019). Ultra-processed diets cause excess calorie intake and weight gain: An inpatient randomized controlled trial of AD Libitum Food Intake. Cell Metabolism, 30(1). https://doi.org/10.1016/j.cmet.2019.05.008
Auyeung, T. W., Kwok, T., Leung, J., Lee, J. S., Ohlsson, C., Vandenput, L., Wing, Y. K., & Woo, J. (2015). Sleep Duration and Disturbances Were Associated With Testosterone Level, Muscle Mass, and Muscle Strength–A Cross-Sectional Study in 1274 Older Men. Journal of the American Medical Directors Association, 16(7), 630.e1–630.e6306. https://doi.org/10.1016/j.jamda.2015.04.006
Serwe, K. M., Swartz, A. M., Hart, T. L., & Strath, S. J. (2011). Effectiveness of long and short bout walking on increasing physical activity in women. Journal of women’s health (2002), 20(2), 247–253. https://doi.org/10.1089/jwh.2010.2019
Jenkins, E. M., Nairn, L. N., Skelly, L. E., Little, J. P., & Gibala, M. J. (2019). Do stair climbing exercise “snacks” improve cardiorespiratory fitness?. Applied physiology, nutrition, and metabolism = Physiologie appliquee, nutrition et metabolisme, 44(6), 681–684. https://doi.org/10.1139/apnm-2018-0675