World Fitness Blog : Leading Global Bloggers

June 7, 2023

The Importance of a Bench Press Arch

Filed under: Fitness,Training — Tags: , , , , — admin @ 2:48 am

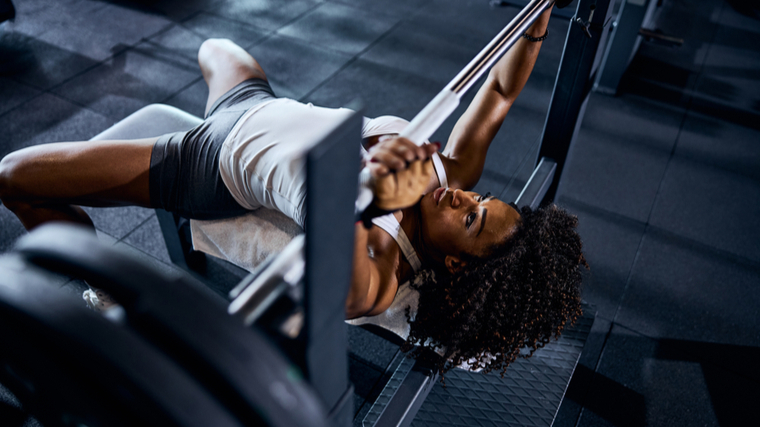
In some gym circles, you’re not considered a “true” lifter if nobody has ever asked you, “How much do you bench?” This fundamental exercise is the archetypal test of upper body strength and size.

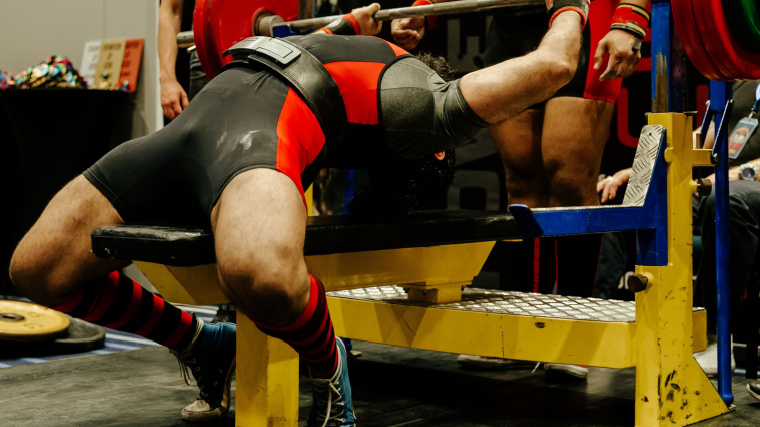
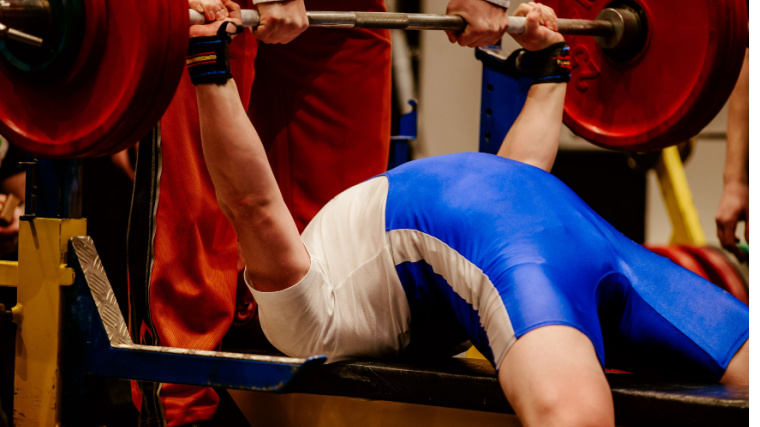
Yet, you might’ve seen this scene happen in person or in a viral video: a powerlifter marches toward a bench press station, folds themselves like a Cirque du Soleil acrobat, and proceeds to lift a seemingly impossible weight using the shortest possible range of motion. On the other side, you see big lifters moving big weights while lying on the bench as flat as a flounder.

woman in gym performing bench press

Credit: YAKOBCHUK VIACHESLAV / Shutterstock

So, who’s right or wrong? Is one of these lifters even “wrong?” Here’s a review of the benefits and risks of performing the bench press with an arch, as well as how and when to use this modified technique to reach your goals.

The Importance of a Bench Press Arch

Benefits of Using an Arch

The bench press arch refers to the deliberate extension and curvature of your spine when lying on the flat bench. A little arch is natural with most people, as it simply follows the natural curve of the spine, which isn’t flat.

You can easily spot an arch, as the lower back of the lifter is not touching the bench. If someone has an exaggerated spine curvature — for instance, a lordosis — they are forced to arch. Some lifters, especially powerlifters in competition, try to amplify this curvature and have as big an arch as possible. Why? It has several benefits, especially if you want to get stronger.

More Weight Lifted

With a bigger arch, the lower portion of your chest is in a higher position. This means that the point of contact with the barbell will be higher and, as such, the range of motion will be shorter. For the same amount of force produced, you can lift more weight. If you want to increase your bench press, then learning how to arch is an excellent way of improving the efficiency of your lift.

This method became so effective that some powerlifters would seem to barely make the barbell move more than a few inches and, as result, would set incredible records. Many would even say it’s cheating, ridiculous, and defeats the purpose of the sport.

As such, some powerlifting federations, like the International Powerlifting Federation — the biggest tested powerlifting federation in the world — updated their competition rules to limit arching. The goal was to ensure that performance is primarily based on a lifter’s strength, and not their mobility. 

Safer on the Shoulders

Your shoulders are some of the most mobile and most fragile joints in your body. They are put under a lot of stress with the bench press. Arching your back allows you to better squeeze your shoulders blades together and down, and maintain them in place during execution of the exercise.

Because the range of motion is shorter with an arched bench press, your elbows travel a shorter distance into the bottom position and will not go as far beneath your shoulder joint. This prevents excessive stretching in your shoulders and chest muscles, while avoiding a relatively weaker position that might result in injuries or joint strain. This is especially important if you have longer arms, as these effects are amplified.

More Overall Stability

Arching your back makes your upper body more “compact” and creates more full-body tension by strongly activating your upper back, lat, hips, and core muscles, compared to lying flat on the bench.

powerlifter preparing to bench press

Credit: Real Sports Photos / Shutterstock

This way, you can properly distribute the energy from your legs through your torso to your shoulders and into the barbell. If your whole body is tensed, you will provide a more stable surface from which to press.

It’s the same principle that makes squatting with your feet on the floor easier than standing on a stability ball — you can generate more force without having to balance your body. If your torso wiggles on the bench with each repetition, you’re bound to leak strength and decrease your rate of technical adaptation.

More Muscle Growth

This is perhaps the most surprising benefit, as most gym veterans swear that the arched bench press should only be used by powerlifters focused on strength, and that a flatter version is better for muscle mass. But studies have shown more back and triceps activation during the arched bench press. (1) That’s logical, as the lats help arch the back, and a shorter range of motion will put more stress on your arms.

But what about building your chest? People have claimed that the arched bench turns the lift into some sort of decline bench press and that’s somewhat true, as lower chest activation is slightly greater. But upper chest activation remained the same, so muscle recruitment is still net-positive, likely because you can use more weight. So overall, you activate more muscle mass and stimulate more growth. 

Risks of Using an Arch

With all these perks, arching seems too good to be true. There might be some risks, though, especially if you exaggerate it too much. You can have too much of a good thing.

Lower Back Strain

Your spine is naturally extended because of its curvature, but extreme extension will put the disks and nerves at a greater risk of injury. Sure, there’s no axial loading or shear forces, but the technique will still put some stress on your lower back, especially if you then use leg drive to generate full-body tension. The probabilities of injuries may be relatively low, but you should keep them in mind, especially if you have pre-existing back issues.

powerlifter preparing to bench press

Credit: Real Sports Photos / Shutterstock

A hernia could even potentially happen, even though it usually occurs during spinal flexion (bending forward at the waist). If you already have lower back troubles or injuries, arching might prove very painful and counterproductive. If you’re such a lifter, you should refrain from using a powerlifting arch and stick to maintaining your natural arch or pressing with a flatter back, depending on which is least painful. 

Less Muscle Mass

But, didn’t we just say that an arched back recruits more muscle mass? Indeed, but there’s arching and there’s arching. If you cut the range of motion too much, some muscles will be less stimulated. The more a muscle is stretched, the more it responds to training. (2) And if there’s almost no stretch due to an extremely limited range of motion, the stimulus will be much lower. 

Using some partial movements here and there is not a problem, but they shouldn’t make up the bulk of your training. If your training is minimalist — using a limited variety of exercises or very low volume — you should probably abstain from using a big arch. Or, if you do bench with an arch, make sure you’re also including full-range exercises like the incline bench press and overhead press to really complete your training and fill out your physique.

How to Arch

Most people already have a natural arch, this is just how they’re built. If you want to stick to a natural arch when performing a bench press, simply squeeze your shoulders blades together and down, and puff your chest up and high. But if you want to maximize your arch (either because you naturally don’t have one or you want to lift as heavy as possible), follow these steps.

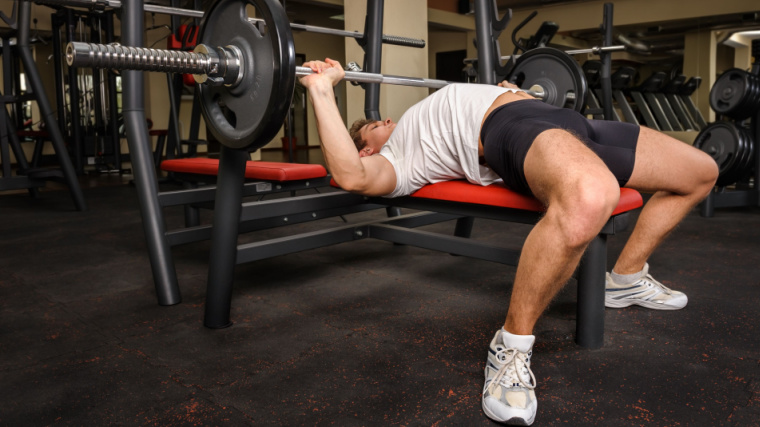
Step 1 — Setup on the Bench

Lay down on the bench, grab the barbell, and grip the bar outside of shoulder-width. Your eyes or eyebrows should be directly in line with the bar. Squeeze your shoulders blades together and down (toward your glutes) as far as possible. Try to feel your traps dig into the bench. Focus on arching your upper back as much as possible, not necessarily your lower back.

Powerlifter Taylor Atwood preparing to bench press

Credit: BarBend / YouTube

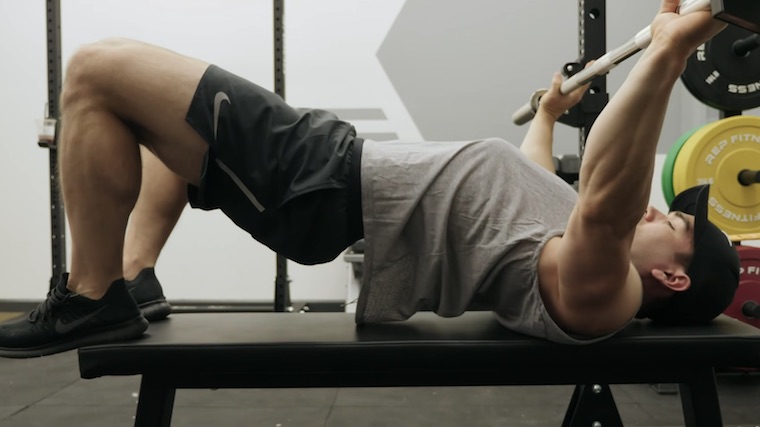
If you want to take things to the max and really optimize your position, you can even put your feet on the bench while setting up your initial position. This will put as much weight as possible on your traps and will help to leverage your body into position.

Step 2 — Set Your Stance

If they were up on the bench, put your feet on the floor while keeping your arch. Position your feet as close to your shoulders as possible. Start “digging” your heels backward as far as you comfortably can.

Powerlifter Taylor Atwood preparing to bench press

Credit: BarBend / YouTube

Push your toes into the ground “down and away” from your body. This lower body pushing motion will help you prevent your glutes from rising off the bench.

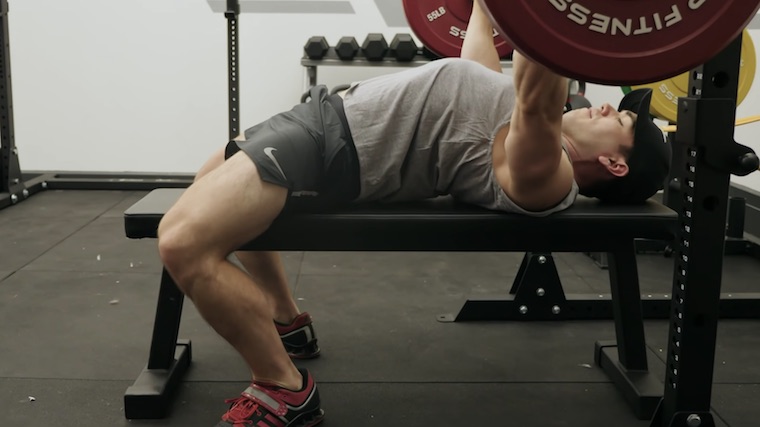
Step 3 — Unrack the Bar, Lower, and Press

Maintain pressure through your feet. Unrack the barbell, with the help of a spotter if possible. Once the bar is set at the midway point, just above your chest, pause very briefly to confirm proper positioning.

Person in gym doing flat bench press

Credit: Serghei Starus / Shutterstock

Keep applying full-body tension from your traps to your toes. Lower the barbell until it gently touches your chest. Feel tension in your upper body at all times and hold your chest high. Move the weight deliberately and cautiously because the range of motion will be less than what you may be used to. As you feel the bar make contact, press powerfully to lockout.

How to Improve Your Arch

The bench press is an unnatural movement in itself — lying on a short platform while repeatedly moving a long, heavy bar above your rib cage and several vital organs. Intentionally arching your upper body during the exercise can feel even more unnatural.

Your first attempts to use an arch will likely feel awkward and certainly won’t be perfect. Also, unfortunately for the stiffer lifters out there, there’s a dose of mobility involved. Some will never develop a really big arch, but you can still improve it following these suggestions.

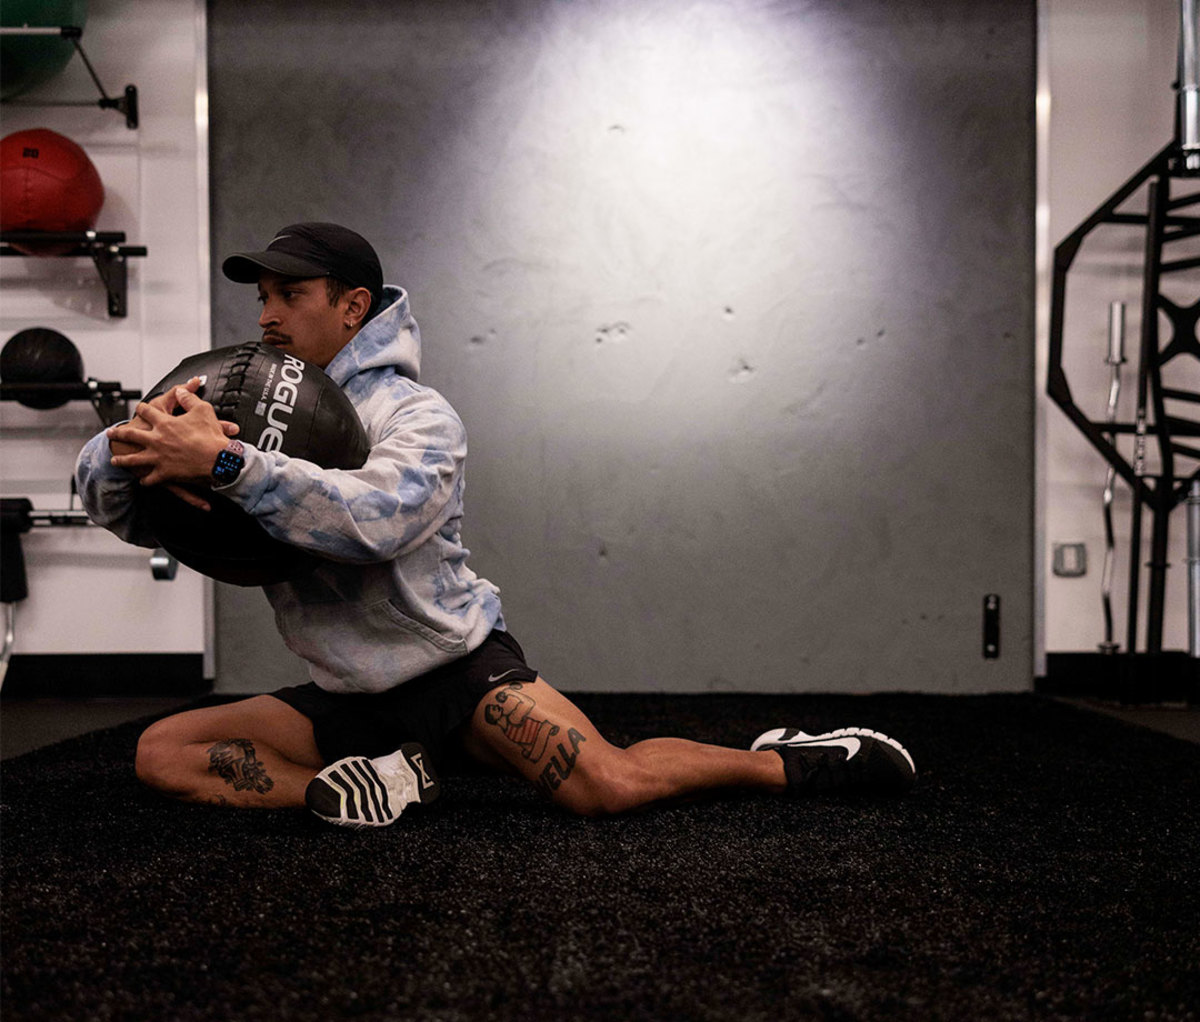
Dynamic Foam Rolling

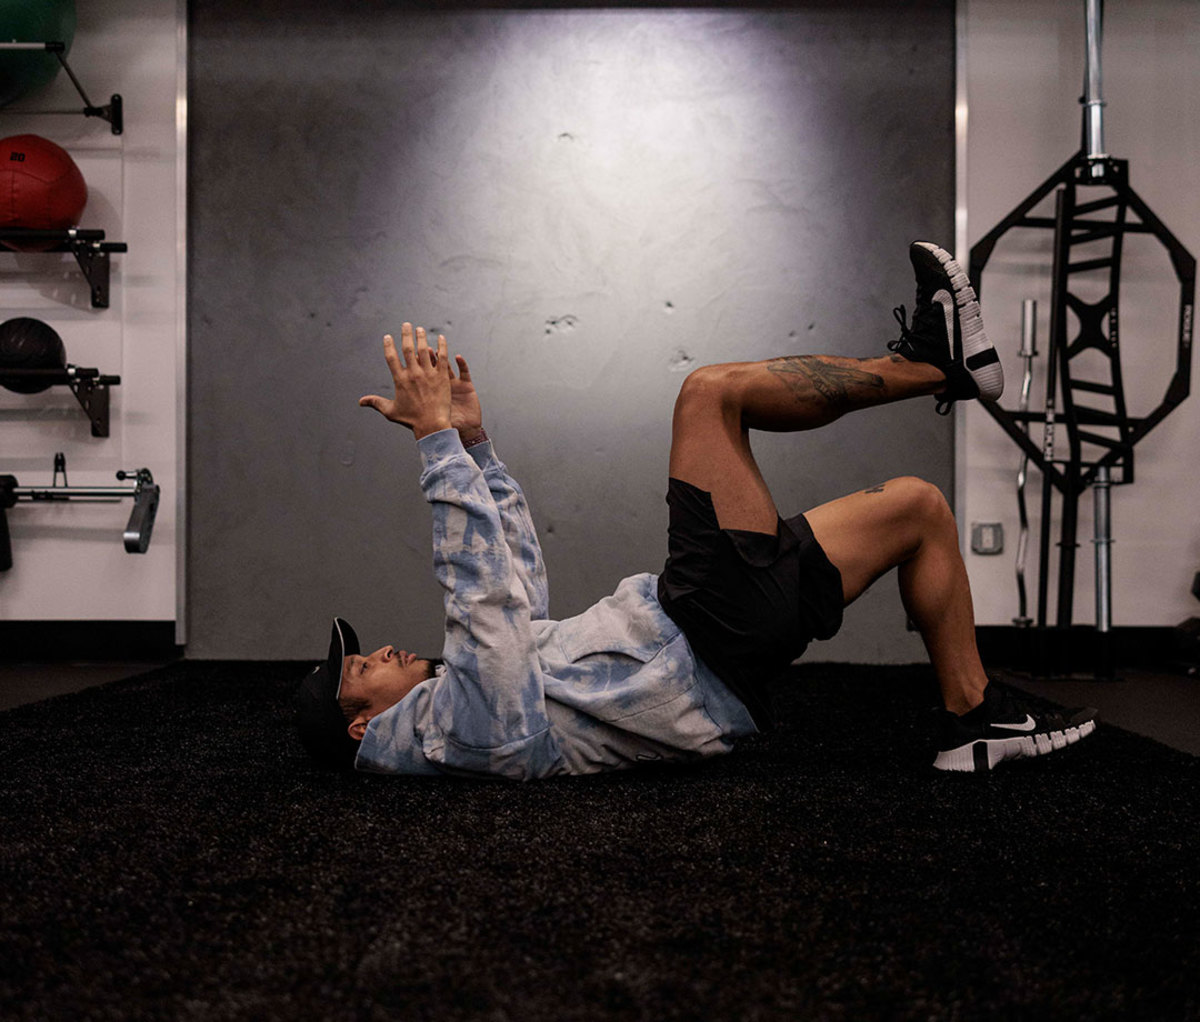
Before you lift, after a general warm-up, grab a foam roller and start hammering your mid-back for a minute. This upper body drill is key for thoracic mobility.

Loosening your spinal erectors, running the full length of your back, will also help tremendously with improving your arch position. Don’t forget to also, carefully, roll your lower back. This will help hold your position when your lower body is set and creating tension.

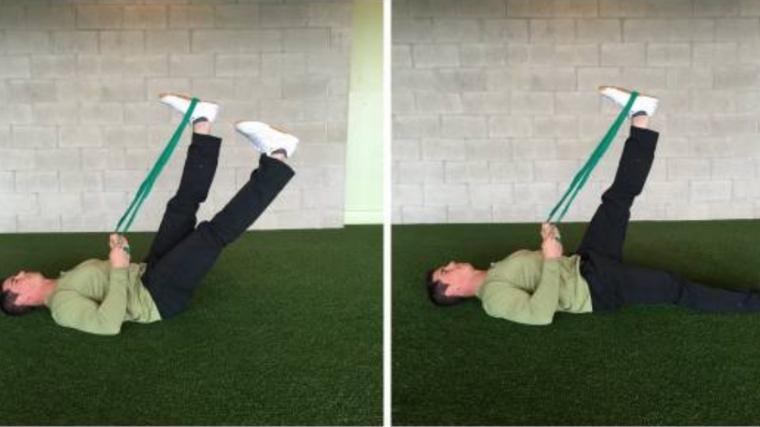
Knee Raises or Leg Raises

Why should you do a few sets of an ab exercise before benching? Well, these movements also greatly stimulate your hips flexors. If you perform ab work with a full, smooth range of motion, those hip flexors will loosen. Tight hips flexors will prevent you from pulling your feet into position on the floor, which will prevent you from getting into a deep arch position.

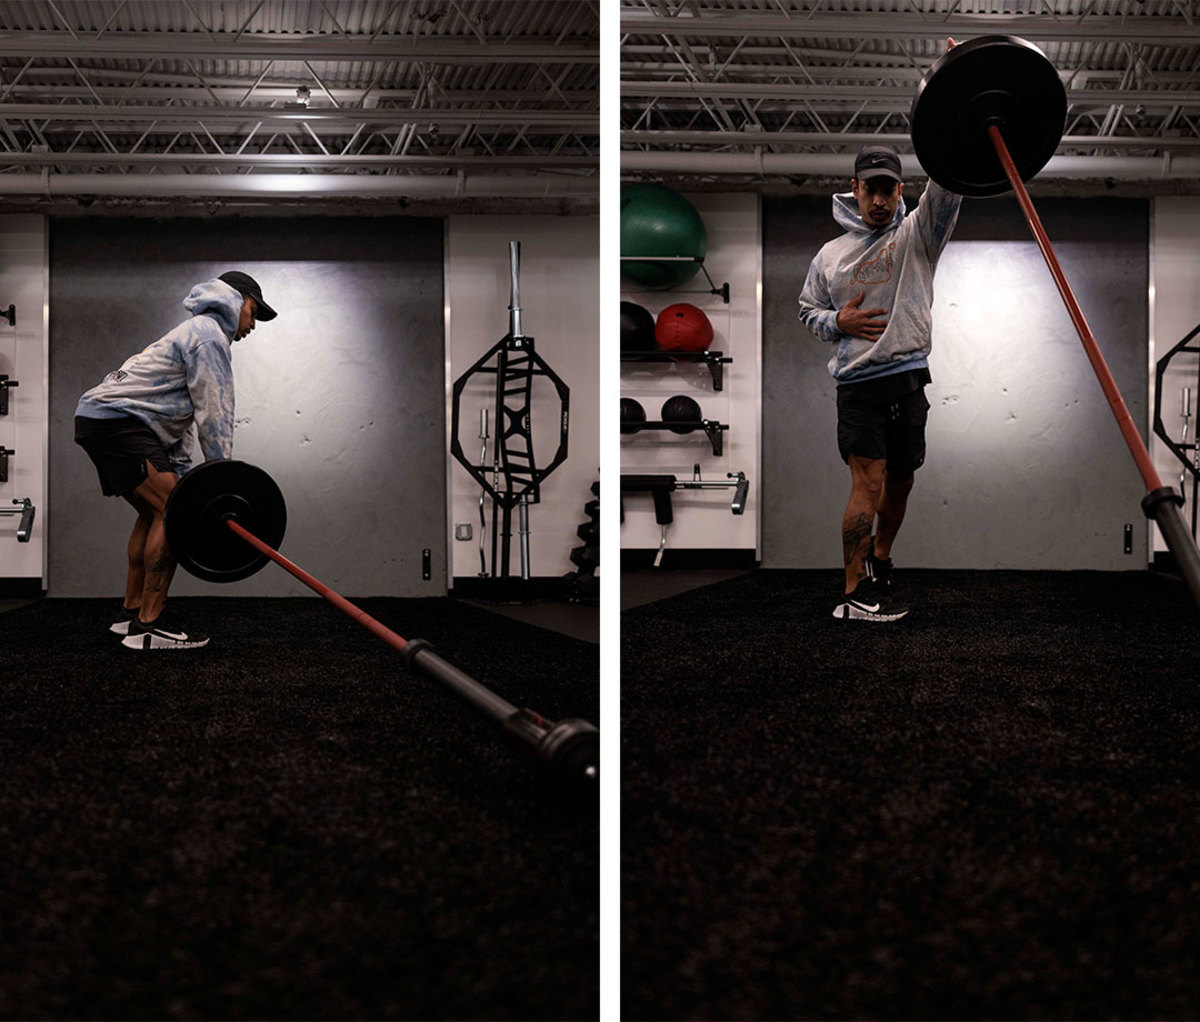
Face Pulls and Postural Exercises

Because of the generally sedentary modern lifestyle, most people are more prone to a kyphotic (rounded shoulder), caveman-style posture. This can increase the risk of bench press injuries, but also prevent you from adopting a great arch. You simply won’t be able to open your chest as much.

A great warm-up before benching would be to grab a light resistance band and perform face pulls, pull-aparts, and the over-and-back (sometimes intimidatingly called “shoulder dislocates”). These exercises will strengthen your rotator cuff and, more importantly, improve your posture which carries over to your arch.

Bench Thoracic Spine Stretch

Stretching after your session is never a bad idea, but you could even do some static stretching before your bench. This can be especially useful in the most extreme cases of bad posture or mobility restrictions. There are several options available, but here’s one of the most effective.

Kneel down in front of a flat bench or a box. Place your elbows on the bench and bend your elbows to aim hands up in the air. Slowly lean your body down until your head passes between, and under, your upper arms. Move as far as comfortably possible.

To accentuate the stretch, bring your hands towards your traps or the back of your neck (without pressing down). Hold the stretch for 45 to 60 seconds.

Big Arch for a Big Bench

Prejudice, misinformation, and a few bad apples have given the bench press arch a bad rep, but there are actually many benefits. If you can ignore the comments you might get from other lifters about “the right way” to bench, give it a try and watch your performance improve, your muscles grow, and your shoulder pain diminish.

References

  1. Alan C. Cudlip, Jacquelyn M. Maciukiewicz, Brendan L. Pinto & Clark R Dickerson (2022) Upper extremity muscle activity and joint loading changes between the standard and powerlifting bench press techniques, Journal of Sports Sciences, 40:9, 1055-1063, DOI: 10.1080/02640414.2022.2046937
  2. Alan C. Cudlip, Jacquelyn M. Maciukiewicz, Brendan L. Pinto & Clark R Dickerson (2022) Upper extremity muscle activity and joint loading changes between the standard and powerlifting bench press techniques, Journal of Sports Sciences, 40:9, 1055-1063, DOI: 10.1080/02640414.2022.2046937

Featured Image: UfaBizPhoto / Shutterstock

Source

February 22, 2022

Train Smarter, Not Harder: Feel-Good Strength and Conditioning Workout

Filed under: Fitness — Tags: , , , , — admin @ 3:52 am

Train smarter, not harder: Time isn’t kind to ego-fueled workouts. It’s time to invest in feel-good training.

Gone are the days of running yourself ragged working your mirror muscles. The new age of fitness welcomes sessions that maximize efficiency, reinforce proper movement patterns, and blend mobility with strength. This workout is like getting a full car service for your body. The warmup inspects tightness and triggers warning lights if major muscle imbalances appear so you can grease those joints and execute the workout at maximum capacity. Remember, this is guiding you to train smarter, not harder, and part of that equation means getting your body moving in the proper range of motion before you add weight, so don’t skip the warmup.

The routine, courtesy of Ariel Foxie, CPT, covers multiple movement patterns (squat, hinge, press and pull). You’ll improve muscular endurance, aerobic capacity and overall strength.

DIRECTIONS

Do once at the end of a weekly strength routine. If coming off a training hiatus, start with fewer sets and/ or lighter loads. Perform supersets, following tempo cues when noted. The four-number sequence indicates: eccentric (lower), pause, concentric (lift), pause. Rest 20 sec. between exercises and 45 to 90 sec. between supersets. Warm up by foam rolling for 2 to 3min., then perform 6 to 8 reps each of the following:

Zach Hetrick
  • Single-leg Glute Bridge (shown)
  • Seated Shoulder Openers
  • 90/90 Hip Switches
  • Modified Pigeon Forward Fold
  • World’s Greatest Stretch
  • Lying Leg Swings

The Workout to Train Smarter, Not Harder

1A. Back Squat 3/0/3/0

With barbell across traps, bend at hips and knees to lower for a count of 3. Go as far as you can without losing the arch in your low back. Immediately extend hips to rise, pushing knees out, lifting for a count of 3, then go immediately into next rep. 8 reps

90/90 Switches With Hip Extension
Zach Hetrick

1B. 90/90 Switches With Hip Extension

Sit with knees bent and feet flat on floor, wider than shoulder width, holding a wall ball. Keep chest high, then drop legs right, creating 90-degree angles with knees. Hinge forward over right thigh, then press your right knee and ankle into the floor while raising into a hip extension. Twist torso over right side for a deeper stretch in left hip flexor. Hinge and lower hips back onto ground. Rotate torso and lift knees back to center. Switch sides. 4–6 x 8 reps

2A. Pullup

3/0/1/1

Hang from the bar with hands shoulder-width apart, palms facing away. Pull yourself up until your chin is over the bar, to start. Lower for 3. Immediately pull up for 1, hold at the top for 1, then repeat. 8 reps

Landmine Hinge to Press
Zach Hetrick

2B. Landmine Hinge to Press

Stand perpendicular to landmine with feet wider than hip-width apart. Hinge at waist, grab the landmine with a mixed grip (outside hand should be underhand) while pulling slack out of the barbell and creating tension in hamstrings. Keep the bar close to your body, then drive hips forward and squeeze glutes to stand. Before full hip extension, pull the barbell up and transition grip for press. Pivot rear foot and leg inward, and drive through ground as you press the landmine overhead using outside hand. Reset and repeat all reps on one side before switching. 3–4 sets x 8 reps

Trap Bar Deadlift
Zach Hetrick

3A. Trap Bar Deadlift

3/1/0/1

Stand within a trap bar (hex bar) with feet at hip width. To start, hinge at hips and grasp handles, then drive through heels, extending through hips and knees to stand, keeping the arch in your low back. Lower for 3, pause at the bottom for 1, then explode up. Pause for 1, then repeat. 8 reps

3B. Dumbbell Bench

Press 2/0/2/0

Sit on the end of a flat bench, resting a pair of moderate to heavy dumbbells on thighs. Lie back and “kick” weights up, guiding them over your chest, palms facing away. Lower dumbbells to sides of pecs for a count of 2, then immediately press up for 2, squeezing pecs at top. 3–4 sets x 8 reps

Zach Hetrick

Finisher

4A. Battle Rope Slams

Hold the ends of battle ropes with a handshake or overhand grip. Come into a squat position, then generate power from the ground up to extend arms overhead as you slam ropes onto the ground. 20 reps

4B. Assault Bike

Work at a low to moderate rate of perceived effort on bike. If tired, work 4/10. If feeling strong, work 7/10. 30–40 sec.

For access to exclusive gear videos, celebrity interviews, and more, subscribe on YouTube!

Source

January 19, 2022

Move Well First: A New Path for Coaching Fitness

Filed under: Fitness — Tags: , , , , , — admin @ 2:00 pm

Mass information in the fitness industry is a beautiful thing; it enables coaches and the general population to learn at a high rate. However, mass information can also lead to mass confusion. Figuring out how to train oneself and others can be a rollercoaster ride — and not always a fun one. 

Man holding a loaded barbell in the front rack position

Man holding a loaded barbell in the front rack position

Thankfully, the intentions behind this industry chatter are typically genuine. Coaches want to help clients achieve results, and the general public is simply looking to feel better. However, amidst the confusion is a growing need for the fitness industry to develop a common language that both professionals and consumers can understand. And that common language should focus on helping society move better and more often for the long haul.

Changing the language of the industry may feel like an impossible task, but two principles are undeniable:

  • Put movement quality first.
  • Help people move more.

Regardless of your goals (muscle hypertrophy, strength, performance, etc.), these two factors are critical for the industry to head in the right direction. A movement-based approach to training has the potential for magic, and it needs to start in gym class for kids. The lack of a proprioceptive-enriched movement lifestyle for children is a major concern for society.

However, it is never too late to restore what Gray Cook calls “movement competency.” Here is Gray’s definition of how to find movement competency:

This we test with movement screening. If screening reveals pain or dysfunction in the form of limitation or asymmetry, there is a movement competency problem. Alternatively, there is a basic movement-aptitude problem—pick your term, but make the point. Adequate competency suggests acceptable fundamental-movement quality.

Achieving movement competency will be hard if we focus our fitness programs purely on looking better. I am a bodybuilder at heart and have worked on building bigger muscles and looking better since I was 15. Fast-forward almost 20-years and I have realized that my chase for aesthetics has left me with faulty movement patterns. I am now forced to work on improving my movement competency instead of working on looking good.

This doesn’t mean that I will never be able to work out for aesthetics, but I do need to earn the right to make that the sole focus of my training. Building muscle is increasingly important as you age, but you can still have a high-level of movement competency at any fitness level. Building muscle and getting stronger should be your main goal, once you start moving well.

A Catalyst for Change

This was my catalyst for developing a movement-based approach to hypertrophy training. In the past, bodybuilders would maybe perform light static stretching, five minutes on a cardio machine, and a few warm-up sets before jumping into a 25-set workout of chest and triceps. Young lifters without a lot of miles on their body can get away with this method for a while, but this approach may eventually leave you with asymmetries, injuries, pain, and frustratingly slow progress.

You don’t have to be in your fifties to have an old training age. As Dan John says, “It’s not the years, it’s the miles.” I have been training hard for almost 20-years with a week off here and there, but not often. The miles are deep in this young body.

If you want to last in the lifting game for the long run, endless sets of eight to 15 reps per body part may not be what your body needs. So, what should a person chasing a bodybuilding-type physique do instead of the typical splits? Revisit and master fundamental human movements and do them with realistic sets, reps, and loads. If you focus on moving better first, you will be surprised how fast your body will be able to get back to lifting heavy objects, often.

A Collaborative Design

Like any other trainer or strength coach, my philosophy has evolved over the years. These days, I follow philosophies of various tried-and-true methods.

Functional Movement Systems (FMS) is a useful approach to understand movement baselines and exercise modifications. Most people would benefit from an FMS screening. Along with a detailed health history at intake, FMS provides a solid foundation when designing programs. For the beginner or veteran, the fundamentals are where you start and finish.

Every strength and muscle hypertrophy program should include some variation of the following movements depending on the goal of the individual. This list is largely inspired by the legendary Dan John:

  • Push: push-ups, bench press, overhead press
  • Pull: dumbbell row, inverted row, chin-ups, pull ups
  • Squat: goblet squat, front squat, back squat, single-leg squat
  • Hinge: deadlift, kettlebell swing, single-leg deadlifts, Olympic lifts
  • Loaded Carry: farmer’s carry, suit case carry, overhead carry, sandbag carry
  • Groundwork: rocking, rolling, creeping, crawling, Turkish get-ups
  • Core/Rotation/Anti-rotation: ab wheel rollouts, cable press outs, chops, lifts

The New Age Bodybuilding Template

Below is a foundational hypertrophy template that consists of lifting 3 days per week for 6 weeks. Dividing your strength and conditioning into four to six week phases will keep your body fresh, resilient, and improve general physical preparedness. This length of time seems to be the sweet spot, since most people have what I call “Exercise ADD.”

Program Components:

  1. Correctives
  2. Movement Preparation
  3. Lift Weights
  4. Finisher

Correctives

Correctives are based off of FMS and health history. For example, a perfect score for an Active Straight Leg is 3/3, 0 for pain. Your goal should be to achieve symmetry (a score of 2/2 or 3/3). If your score is 2/1, the following corrective exercises will use core and motor control to improve alternating hip flexion and extension.

Man performing lower body mobility drills on floor with band

Man performing lower body mobility drills on floor with band

  • Alligator Breathing: Lay down in a comfortable position for 2-3 minutes. I prefer on the stomach to feel the abdominal wall. Breathe in and out through your nose. Focus on pulling air deep into your belly. It may help to imagine pulling air down into your feet.
  • Assisted Leg Lowering: 10 reps each leg
  • Cook Hip Lift: 5 x 10-second holds each side

Movement Preparation

Before you begin your workout spend 5-10 minutes on the following movement preparations:

  • Kettlebell arm bars: 5 each side
  • Half-kneeling kettlebell halos: 10 reps
  • Goblet squat w/prying knees: 5 reps
  • Lunge Matrix: 6 reps
  • Plank to Down Dog: 10 reps (not in video)
  • Inch Worm: 10 reps (not in video)
  • Jump Rope: 2-5 minutes (not in video)

Lift Weights

Below are the rep rotations for the three lifting days. Organize your week so that you don’t lift two days in a row.

  • Monday (or Tuesday): 5 x 5
  • Wednesday (or Thursday): 8 x 3
  • Friday (or Saturday): 3 x 8-12

The following exercise options are based on the fundamental movement patterns:

  • Push: One-arm kettlebell press, single-arm bench press, push-ups
  • Pull: Inverted row, chin-ups
  • Squat: Goblet Squat, single-leg squat, front squats
  • Hinge: Deadlift, single-leg deadlift, kettlebell swing
  • Loaded Carry: farmer’s walk, suitcase carry
  • Ground Work: Turkish get ups, crawling and rolling
  • Core (rotation/anti-rotation): McGill Big 3, rollouts, anti-rotation press outs

Finisher

Pick one conditioning finisher per training session:

  • Air Bike Sprints: 6-8 rounds of 30 seconds on, 30 seconds off
  • Concept 2 Rower: 1,000 meters
  • Ski Erg Sprints: 3 rounds of 1-minute on, rest 2 minutes in between sprints
  • Sled Push/Pull: 5 x 50 yards
  • Battling Ropes: 8 x 20 reps for 2 arm slams. Rest 30 seconds between sets.

Cool-Down

Proper recovery will provide your body with a better base to keep building muscle for the long haul. Before you skip out of the gym after your workout, run through this cool-down routine:

  • Alligator breathing: 2 minutes
  • Head nods: 10 reps up and down and 10 reps side to side
  • Bird dogs: 10 reps/side
  • Rock backs: 20 reps
  • Egg rolls: 20 reps
  • Get up and down off of the ground: 5-10 reps
  • Baby crawling, Spiderman crawling: 30-40 yards each

Change Is Here

I will always be a meathead at heart. I love bodybuilding and I am amazed at the amount of weight powerlifters can move. But the “pedal to the metal” workouts eventually take their toll.

If we continue to direct the general public towards endless sets of body-part split workouts, force Olympic lifting on people who are not ready and may never be ready to perform, and max out on the squat, deadlift, and bench press, the long haul may never come. Let’s focus on keeping people moving instead.

Source

July 11, 2021

3 Ways to Address the Myth of Good Posture

Not many words make people shift in their seats as the word posture does. Probably just reading it made you straighten up. What did you do? How are you sitting now?

When most people think of good posture, they think of sitting and standing up straight with the shoulders pulled back. Trying to maintain this position can be tiring.

Many people give up, falling into the hunched position encouraged by gravity and our screens. Even those who manage to hold themselves in a good posture may experience tension and discomfort. So what’s the point?

The Downside of the Urge to Hunch or Slouch

While attempting to maintain good posture can cause discomfort, it’s better than the alternative. Sitting or standing for prolonged periods without actively engaging our muscles for support leads to an extra load on the joints and ligaments of the spine.

These structures aren’t designed to be loaded in a bent position for long periods, and the additional stress can result in stiffness and pain.

Our spine isn’t the only thing that suffers when we hunch and slouch. When the upper back stiffens, our rib cage and lung expansion are restricted. This restriction limits oxygenation and increases the work of breathing, which can trigger our stress response and impair cognition.

When your upper back rounds and your head sticks forward over your body, tension can develop in the muscles attaching to your jaw and face. This tension can result in the movement of your jaw becoming painful or restricted and contribute to headaches.

Many other hormonal and behavioral effects are associated with bad posture, some of which are discussed in this popular TED talk by social psychologist Amy Cuddy. But maintaining good posture is easier said than done.

To Maintain Good Posture, Avoid the Pitfalls

Many people develop imbalances when they try to achieve and maintain good posture. Imbalances occur when parts of your body that generally work together can no longer cooperate because of a mismatch in strength or mobility.

Imbalances can result in tension and discomfort and cause dysfunction in other parts of the body.

This pitfall comes from how most people think about attaining good posture. A common misconception is that to have good posture; you need to get into a straight position and hold it there while you sit or stand.

When you ask your body to complete a task such as stand up straight, or pull the shoulders back, without telling it how to accomplish this, the body will use the muscles you use the most.

This reliance on strong muscles results in the prolonged use of muscles that are already strong, while weaker groups are neglected. Over time, stronger muscles get stronger and tighter, while weaker muscles atrophy.

For example, if you’ve experienced lower back pain when sitting up straight, this may be because your stronger lower back muscles are working too hard, attempting to compensate for your weaker lower abdominal and pelvic muscles.

The Most Common Imbalance

Your lower back and pelvic muscles are the most common site of imbalance. The muscles that arch your lower back are often overused in many activities, including prolonged sitting and standing, exercising, and carrying.

Conversely, the muscles of your lower abdomen and pelvis are usually under-utilized. This neglect is partly because many of us experience stiffness and rounding in the upper back, and our body compensates for this by overarching the lower back when we ask it to sit or stand up straight. The result is an exaggeration of our natural spinal curves.

When the lower back is over-arched, the pelvis will tip forward, reducing activation in the lower abdominal and gluteal muscles. If left unchecked, this imbalance can contribute to dysfunction throughout the body.

Rethink Good Posture

Instead of thinking of posture as a position, think of it as the balance of strength and mobility across the muscles and joints of your body.

Rather than trying to achieve good posture by sitting or standing up straight, use your body in a way that promotes musculoskeletal balance.

An excellent way to improve posture is to move more. Setting reminders to move regularly by incorporating methods to move more into your day, such as:

  • Vary your work position with an adjustable desk.
  • Use the restroom on another floor, so that you can climb the stairs.
  • Vary the type of manual work you are doing.

A variety of movements will mix up the loading pattern on your body and reduce imbalances.

However, movement without conscious effort is usually not enough to resolve significant imbalances.

Unless we are performing a new type of movement, or consciously activating weak muscles and relaxing strong ones, the body will still use the muscles with which it is most familiar. You may still experience discomfort or tension, even after taking a break to move around.

Actively Improve Posture

Consciously challenging your weaker muscles and relaxing your overactive muscles is the best way to restore balance. But, this is easier said than done.

Overactive muscles are difficult to relax, and underactive muscles are hard to feel and use.

The rest of this post will discuss techniques designed to help you restore balance while:

  • Sitting
  • Standing
  • Performing functional tasks like manual work and exercise

Improve Lower Back Posture

The first step to achieving balance across the muscles of your lower spine and abdomen is to move the area through its full range of motion, rather than to confine it to an arched or slouched position. You can do this with an exercise called the pelvic tilt.

If you have limited control of your lumbar spine and pelvis, you may find the pelvic tilt to be difficult at first.

These exercises are fundamental, and we recommend them for people of all ability levels.

To perform the pelvic tilt:

  • Sit in a comfortable position with your feet on the floor. Place the hands around the hips so that you can feel the bony bit on the front of your hip with your index finger. Wrap your thumb around and feel the bone at the back of the pelvis. Imagine you are holding a big bowl of water in your hands.
  • Tip the pelvis forward as far as you can, as if pouring water out of the front of the bowl. Your lower back will arch, and you will roll forward onto your crotch. Tilting forward will activate the muscles of the lower back while reducing the load on its joints and ligaments. If held for a prolonged period, the tipped forward position will lead to overactivity in muscles of the lower back and front of the hips. The muscles of the lower abdomen and pelvis will be put at a mechanical disadvantage, leading to an imbalance.
  • After you have pushed the bowl forward as far as it will go, roll backward (tipping water out of the back of the bowl) while preventing your chest and upper back from slouching. As your pelvis tips backward, activate the lower abdominal muscles.
  • A useful cue is to imagine that you are using the area underneath your belly button to zip up your pants. Tipping backward and drawing up like this will stretch the lower back and activate the muscles of the lower abdomen and pelvic floor.
  • Sitting in this tilted back position will offload the muscles of the lower back, but may stress the joints of the spine if held for a prolonged period.
  • Rather than arch or slouch, try keeping the back and pelvis in the middle of the two positions. With a neutral pelvis, the load is balanced across the front and back of the trunk. The spine, abdominal, and back muscles all take a share of the load.

Repeat the pelvic tilt five times to activate and stretch both sides of the trunk, and then finish in a neutral position. You can find the neutral by moving your bowl of water to a level position so that the bony bits on the front and back of the pelvis are even in height.

Another way to tell is by looking at the waistband of your clothing. In a neutral position, the waistband usually is parallel to the ground rather than at an angle.

You can perform the pelvic tilt while sitting, standing, or exercising. It can function as a preventative measure or as a technique to relieve pain in the back or hips. It’s one of the best ways to assess and improve the most common site of postural imbalance.

If you have an existing back injury, you may experience some pain when pelvic tilting. This pain is normal. Reduce the range of motion until the movement is no longer painful, and then gradually build it up again.

Or, try imagining that a string is pulling the top of your head to the ceiling, making you as tall as possible as you perform the tilt. This lifting will help to unload the spine and reduce pain.

Another effect you may experience is the feeling of being hunched when you tip the pelvis backward. This feeling is also familiar, and it probably means that your upper back has stiffened into a rounded position. This stiffness may be why your lower back was arching excessively in the first place: to keep your upper back more upright.

Improve Upper Back Posture

Now that you’ve begun to improve your control of the lumbopelvic region, you can move on to the second most common region of imbalance: the upper back and neck.

These areas may feel rounded now that the lumbopelvic region is in a neutral position. You will need to improve their ability to arch if we want to promote musculoskeletal balance.

You can extend the upper back, also known as the thoracic spine, over the back of a low-backed chair.

  • Lace your fingers together behind your head, squeeze your shoulder blades together, and lean back so that the top of the backrest pushes into your back.
  • To emphasize the extension of the upper back, limit arching of the lower back by keeping your lower abdominal muscles engaged.
  • Hold this extended position for about fifteen seconds, feeling a stretch in your chest and upper back.

Stretching the muscles and joints of the upper trunk with the thoracic extension is an excellent way to reduce overactivity. But we still need to strengthen our underactive muscles.

The muscles between and below the shoulder blades are often underused, and activating them can help to relieve upper back, neck, and shoulder pain.

  • With your pelvis in a neutral position, pull the chin back as if trying to be as tall as possible.
  • Then, squeeze the shoulder blades down and back together.
  • The body often compensates for limited movement of the shoulder blades by arching the lower back, so be sure to keep the pelvis neutral.
  • The upper shoulders will also try to compensate during this movement, so remember to squeeze the shoulders down and back, rather than up and back. Perform the squeeze ten times to activate the muscles of the upper back.

There may not be much movement at first, and it will be hard to feel the muscles working..

It’s All About Balance

Good posture is traditionally thought of as standing and sitting up straight with the shoulders pulled back. This is difficult for many people to maintain, and those who do maintain it do so by often overusing their strong muscles.

To improve your strength, mobility, and risk of injury, think about posture as the balance between different muscles and joints of the body.

Improve your posture by introducing more movement to your daily routine and by consciously developing a balance between overused and underused muscles.

When performed regularly and deliberately, the pelvic tilt, thoracic extension, and shoulder retraction exercises will help you achieve and maintain balance without strain and discomfort, making good posture second nature.

Initially, these movements can be made difficult by stiffness in adjoining parts of the body.

Source

March 27, 2021

Effective Fitness Requires an Intuitive Mindset

The key to effective fitness and training is to know yourself. Introspection’s power will allow you to develop a deep sense of understanding for everything you will learn on your journey.

Danny Kavadlo, with his brother Al Kavadlo, is an authority in calisthenics and fitness.

As he puts it, “It’s important to understand that even with a definitive program, you should always be prepared to improvise. No one who ever met you can make an exact program. There will always be a need for intuition in training.”

In other words, it’s up to you to step up and find out what works.

The Enthusiast and the Casual Exerciser

The world of fitness is an automatic filtering machine that separates enthusiasts from casual exercisers. This separation doesn’t mean to discriminate, but it’s just how it is.

The enthusiast and the casual exerciser don’t think the same, they don’t live the same, and most importantly, they don’t have the same beliefs.

Here’s an example, a casual exerciser will always look to their environment for motivation, but in Al and Danny’s case:

They say, “F**K motivation. ANYONE can workout when they’re motivated! It’s working out when you’re NOT motivated that leads to success. It’s the same thing career-wise.”

The game rules are pretty simple; you have to show up and put in your time. Another level of discipline and strength that perfectionists are in pursuit of is called true strength. Danny and Al describe true strength beyond the physical.

This statement doesn’t intend to discredit the people whose goal is to look good or do the bare minimum to be healthy.

However, in 2021, the real meaning behind the words strength and health has evolved into a raw and philosophical form.

If you don’t already feel inspired by reading this, here’s why you should be. As Danny describes physical strength, “To me, true physical strength is the ability to navigate freely in this world. It’s both pound-for-pound strength and absolute strength. A combination of power, balance, and mobility.”

While many of us may not include either balance or mobility in our training, these aspects are most certainly part of the equation when it comes to long-term fitness.

Challenge Your Strength

To us, building strength isn’t just about lifting heavy weights, running ultra-marathons, or scoring the most points. It’s about self-development and the desire to push yourself beyond your limits to see how far you can go.

It’s about embracing the challenge ahead and taking it in as a lesson. Hence, no one program can change your life. You have to tweak it to fit your own needs and situation.

Regular exercise or training is essential. It regulates your blood flow, gets rid of toxins in your body, and helps you clear your head. But if you’re willing to go deeper and immerse yourself in the mindset, you will learn so much more about yourself and develop more than just physical strength.

According to Danny, “I would also include mental fortitude, emotional wellness, compassion, and willingness to help others, in addition to being physically unyielding.”

Unfortunately, the future of the fitness industry may be uncertain at this point. Many people see it as a luxury when, in fact, it should be an essential business.

Danny Kavadlo says, “While I’m saddened at the devastation to the industry, I’m more saddened by the devastation to overall health that these mandates bring: kids not in school, depression, domestic violence, suicide, alcoholism, and drug abuse. People need to work out now more than ever, and ironically, it’s being discouraged in the name of health.”

If you’re reading this, I hope your next moves include signing up for the gym, spending an extra hour each day learning about your health, or getting creative with your regular programs to test yourself. You may not need a gym to do this.

Al Kavadlo adds, “We don’t discourage it! In fact, Danny and I have been talking about the virtues of working out gym-free for years! So anyone who thinks they can’t work out without a gym is crazy! You don’t need much—or any—gear to get in shape!”

Danny and Al Kavadlo’s book, Get Strong, focuses on explosive calisthenics. It’s an amazing guide to help you develop strength, agility, and combat-ready reflexes, using only your body weight.

If you’re already pretty fit and have no problem doing pull-ups, Danny suggests, “At least ten strict pull-ups before embarking on the muscle-up, but every case is different.”

Training my body to do the muscle-up has completely changed my perception of body mechanics and training regime. It has been gratifying, and I hope that you will get the same value or even more than I have gained.

Most importantly, remember to breathe.

Al says, “It is recommended to exhale when exerting and inhale on the negative phase of an exercise.”

Breathing exercises not only help you activate your core but also assist with recovery.

Source

February 8, 2021

How I Found CrossFit and Community During Lockdown

Being a jiu-jitsu practitioner for the last ten years, I have naturally adopted the mindset to stay calm and leverage opportunities. However, it’s tough to practice the art as regularly as you would like because you start to lose muscle memory, rhythm, and accuracy.

That being the case, I had to find another sport that instilled the same discipline while putting myself outside of my comfort zone.

Enter CrossFit Firefly, a box gym I found on Facebook with no website, no significant presence, and no Yelp account. This was going to be interesting.

How I Found CrossFit and Community During Lockdown - Fitness, crossfit, wod, kettlebells, mobility, community, jiu-jitsu, dance, capoeira, rhythm, creative movement, cleans, AMRAP, pandemic, covid-19, box gym, lockdown, brazilian jiu jitsu

Good Coaching Cues Fire Up Neurons

Ferdinand Thieriot taught my first session with a glass-blower turned trainer and co-owner of Crossfit Firefly. While calling me out on my bad form, he eloquently elaborated on the little details that fixed my curved back and form throughout the AMRAP exercises.

It’s not exactly what he said, but how he said it that made it all click.

It was like engaging with an eccentric fitness guru that dedicates his time and effort to perfect the art of training another individual.

His few words opened up a new point of view that resonated with me.

My neurons and nerves were firing as I reinforced the habit of redistributing the weight across my feet rather than just the ball of my feet. And within three weeks, I did a set of cleans with perfect form during the AMRAP WODS.

Building a CrossFit Community

Ferdinand runs and co-owns CrossFit Firefly, established in 2015, with his wife, Tracy Thieriot. They are avid Breaking Muscle readers and credit Chris Holder’s kettlebell instructionals as one of their best resources for form and movement.

While Ferdinand built his career in the fitness industry through strong attention to detail, intense self-awareness, and a specific sense of direction, Tracy relied on her fiery creativity and sense of adventure as a dance communication and ethnic studies major who believes that entropy is her default state. Her modern dance and contact improvisation background led her to find CrossFit and explore other arts like Capoeira and Brazilian jiu-jitsu.

How I Found CrossFit and Community During Lockdown - Fitness, crossfit, wod, kettlebells, mobility, community, jiu-jitsu, dance, capoeira, rhythm, creative movement, cleans, AMRAP, pandemic, covid-19, box gym, lockdown, brazilian jiu jitsu

We instantly connected through sharing our experiences in dance and mobility. Tracy says that doing WODS helps her develop a better sense of managing her center of gravity while exploring mobility and movement through her craft.

As a competitive athlete at 5’11″ with an ectomorph body type, that conversation hit home.

CrossFit is an excellent form of training to get in shape and condition your body if you’re a practitioner specializing in another art form.

The Circle Concept of Energy Transference

If you’ve read this far, then you might realize that Tracy and Ferd are purists who believe in the healing effects of exercise and the impact it has on the community.

They talk about this concept of circle technology—specifically the transference of energy through support, suffering, cheering, and abandoning all pretenses.

It’s raw, and it’s real.

How I Found CrossFit and Community During Lockdown - Fitness, crossfit, wod, kettlebells, mobility, community, jiu-jitsu, dance, capoeira, rhythm, creative movement, cleans, AMRAP, pandemic, covid-19, box gym, lockdown, brazilian jiu jitsu

We’ve all seen the best and worst of each other, so we might as well put in the real work.

You can say that the stars have been aligned for the CrossFit couple to serve the community through their box gym.

When you have all your members asking you to stay open throughout the lockdown, how can you not be motivated to fight for the right to keep your doors open?

Source

January 29, 2021

A Successful Coach or Trainer Needs Emotional Intelligence

Entry-level personal trainers initially rely on a training certificate and a high school diploma to successfully land a job.

However, coaching as a career path requires something more- Emotional Intelligence (EI). According to Melinda Abbott of Columbia University,1 49% or more of successful coaching is derived from a coach’s ability to monopolize emotional intelligence. Moreover, the ability to connect on a social level has been proven to drive motivation and teaching efficacy.

The bottom line is a coach should focus a substantial portion of their time on sports psychology

The Benefits of Conscious Coaching

A well-known coach, Brett Bartholomew, brings up in his book, Conscious Coaching 2 the importance of understanding the types of people you coach. As of late, there is a growing body of evidence surrounding understanding personality types for career success within the workplace and academic performance training.2

However, within the realm of sports, this too is becoming important. As Mark Rippetoe points out in his book Practical Programming for Strength Training,3 a strength coach will spend more time with an athlete during their career individually than any other coach. Therefore, knowing your athlete or client is of utmost importance.3

Focus less on counting reps and focus more on the client’s needs and know when to refer out

Coaches are not licensed to be psychiatrists or medical doctors (unless one holds that title); nevertheless, understanding how EI applies to a client’s lifespan warrants some explanation. EI is a type of social intelligence that involves the ability to monitor one’s own and others’ emotions, discriminate among them, and use the information to guide one’s thinking and actions, according to Salovey & Mayer, 1990. In the context of coaching, this requires first an understanding of how a person approaches being instructed, how one manages failure, success, plateaus, and their interaction with nutrition and overall personal wellness.3,4,5,6 

Emotional Intelligence in Coaching Builds Trust

One of my sessions consisted of six minutes of a client discussing their issues for the day before mobility work and isometric drills. EI allows that client to feel comfortable and builds trust.

Without trust, a client is not likely to follow instructions, and the client does come first.

You can have a Ph.D. in biophysics, but the client could care less; their foci are:

  1. Achieving their intended results
  2. Feeling appreciated

Those six minutes to my client made the remainder of her day far more enjoyable, and she will look forward to her next session. 

As a coach, having a graduate degree makes reading bloodwork easier and discussions with a client’s physician more illuminating. The client learns that you care beyond the aspect of the job; this creates buy-in.2

This client is more likely to refer others to you and participate in higher engagement training

Another client learned quickly that their well being is most important in and out of the competition. During a time such as COVID-19, clients are far more reluctant to engage with their coach, let alone purchase high-fidelity coaching programs.

As clients resurface, it is far more important to cater to mental health needs with the same vigor as a premium program or nutritional plan.

In particular, athletes who face suspension of events or entire seasons may feel displaced without a coach guiding them.

Contrary to popular belief, athletes often suffer more mental illness than average gym patrons.

Furthermore, they are less likely to seek to consult for mental health issues. 

As a coach, it requires that red-flags in normal function be caught sooner rather than later and ensure that your gym or office is a safe space. It is through a proper institution of emotional intelligence practice that client outcomes improve.7

References:

Source

November 30, 2020

How to Start Calisthenics Training

With the amount of information we’re exposed to, it”s easy to overcomplicate our training. When it comes to calisthenics, it appears to look unsafe because we see the end product from the best athletes, but calisthenics is for all levels.

There are various forms of calisthenics/bodyweight training that you can do, based on your goals.

It’s important to keep things simple. You need to ask yourself this question “Does my training match my goals?” I see many times that people aren’t training specifically for the goals they want.

They say they want apples, yet they are planting orange trees.

This article is meant to simplify calisthenics training, guide you from beginner to advanced, and show you how all levels can use the body as a paintbrush to create a masterpiece.

General Strength- Beginner to Intermediate

I know the temptation to advance as quickly as possible is significant, but it will only lead to injuries, massive weakness, burnout, and frustration.

If you haven’t done this style of training before, then start with the basics. Work on the big six:

  1. Pullups
  2. Dips
  3. Rows
  4. Pushups
  5. Handstands
  6. L-sit

These are the pillars of calisthenics training because they cover the muscle groups used in many advanced skills. Do this for 3-6 months.

It may seem long, but it is the quickest way to advance.

If you skip this vital stage in your development, you’ll still have to come back to it because the chinks in your armor will show, and progress will be slow.

During this phase, the aim is to learn your first pullup.

For example, get comfortable with doing 12 + reps. As you progress, begin implementing different variations of these moves in the free beginner calisthenics program, Bodyweight Strong.

Use this time to improve your mobility and flexibility so that it won’t restrict you later.

Keep in mind less is more. More time in the gym and more days of training will not make for better results.

As a beginner, train 2-4 days a week. One hour per session is enough time to put in good, quality work while allowing adequate time for your body to recover.

Specific Strength- Intermediate to Advanced

This is when you start to focus on specific goals like static skills, freestyling, and rings.

Choose 2-3 goals to focus on:

It really depends on what you want and where you want to take your training.

Design your program in 4-8 week blocks, with your overall training 3-6 days per week.

Mon Tues Wed Thurs Fri Sat Sun
High Intensity Low Intensity High Intensity Low Intensity High Intensity Rest Rest
Pulling Strength Handstand Balance Grip Pulling Strength Handstand Balance Core Pulling Strength    

For example, if your goal is the muscle-up and handstand pushups, each exercise you choose for your program should improve some aspect towards reaching those specific goals.

I see too many people trying to cover every movement pattern and work on every weakness.

Less is more. You can always change your focus in the next program.

Build Strength

The word strength is used too loosely in fitness, so let’s define it. When I mention strength, I refer to absolute strength as 1 rep max and maximal strength (85% to 90% of 1 RM).

The stronger you are, the more calisthenics skills you can do.

Understand that your body has three energy systems that it uses independently or simultaneously to contract your muscles.

  1. Creatine phosphate lasts 1-12 seconds and is used for high intensity and demanding tasks such as heavyweight or difficult bodyweight exercises that you can only do for low reps.
  2. The glycolysis and oxidative system are used for muscle building, conditioning, and endurance.
  3. The anaerobic system lasts for 10 seconds – 2 minutes. The aerobic system is low intensity and lasts for a long time. This is your endurance training or for daily tasks.

How to Start Calisthenics Training - Fitness, 1 rep max, Training, endurance training, bodyweight exercise, calisthenics, mobility, flexibility, rings, handstand, energy systems, static balance, pullups, handstand push up, rows, l-sit, hand strength, bodyweight workout

Strength training is taxing on the nervous system, requiring a minimum of 24 hours to recover between strength sessions.

  • Train 2-4 days per week.
  • Training your absolute strength to failure should be used sparingly to test your current level or gain that motivational boost.
  • You cannot train like this all the time because your nervous system will not recover between sessions, and it will ruin your progress.
  • Instead, train your maximal strength leaving 1 rep in reserve. If you know/ think that you can do 3 reps of an exercise max (e.g., muscle-ups), do 2 reps for all your sets.
  • This builds strength while not overtaxing the nervous system.
  • Train high sets in the 4-8 and 1-5 rep range.
  • For isometrics (during contraction, the muscles don’t noticeably change the length, and the affected joints don’t move), 1-12s.
  • Eccentrics (contraction caused by the muscle’s lengthening) 1-5 reps, each rep 7 seconds long.

Remember, if you feel the pump or burn in your muscles, you’re no longer training strength.

Build Muscle

Run from anyone who says, “You can’t build muscle with calisthenics.”

Your muscles don’t know the difference between bodyweight exercises, weights, or a table.

It can’t identify whether you’re picking up a 6 kg, 20 kg dumbbell, or bodyweight. Your body feels the resistance, intensity, and how taxing a movement is.

How does the training look? A rep range of 6-12 reps (working at 65-85% of 1 rep max) is the most effective way to stimulate muscle growth.

Instead of increasing the weight, you increase the difficulty of the bodyweight exercises.

Choose exercises that are challenging to you in this rep range.

When pullups become easy, do a harder variation such as close-grip pullups. Utilize the same muscle-building techniques you would with weights such as mechanical tension, eccentric damage, metabolic stress, push-pull splits, or drop sets.

The current culture wants to create a rivalry between calisthenics and weights when the reality is you can use both.

Gymnastics is a bodyweight sport, and they utilize weights in their training.

Many sports, football, basketball, athletics, use weights to improve performance, calisthenics is the same.

  • Doing weighted calisthenics, such as weighted pull-ups and weighted dips, is a great way to build strength and muscle.
  • Bodyweight exercises and weights are great for training compound movements (multiple muscle groups and joints).
  • There’s a wide variety of isolation exercises (multiple muscle groups and one joint). With isolation exercise, you can target certain muscles, which is great for improving aesthetics.

The lower-body is naturally powerful, so bodyweight training can only go so far. That’s why weighted squats, deadlifts, hip thrusts are excellent for building muscle.

Match Training to Goals

I always say there’s no perfect way to train. It depends on your abilities and goals.

Make sure your training matches your goals, and train specifically with them in mind.

Train like a powerlifter if you want to do those advanced calisthenics skills.

Train like a bodybuilder if you want to be in the best shape of your life.

Train like an athlete if you want to be crazy fit or do freestyling.

Source

Powered by WordPress